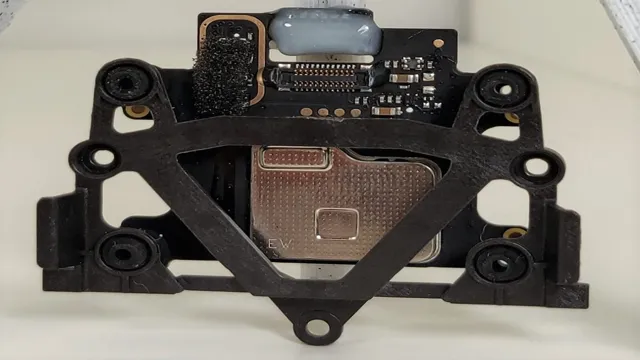
If you’re a drone enthusiast and you own a DJI Mini 3 Pro, maintaining your equipment is crucial to ensure that you capture breathtaking footage and have a smooth flying experience. One of the essential drone calibrations you need to perform is the IMU calibration. The IMU, or Inertial Measurement Unit, is responsible for tracking the drone’s position and movement.
Calibrating the IMU will help ensure that your drone stays stable in the air and provides accurate flight data. In this blog post, we’ll walk you through how to calibrate your DJI Mini 3 Pro IMU, step-by-step. So grab your Mini 3 Pro, and let’s get started!
Why Calibrating Your IMU is Important
If you own a DJI Mini 3 Pro, then you should certainly take the time to calibrate its IMU (inertial measurement unit). Why? Well, even the slightest calibration error can lead to all sorts of problems, including your drone drifting off course or even crashing. Essentially, the IMU measures the drone’s position and movements, and any incorrect measurements can throw everything off balance.
This is why it’s extremely important to make sure the IMU is calibrated correctly before flying your drone. Thankfully, the process is relatively simple and can be done via the DJI Fly app. So, don’t risk a potentially dangerous and costly mishap by neglecting to calibrate your DJI Mini 3 Pro’s IMU.
Maintain Optimal Flight Control
Maintaining optimal flight control is of utmost importance for any drone flyer, especially when performing complex aerial maneuvers or working on projects that require steady and precise movements. One of the ways to ensure optimum flight control is by calibrating the IMU or Inertial Measurement Unit. IMU is responsible for providing real-time data on the drone’s orientation, speed, and direction, making it an integral part of flight control.
However, over time, slight changes in the drone’s surroundings or wear and tear can affect the IMU’s accuracy, leading to unstable and erratic movements. To prevent such scenarios, it is critical to calibrate the IMU regularly. A properly calibrated IMU ensures that your drone is flying at optimal performance and increases efficiency, reducing maintenance and repair costs.
So, next time you take your drone out for a spin, make sure to calibrate the IMU before takeoff.
Avoid Sudden Loss of Flight Control
Calibrating your IMU is essential for maintaining proper flight control, and avoiding sudden loss of control when flying a drone. IMU stands for Inertial Measurement Unit, and it is responsible for measuring the acceleration, orientation, and often the magnetic field around the drone. As you can imagine, small variations in the readings can throw off the drone’s controls and cause it to become unstable.
This is especially true for more advanced drones capable of flying at higher speeds, or in complex environments. Calibrating your IMU involves setting the baseline for these measurements, so the drone’s software knows what to expect and can react appropriately to changes in flight conditions. It’s critical to ensure this calibration is performed regularly, especially when traveling to new locations or making significant changes to the drone’s hardware or firmware.
Overall, taking the time to calibrate your IMU can save you from potentially dangerous situations and equip you with the necessary tools to enjoy flying your drone smoothly and reliably.
Prevent Accidents and Crashes
Calibrating your IMU, or Inertial Measurement Unit, is crucial to preventing accidents and crashes. IMUs are vital components of modern vehicles, as they help stabilize the vehicle and keep it in control while it’s in motion. However, if an IMU is not calibrated correctly, it can cause serious problems and lead to accidents.
Calibrating an IMU ensures that it’s working properly and accurately measuring the vehicle’s orientation and motion. Think of it as checking your compass before embarking on a journey – you need to know that it’s pointing in the right direction, or you could get lost. Similarly, calibrating your IMU ensures that your vehicle is traveling in the right direction and stays on course, preventing accidents and crashes.
So, the next time you’re heading out on a drive, take a few minutes to calibrate your IMU and stay safe on the road.
How to Calibrate Your DJI Mini 3 Pro IMU
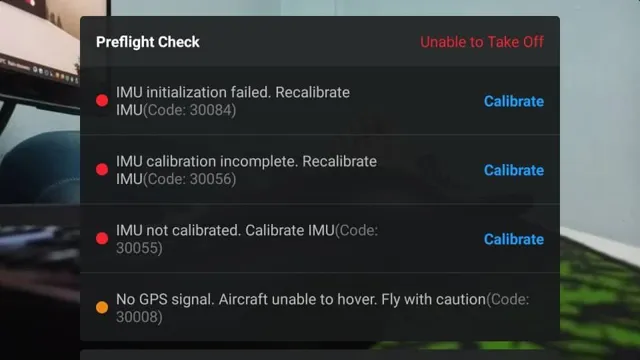
If you’re encountering issues with your DJI Mini 3 Pro’s stability or erratic flight behavior, it may be time to calibrate its IMU (Inertial Measurement Unit). Calibrating your drone’s IMU helps ensure that its sensors are accurately measuring its movement and positioning. To start the calibration process, ensure that your drone’s firmware is up to date and that you have a level surface to work on.
Start by entering the drone’s settings and selecting “Sensors.” From there, you can choose “IMU Calibration” and follow the steps to complete the process. It’s important to keep your drone still and avoid any movement during the calibration process.
Once the calibration is complete, you should notice improved stability and smoother flight. Keep in mind that it’s recommended to calibrate your drone’s IMU periodically or after any rough handling or crashes. Regular calibration will help ensure that your DJI Mini 3 Pro performs at its best.
Step-by-Step Guide
If you’re a proud DJI Mini 3 Pro owner, calibrating your IMU is an essential task to ensure stable flight control. The inertial measurement unit (IMU) helps your drone measure its orientation, acceleration, and direction while flying. Calibration helps sync the IMU sensor with the drone’s firmware, ensuring smooth flight control and accurate readings.
Here is a step-by-step guide to calibrating your DJI Mini 3 Pro IMU. First, ensure your drone’s battery is fully charged and that you’re in a wide-open space. Next, turn on your drone and open the DJI Fly app.
Navigate to the settings menu and click on the “Sensors” tab. From there, select “IMU Calibration” and follow the on-screen instructions. You’ll be prompted to place your drone on a flat surface and rotate it through different orientations.
Once you’ve completed the process, your drone will be calibrated, and you can enjoy stable flight control. Don’t skip this essential step before taking off on your next adventure.
Preparing for Calibration
If you’re looking to optimize the performance of your DJI Mini 3 Pro drone, calibrating its Inertial Measurement Unit (IMU) is an essential step. Not only will it improve the drone’s stability and accuracy, but it can also reduce the risk of crashes. Before starting the calibration process, it’s important to prepare accordingly.
Find a level, stable surface, and remove any accessories such as the propellers or battery. Make sure the drone’s firmware is up to date, and it’s recommended to perform the calibration indoors with a temperature between 25-30 degrees Celsius. Once you’re ready to start, follow the instructions provided by DJI carefully.
This typically involves powering up the drone and accessing the calibration settings through the DJI Fly App or the on-board screen. The process involves rotating and tilting the drone in different directions to establish a baseline for the IMU’s sensors. It’s important to stay patient throughout the process and ensure that the drone remains level during each step.
With a properly calibrated IMU, your DJI Mini 3 Pro will be ready for optimal performance.
Calibration Process
Calibrating your DJI Mini 3 Pro IMU might seem daunting at first, but it’s a crucial step in making sure your drone can fly smoothly and accurately. Essentially, calibration means ensuring that the drone’s internal sensors are properly detecting and transmitting data about its position and movement. To begin the process, make sure your drone is on a level surface with plenty of space around it.
Then, connect to the DJI Fly app and go to the “Calibrate” section. Here, you’ll see options for calibrating the compass, the vision sensor, and the IMU. For the IMU calibration, follow the on-screen instructions to rotate and tilt the drone in various directions.
This allows the sensors to recalibrate and adjust to any changes in the drone’s environment or position. Once the calibration is complete, you should notice smoother flights and more accurate positioning. Just remember to calibrate your IMU every few months or after any major crashes or changes to the drone’s hardware.
Tips for Successful IMU Calibration
Calibrating your DJI Mini 3 Pro’s IMU is essential to ensure accurate and stable flight. Here are some tips to help you successfully calibrate your drone’s IMU: First, ensure that your drone is on a level surface and that the GPS signal is strong. Next, avoid conducting the calibration near any magnets, as this could interfere with the accuracy of the calibration.
It is also important to ensure that the drone’s propellers are removed during the calibration process. Follow the instructions provided by the DJI Fly app carefully to complete the calibration process. Finally, after the calibration is complete, test the drone indoors first to ensure that everything is working properly before flying it outside.
Remember, proper IMU calibration can make all the difference in the accuracy and stability of your DJI Mini 3 Pro, so be sure to take the time to do it right.
Finding a Flat Surface
When it comes to calibrating your IMU, finding a flat surface is crucial to ensuring a successful calibration. The first step is to choose a level surface that is free from any interference or obstruction. Avoid using surfaces that are soft, such as carpets or soft beddings, as they may give inaccurate readings and lead to poor calibration.
Instead, opt for a hard, flat surface like a tabletop or a floor that is free from any bumps, cracks or holes. Once you have found a suitable surface, ensure that your device is positioned vertically to obtain more reliable readings during calibration. This can be achieved by using a stand or simply by holding it upright.
It is also important to make sure that your device is not moving or vibrating during the calibration process, as this can cause inaccuracies in the readings. Finding a flat surface may seem like a small step, but it is a crucial one in ensuring the accuracy and reliability of your IMU data. Taking the time to find the right surface and positioning your device correctly will lead to a more efficient and effective calibration, providing you with more accurate results in your future data collection efforts.
So next time you calibrate your IMU, remember that the surface you choose is just as important as the calibration process itself.
Avoiding Magnetic Interference
When it comes to calibrating an IMU (Inertial Measurement Unit), there are a few things to keep in mind if you want to avoid magnetic interference. One tip is to make sure you’re calibrating the IMU in an area free from magnetic fields, such as a magnetically shielded environment. You should also avoid calibrating near electronic devices that might create electromagnetic interference, like routers or microwaves.
Another helpful tip is to rotate the IMU during calibration to help account for any magnetic interference from nearby sources. By taking these precautions, you can ensure a successful IMU calibration and avoid any issues caused by magnetic interference. So, if you want to improve the functionality of your IMU, take magnetic interference into account and be mindful of the environment in which you’re calibrating.
Checking Your Calibration Status
IMU Calibration Checking the calibration status of your IMU is essential to ensure that your device is functioning accurately. A poorly calibrated IMU can wreak havoc on the accuracy of any task it is used for, leading to incorrect data and possibly even errors in decision-making. To avoid such situations, there are a few tips to follow when calibrating your IMU.
Firstly, ensure that the IMU is level when calibrating it. Secondly, make sure to select a location with minimal magnetic interference, such as away from metal structures or electrical equipment. Utilizing a calibration routine and following the steps correctly can significantly improve the accuracy of your IMU.
Finally, it is crucial to regularly check and recalibrate the IMU to maintain its accuracy over time. Keeping these tips in mind will ensure that your IMU stays precisely calibrated, providing accurate and useful data.
Conclusion and Final Thoughts
In conclusion, the IMU Calibration process for the DJI Mini 3 Pro is a crucial step in ensuring that your drone is ready to take to the skies. It’s like getting your spatial bearings before embarking on a journey, making sure that everything is aligned and ready to go. So, remember to take the time to complete this process, because in doing so, you’ll unlock a world of aerial possibilities and incredibly smooth flight experiences.
Happy flying!”
FAQs
What is IMU calibration on DJI Mini 3 Pro?
IMU calibration on DJI Mini 3 Pro is a process of calibrating the drone’s inertial measurement unit. It ensures optimal accuracy in the drone’s flight control.
How to perform IMU calibration on DJI Mini 3 Pro?
To perform IMU calibration on DJI Mini 3 Pro, follow these steps:
a. Go to DJI Fly app and connect your drone.
b. Access the drone’s settings and select calibration.
c. Follow the on-screen instructions to complete the process.
Why is IMU calibration important for DJI Mini 3 Pro?
IMU calibration is important for DJI Mini 3 Pro as it ensures the drone’s flight control is accurate and stable. This calibration prevents the drone from drifting or being uncontrollable during flight.
How often should I perform IMU calibration on DJI Mini 3 Pro?
It is recommended to perform IMU calibration on DJI Mini 3 Pro every time you travel to a new location, after a firmware update or crash, and periodically every few months to ensure optimal flight control.


