As a proud owner of a DJI Mini 3 Pro, you understand the importance of high-quality footage when capturing the perfect shot. However, before you set off on your next adventure, it’s essential to ensure that your SD card is properly formatted. Knowing how to format your SD card is vital to prevent issues with storage and avoid potential data loss.
It’s a simple process, but for beginners, it can be confusing. Luckily, we’ve got you covered with this informative guide on how to format your DJI Mini 3 Pro SD card. So, let’s get started and ensure that your next adventure is captured with stunning visual quality.
Preparation
If you own a DJI Mini 3 Pro, formatting your SD card is a necessary step before using your drone for flying and capturing stunning aerial photos and videos. It’s important to ensure that your SD card is correctly formatted to avoid any data loss or camera malfunctions during your drone flights. First, make sure to purchase an SD card with a fast read/write speed and an appropriate storage capacity for your needs.
Insert your SD card into your computer or laptop, and locate the drive in your file explorer. Right-click on the drive and choose the “Format” option. Select the file system type, which is typically FAT32 for SD cards of 64GB or less and exFAT for SD cards over 64GB.
Then, click on “Start” to begin formatting your SD card. It’s important to note that formatting your SD card will erase all data on it, so be sure to backup any important files before initiating the formatting process. Once the process is complete, your SD card will be ready to use in your DJI Mini 3 Pro drone.
Make sure the drone and controller are off
One of the most important things to remember when preparing to fly a drone is to make sure both the drone and its controller are turned off. This might seem like a no-brainer, but it’s easy to forget in the excitement of setting up for a flight. Turning off the drone and controller beforehand ensures that you have complete control over the drone’s movements right from the beginning.
It’s also a good idea to double-check that the battery is fully charged before taking off. This will prevent any unwanted surprises mid-flight and give you more peace of mind while operating the drone. So take a few extra minutes to prepare properly and enjoy a smooth, safe, and successful flight.
Remove the SD card from the drone
Preparing for your next drone flight can be exciting, but it’s essential to remember to remove the SD card from your drone before taking off. This simple step will ensure that all the footage you capture during your flight is safely stored on the SD card, ready for you to edit and share later. Many drones have an SD card slot located on the side or back of the device, which is easily accessible by removing a small cover.
Gently slide the SD card out of the slot, being careful not to touch the gold contacts, and place it into your computer or a card reader to transfer your videos and pictures. It’s important to carry spare SD cards with you so that you can quickly and easily replace them during your flights without losing any footage. Remember, removing the SD card is a crucial part of preparing your drone for flight and ensuring that you capture all those amazing aerial shots to share with friends and family.
Format the SD card
If you’re planning on using a DJI Mini 3 Pro, then it’s important to know how to format the SD card correctly. Formatting your SD card is crucial to prepare it for the drone’s recording capabilities. This process erases all the data on the card and prepares it for future use.
Before formatting, remember to save any files that you need to a separate location. Begin by inserting the SD card into your computer’s SD card reader. Then navigate to the SD card and right-click to open the menu and select the “Format” option.
In the format menu, make sure the “File system” setting is set to “exFAT” for the best compatibility with the drone. After formatting is complete, carefully reinsert the SD card into the drone. With a properly formatted SD card, your drone will perform more efficiently, and you can record breathtaking aerial footage without any complications.
So, always format your SD cards correctly to get the most out of your DJI Mini 3 Pro.
Insert the SD card into a computer or adapter
When you’re ready to format an SD card, start by inserting it into either a computer or adapter. Once you’ve inserted it, there are a few different ways you can go about formatting it depending on your needs. One way to format an SD card is to use the default formatting options built into your computer’s operating system.
To do this, right-click on the SD card in your file explorer and select the “Format” option. From there, you can choose the file system you want, such as FAT32 or NTFS. You should also select the “Quick Format” option if you just want to erase the contents of the SD card.
If you need to perform a more thorough wipe of the card, deselect this option. This will take longer, but it will do a complete erase of the card. After this process is completed, your SD card should be successfully formatted and ready to use.
Don’t forget to save a backup copy of any important data before formatting an SD card, as all data on the card will be deleted during the formatting process.
Open the file explorer or Finder on your computer
When it comes to formatting an SD card, the process is relatively straightforward and can help ensure optimal performance and storage capacity. To get started, open up your file explorer or Finder on your computer. From there, locate the SD card that you want to format, and right-click on it to bring up a dropdown menu.
Look for the option to format the SD card, which should be labeled something like “Format” or “Erase.” Once you click on this option, you’ll be prompted to select the formatting type and other settings, such as the file system and allocation unit size. Keep in mind that formatting will erase all data on the SD card, so it’s essential to back up any important files beforehand.
With a few quick steps, you can format your SD card and ensure maximum performance and storage capacity.
Locate the SD card and right-click on it
When it comes to formatting an SD card, there are a few simple steps to follow. First, locate the SD card by checking your computer’s file explorer. Once you find it, right-click on it to bring up a context menu where you can select the “Format” option.
Formatting an SD card is important for several reasons, such as clearing any corrupted files or preparing the card for use in a different device. However, it’s essential to remember that formatting will erase all the data on your card, so make sure to back up any important files you want to keep before proceeding with the process. Regularly formatting your SD card can also help improve its performance and lifespan.
Overall, formatting your SD card is a simple process that provides numerous benefits, so be sure to remember to do it regularly to keep your files safe and secure.
Select the ‘Format’ option
Once you have decided to format your SD card, the next step is to select the appropriate format option. The format option enables you to prepare your card for the intended use by erasing any existing data and setting up the file system the card will use. There are various format options available, each suited to different types of devices.
For instance, if you intend to use your SD card for a camera, the recommended option would be FAT32, whereas if it’s for a smartphone, you might select exFAT. To format your card, insert it into your computer or device, then navigate to the ‘Format’ option and select the desired format. Before you start the formatting process, ensure you’ve backed up any critical data that you wish to keep.
Formatting your SD card will erase all data stored on it, and once complete, it will be set up for use with your desired device.
Choose ‘FAT32’ as the file system
If you’re planning to store data on an SD card, it’s essential to format it correctly to ensure compatibility with your device. The file system you choose while formatting an SD card plays a vital role in its performance. While formatting an SD card, it’s necessary to choose ‘FAT32’ as the file system.
FAT32 is a widely used file system that is compatible with a wide range of devices. It’s ideal for transferring files between different devices and operating systems. Additionally, FAT32 supports larger file sizes and creates fewer problems related to fragmentation.
So, next time you format an SD card, make sure to choose ‘FAT32’ as the file system to ensure smooth data transfer and optimum performance.
Click ‘Start’ and wait for formatting to complete
Formatting an SD card is an essential task that each user should learn to perform. It helps erase all data from the memory card and prepares it for use. The process may vary from device to device, but the steps are relatively simple and require only a few minutes to complete.
First, insert the SD card into the device and locate the ‘Settings’ menu. Then, find the ‘Storage’ option and select the SD card. Finally, press the ‘Format’ button, and wait for the device to complete the formatting process.
It is essential to ensure that all important data on the SD card is saved before formatting, as the process will erase everything. Additionally, always follow the device’s instructions to ensure that you do not damage the card. With just a few clicks, you can format an SD card and prepare it for your next adventure, whether it be taking photos or storing important files.
Insert the SD card back into the drone
After capturing some breathtaking aerial footage with your DJI Mini 3 Pro, you’ll need to make sure your microSD card is formatted before using it again. To do that, you’ll need to insert the SD card back into the drone. The formatting process is straightforward and will quickly erase any files you have on the memory card.
Once you’ve inserted the SD card, turn your Mini 3 Pro on and go to the “Storage” option in your device settings. From there, choose “Format SD Card,” and the formatting process will start automatically. Before you do this, make sure to save any important footage to your computer or another device.
Formatting an SD card allows it to perform better, reducing the risk of file corruption and improving your drone’s overall performance. By taking care of your DJI Mini 3 Pro’s SD card, you can ensure that you’ll be able to capture stunning videos and images every time you take to the skies.
Power on the DJI Mini 3 Pro and wait for the drone to recognize the SD card
DJI Mini 3 Pro, SD card, drone When it comes to flying your DJI Mini 3 Pro, having an SD card is crucial for storing all your captured moments. After inserting the SD card into your drone, power it on and wait for the drone to recognize it. Sometimes, it may take a few minutes to register, so it’s best to be patient.
Once the drone has recognized the SD card, you can start capturing high-quality images and videos. After taking a break, have you ever accidentally left the SD card in your laptop, and now you need to put it back in your drone? No worries; it’s a simple process. Firstly, ensure that the drone is powered off and remove the battery.
Next, safely remove the SD card from your laptop or device and reinsert it into the designated slot in the drone. It’s essential to make sure that the SD card clicks and sits firmly in place before turning the drone back on. In conclusion, the DJI Mini 3 Pro is an excellent drone for capturing stunning aerial footage, and having an SD card is crucial to store those precious memories.
Simply insert the SD card before turning on the drone, and wait for the recognition, and if you ever need to remove and insert the SD card back, follow the steps mentioned above. Happy flying!
Conclusion
In the world of drones and aerial photography, the DJI Mini 3 Pro is a star among stars. And to properly capture and save all the stunning images and footage it produces, you need a trusty sidekick – the SD card. The Mini 3 Pro can support SD cards up to 256GB, ensuring you have ample space to store your masterpieces.
So, while the Mini 3 Pro is the quintessential aerial artist, the SD card is its steadfast partner in crime, always ready to preserve those special moments. Together, they make a dynamic duo that truly takes flight.
FAQs
What type of SD card is compatible with DJI Mini 3 Pro?
DJI Mini 3 Pro is compatible with microSD cards with a capacity of up to 256GB and a write speed of up to 90MB/s.
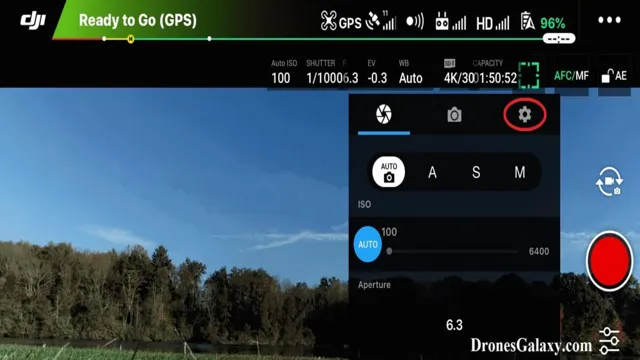
How do I format the SD card on DJI Mini 3 Pro?
To format the SD card on DJI Mini 3 Pro, go to the camera settings in the DJI Fly app and select “Format SD Card”.
Can I use my old SD card from another drone on DJI Mini 3 Pro?
You can use your old SD card on DJI Mini 3 Pro as long as it meets the minimum requirements of a microSD card with up to 256GB capacity and up to 90MB/s write speed.
What happens if I use an incompatible SD card with DJI Mini 3 Pro?
Using an incompatible SD card with DJI Mini 3 Pro may result in slow read/write speeds, corrupt files, or camera errors. It is recommended to use a compatible SD card to guarantee optimal performance.


