Are you interested in building your very own drone but don’t know where to start? Look no further! In this blog post, we’ll guide you through the steps of building a Johnny FPV drone from scratch. Building a drone may seem intimidating, but it is a fun and rewarding experience that allows you to customize your aircraft to your liking. A Johnny FPV drone is an especially exciting choice because it is designed specifically for first-person view flying, which means you can experience the thrill of flying from a bird’s eye perspective.
To start building your Johnny FPV drone, you’ll need to gather the necessary materials, such as a frame, motors, flight controller, and camera. Once you have all the parts, you can start assembling your drone, which involves attaching the motors, flight controller, and camera to the frame. After assembly, you’ll need to set up and configure the drone’s software and balance the propellers.
Finally, you’ll be ready to take your drone out for a spin and experience the excitement of first-person view flying. Building a Johnny FPV drone from scratch may seem like a daunting task, but with the right instructions and a little bit of patience, anyone can do it. So, why not give it a try and see what you can accomplish?
Introduction
If you’re looking to build a Johnny FPV drone, you’re in for a treat! These drones are becoming increasingly popular thanks to their amazing flight performance and FPV capabilities. To start, you’ll need some knowledge of electronics, soldering, programming, and a few other technical skill sets. But don’t worry if you’re not an expert, there are plenty of tutorials available that can guide you through every step of the process.
The most important part of building your own Johnny FPV drone is selecting the right components and assembling them correctly to ensure optimal performance. Keyword research is essential when selecting the right components, and you should consider the propellers, ESCs, motors, and various other components to ensure maximum efficiency. Once you have assembled your drone, you can start practicing and tuning it to your liking, and you’ll be flying like a pro in no time!
Explaining what an FPV drone is
An FPV drone is a type of drone used for First Person View flying. It allows the pilot to experience flying as if they were in the cockpit of the drone. This immersive experience is made possible through the use of a camera mounted on the drone that streams live video footage to a pair of goggles worn by the pilot.
This allows the pilot to see exactly what the drone sees, putting them in control of the drone’s movements as if they were actually flying it. FPV drones are popular among hobbyists and professionals alike, as they allow for precise control and the ability to capture thrilling footage from unique perspectives.
Benefits of building your own drone
Building your own drone can be an exciting and rewarding experience that comes with many benefits. One of the most significant advantages of building your own drone is the ability to customize it to your specific needs and preferences. Whether you’re looking for a drone that can fly longer distances, carry heavier payloads, or capture high-quality photos and videos, building your own drone allows you to tailor it to your specific requirements.
Additionally, building a drone from scratch can also be a great learning experience that can teach you about electronics, soldering, and aerodynamics. With the right skills, you can even try your hand at creating your own unique designs and modifications. Ultimately, building your own drone can provide a sense of satisfaction and accomplishment that you won’t get from buying a pre-made drone off the shelf.
Components Needed
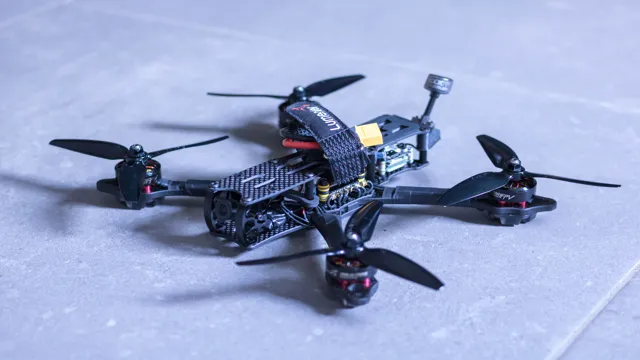
If you’re interested in building a Johnny FPV drone, there are several key components you’ll need to get started. First and foremost, you’ll need a high-quality drone frame that can withstand the demands of FPV flying. Next, you’ll need a powerful flight controller that can handle the sophisticated algorithms and inputs required for FPV maneuvering.
You’ll also need a set of high-performance motors and propellers, as well as a high-definition camera for capturing crystal-clear footage while flying. Other important components include a reliable radio transmitter and receiver, a battery and charger, and various other accessories such as antennas and mounting hardware. With the right components in place, building your own Johnny FPV drone can be an incredibly rewarding experience, offering unparalleled performance and capabilities that simply can’t be found with off-the-shelf drones.
So if you’re ready to take your flying skills to the next level, now is the time to start planning your build.
Overview of components needed
To ensure your computer runs smoothly and efficiently for all your daily needs, you’ll need several key components. The first component is the processor, also known as the CPU. This is the brain of your computer and will determine how quickly it can perform tasks.
Next, you’ll need a motherboard to connect all the components together, including your CPU, RAM, and storage devices. RAM, or Random Access Memory, is essential for multitasking and running multiple applications simultaneously. For storage, you can either use a hard drive or solid-state drive to store all your files and programs.
A graphics card is also important if you plan on using your computer for gaming or graphic design. The power supply unit provides power to all the components and is vital for keeping your computer running smoothly. Finally, you’ll need a case to house all the components and protect them from dust and other elements.
With these components in place, you can ensure your computer runs smoothly and efficiently for all your needs.
Explanation of each component needed
When it comes to building an electronic device, there are various components that you’ll need to consider. These components aren’t just random parts; they each serve a distinct purpose in making sure your device works efficiently. The primary components you’ll need include a power source, a processor, memory, input/output systems, and a display.
A power source is necessary to supply electricity to your device, and you can either use batteries or a plug-in adapter. Your processor acts as the brain of your device, interpreting and executing instructions. Memory stores data temporarily, allowing your device to open and run different applications quickly.
Input/output systems consist of physical ports and connectors that enable communication between devices. For example, USB ports are commonly used for transferring files. Displays are essential in providing visual feedback from your device, and they come in various shapes and sizes, including touchscreens, LED screens, and OLED screens.
By selecting the right components for your device, you can build a device that’s both efficient and practical.
Recommended brands for each component
When it comes to building a PC, selecting the right components is crucial. Here are some recommended brands for each component that will help you get the most out of your build. For the CPU, we recommend AMD’s Ryzen or Intel’s Core processors.
Both brands produce high-quality products that perform well under heavy loads. For the motherboard, ASUS, Gigabyte, and MSI are all excellent options. These brands offer stable and reliable motherboards that can support the latest CPUs and GPUs.
When it comes to memory, Corsair and Kingston are two of the most trusted brands. Their DDR4 modules offer high speed and low latency, making them ideal for gaming and content creation. For storage, Samsung and Western Digital produce some of the best SSDs and HDDs.
Their drives offer fast read and write speeds, making them ideal for storing large files and running demanding software. Finally, when it comes to the graphics card, we recommend NVIDIA or AMD. Both offer powerful GPUs that can handle the latest games and software.
Overall, these brands offer high-quality components that will help you build a reliable and high-performing PC.
Building the Drone
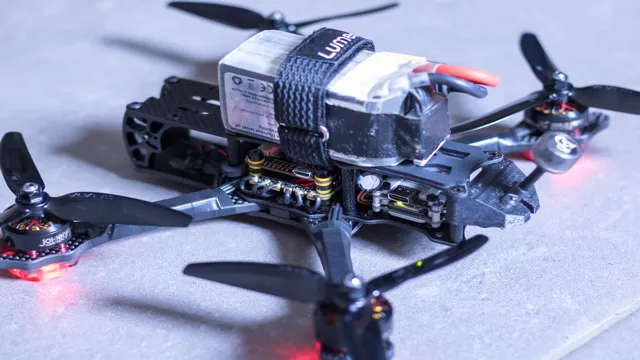
Building a Johnny FPV drone can be an exciting and rewarding experience for anyone interested in flying. To start, you’ll need to gather all the necessary components, including a frame, motors, flight controller, and camera. Once you have all the parts, it’s time to assemble the drone.
Begin by soldering the wires, connecting the motors to the ESCs, and attaching the flight controller to the frame. Next, attach the camera and transmitter to the drone. When everything is assembled, you can connect the battery and test out the drone.
Make sure to tune the PID settings and test the flight characteristics. Building a Johnny FPV drone can be a challenging but fun project that will give you hours of entertainment and a rewarding flying experience. Don’t forget to keep safety in mind, and always fly responsibly.
Step-by-step instructions for assembling the drone
Assembling a drone may seem like a daunting task, but by following step-by-step instructions, it can be a rewarding experience. Start by laying out all of the drone’s components in a clean and clear workspace. Take extra care with delicate components like the camera and the propellers.
Begin by attaching the arms to the frame, ensuring they are securely fastened with screws. Then, connect the motor and the electronic speed controllers to the arms. Next, attach the landing gear and the battery mount.
Once the basic components are securely fastened, attach the camera, transmitter, and receiver. Finally, attach the propellers and calibrate the drone. This involves verifying that the drone’s gyroscope and accelerometer are working correctly, which is key for stable flight.
With your drone assembled and calibrated, you’re ready to take to the sky and capture amazing footage from above.
Tips and tricks for ensuring proper assembly
Building a drone can be an exciting and challenging task, but ensuring proper assembly is crucial for a safe and successful flight. Here are some tips and tricks to keep in mind while building your drone. Firstly, always read the instructions carefully and thoroughly before starting.
Identify each part and make sure you have all the necessary tools and equipment. Double-check your work at each stage, and don’t hesitate to ask for help if you are unsure about something. When mounting parts, ensure they are securely fastened, and be cautious not to over-tighten screws or strip threads.
Keep wires tidy and knot-free, and remember to check the polarity of all connections. Always take your time and be patient, as rushing can lead to mistakes and damage. Finally, once you have completed the assembly, run some pre-flight checks to ensure everything is working correctly before taking off.
By following these tips, you can ensure a safe and successful drone build and flight.
Calibrating and Testing
When building a Johnny FPV drone, it’s essential to calibrate and test it to ensure its optimal performance. Calibrating the drone involves adjusting its various components, such as the flight controller, motors, and propellers, to work efficiently together. It’s crucial to follow the instructions of the manufacturer correctly.
Once calibration is done, testing the drone is essential to ensure it flies perfectly. You must test the stability, speed, and maneuverability. Also, make sure the video feed from the camera is clear and the radio link is strong.
Testing your Johnny FPV drone before hitting the skies is vital to avoid any crashes or accidents that can damage your drone and hurt yourself. Always remember that the proper calibration and testing will lead to a world-class flying experience. So, don’t rush the process and make sure to take your time in building and testing your Johnny FPV drone to enjoy its full potential.
Explanation of why calibration is important
Calibrating and testing equipment is crucial for ensuring accurate and reliable results. Without calibration, measurements can be off, leading to faulty products, wasted resources, and potential safety risks. Calibration involves comparing the readings of a device against a known standard to determine any deviations or errors.
These deviations can then be adjusted to ensure the device is providing accurate readings. The calibration process should be performed regularly, as equipment can drift over time due to environmental factors or normal wear and tear. By regularly calibrating and testing equipment, we can have confidence in our measurements and trust in the quality of our work.
So whether you’re working in a laboratory, manufacturing facility, or any other field that relies on precise measurements, calibration should be a top priority.
Step-by-step instructions for calibrating the drone
When it comes to calibrating your drone, it’s important to follow proper steps to ensure a smooth and successful flight. First, find an open and flat space to set up your drone. Turn on the drone and remote control, and connect them.
Access the calibration menu in your drone’s app or settings. The app may ask you to adjust the pitch and roll of the drone by manually moving it around. Follow the on-screen instructions carefully.
Next, you may be prompted to perform an IMU calibration, which is crucial for stabilizing the drone in the air. This process may take a few minutes, so be patient. Finally, perform a compass calibration by rotating the drone while following the app’s instructions and ensuring there are no magnetic objects nearby.
After calibration, do a test flight in a safe and open area to ensure everything is working properly. By following these steps, you can ensure a safe and successful flight every time.
Testing the drone to make sure it works properly
Calibrating and testing your drone is an essential process that ensures it’s working correctly and avoids any unexpected crashes. The first step in calibration is to ensure that your drone is on a flat and stable surface. Then, turn on your drone, connect it to your remote, and calibrate the compass.
This prevents the drone from veering off course or flying in the wrong direction. Next, you’ll need to calibrate the gyroscope and accelerometer, which helps your drone remain stable in the air. Once your calibration is complete, it’s time to test your drone.
Start by performing a quick and simple flight test to ensure the drone’s basic functions are working. This includes testing the propellers, motors, and camera. It’s important to familiarize yourself with the controls and test the drone in various conditions to make sure it’s working correctly.
Lastly, it’s vital to remember to check your drone often for any signs of wear and tear, which could cause it to malfunction, leading to a disaster mid-air. By taking the time to calibrate and test your drone, you’ll have peace of mind knowing your drone is working correctly and safely.
Conclusion
In conclusion, building a Johnny FPV drone is not for the fainthearted, but it is definitely a rewarding and exciting experience. You’ll need a combination of technical skills, patience, and most importantly, creativity to come up with a unique and fully functional quadcopter that suits your flying style. Whether you’re looking to dominate the race track or capture breathtaking aerial shots, building your own Johnny FPV drone is a surefire way to test your limits and unleash your inner drone badassery.
So, get your tools ready, let your imagination soar, and happy building!”
Recap of benefits and importance of building your own FPV drone
Calibrating and testing your FPV drone after building it is an essential part of the process. Even with the necessary components and careful assembly, errors can still occur, which can affect the drone’s performance. Calibration allows you to fine-tune and adjust the settings, ensuring optimal flight performance.
You will need to calibrate the accelerometer, compass, and gyroscope. Testing the drone is also crucial to identify issues before flying it outside. One helpful testing method is to hover the drone indoors and examine if it remains stable.
You can also test the range of the drone’s communication system to ensure you do not lose control of it. It is better to discover issues during the calibration and testing stages than during a flight. By calibrating and testing your FPV drone, you can ensure that it performs at its best, providing you with a fun and exciting flying experience.
Encouraging readers to give it a try
Calibrating and testing your equipment is an important step in ensuring accurate and reliable results. Whether you’re a seasoned professional or just starting out, taking the time to properly calibrate your instruments can make all the difference. Not only will it improve the quality of your data, but it can also save you time and money in the long run.
So, what exactly does calibration involve? Essentially, it means comparing your equipment to a known standard in order to ensure that it’s measuring correctly. This might involve adjusting settings, making physical tweaks, or even using specialized software programs. Testing, on the other hand, involves actually using your equipment to gather data and checking that it’s within acceptable limits.
By doing both of these activities regularly, you can be confident that your results are robust and accurate. So, why not give it a try and see for yourself how much of a difference it can make?
FAQs
What are the necessary components to build a Johnny FPV drone?
The necessary components to build a Johnny FPV drone include a flight controller, ESC (electronic speed controller), motors, camera, video transmitter, receiver, remote controller, battery, and frame.
Is it difficult to build a Johnny FPV drone?
Building a Johnny FPV drone requires some technical skills and knowledge of electronics, but with proper guidance and tutorials, it can be a fun and easy task.
Where can I find tutorials on building a Johnny FPV drone?
There are several online communities, forums, and YouTube channels dedicated to drone building, such as Oscar Liang, Joshua Bardwell, and UAVfutures.
What is the approximate cost of building a Johnny FPV drone?
The cost of building a Johnny FPV drone varies depending on the quality of components used, but on average, it can range from $400 to $600.