Featured image for this comprehensive guide about what is a vtx?
Image source: cubefpv.com
Ever wondered what truly allows you to experience the breathtaking, first-person view (FPV) world through the eyes of your drone? That exhilarating sense of flight, soaring through the air, and navigating obstacles as if you were truly on board? While your drone’s camera captures the action, there’s a crucial, often unsung hero working tirelessly to transmit that live footage directly to your FPV goggles: the Video Transmitter, or VTX.
For newcomers to the exhilarating hobby of FPV drones, the array of technical jargon can seem overwhelming. Among terms like ESC, FC, and Lipo, understanding what is a VTX is foundational to grasping how your drone’s video feed reaches your display. Without a properly functioning VTX, your FPV experience would simply be a series of disconnected maneuvers, devoid of the immersive visual feedback that makes FPV so incredibly captivating.
This comprehensive guide will demystify the VTX, breaking down its function, types, specifications, and how to get the most out of it. Whether you’re building your first FPV drone or looking to upgrade your existing setup, understanding your video transmitter is key to unlocking a smoother, clearer, and more reliable flight experience. Let’s dive deep into the heart of FPV video transmission!
Quick Answers to Common Questions
What is a VTX, simply put?
A VTX, or Video Transmitter, is the essential piece of hardware on your FPV drone that wirelessly sends the live video feed from your camera straight to your FPV goggles or screen. It’s how you see what your drone sees in real-time!
What’s the main job of a VTX on my drone?
The VTX’s main job is to take the video signal captured by your drone’s camera and broadcast it wirelessly. This creates the immersive, first-person view that makes FPV flying so exciting.
Why do I absolutely need a VTX for FPV flight?
You need a VTX because without it, you wouldn’t get any video feed to your goggles, meaning no FPV flying at all! It’s the critical link that lets you “sit” in the cockpit of your drone.
How does a VTX actually send the video to my goggles?
The VTX takes the video signal and broadcasts it as radio waves on a specific frequency, which your FPV goggles’ receiver then tunes into. It’s essentially a miniature, dedicated video broadcasting station on your drone.
What’s one key thing to know about different VTX types?
One important difference is power output; a VTX with higher power generally offers a stronger, more reliable video signal and better range. However, more power can also draw more battery and require better cooling.
📋 Table of Contents
What Exactly is a VTX? The Core Function of Your FPV Eyes
At its most fundamental level, a VTX (Video Transmitter) is an electronic component on your FPV drone responsible for taking the analog or digital video signal from your FPV camera and broadcasting it wirelessly. Think of it as a miniature, personal TV station for your drone. This broadcast signal is then picked up by a compatible receiver (often built into or connected to your FPV goggles or ground station), which decodes the signal and displays the live footage for you.
Learn more about what is a vtx? – what is a vtx?
Image source: static.wixstatic.com
The process typically works like this:
| Feature | Description/Purpose | Typical Specifications / Notes |
|---|---|---|
| Primary Function | Converts an analog video signal from a camera into a radio frequency (RF) signal. | Essential component for First-Person View (FPV) drones and RC vehicles. |
| Operating Frequency | The radio band used to transmit the video signal wirelessly to a receiver (goggles/monitor). | Mostly 5.8 GHz for FPV (avoids interference with 2.4 GHz control signals). |
| Power Output | The strength of the transmitted signal, determining range and penetration. | Common values: 25mW (legal limit in many areas), 200mW, 600mW, 1000mW+. Higher power means more range but also more heat and battery drain. |
| Channels & Bands | Allows selection of specific frequencies within the band to avoid interference, especially when multiple pilots are flying. | Typically 40-72 channels across 5-9 different bands (e.g., Raceband, Fatshark, Boscam A/B/E). |
| Control Protocols | Enables remote configuration of VTX settings (power, channel) directly from the flight controller OSD or transmitter. | Most popular: SmartAudio (developed by TBS) and Tramp Telemetry (developed by ImmersionRC). |
- Capture: Your FPV camera captures real-time video footage of what’s in front of your drone.
- Transmit: The camera sends this video signal to the VTX. The VTX then converts this signal into a radio frequency (RF) wave and transmits it through its antenna.
- Receive: Your FPV goggles or ground station, equipped with a video receiver (VRX), picks up these RF waves.
- Display: The VRX decodes the RF wave back into a video signal, which is then displayed on the screens inside your goggles, providing you with a live, immersive view.
In essence, the VTX is the bridge between your drone’s perspective and your own. It’s the critical component that transforms a simple onboard camera into a window to an aerial world. Without a reliable FPV VTX, the thrill of high-speed drone racing or precision freestyle flying would be impossible. The quality and reliability of this transmission directly impact your ability to fly confidently and safely.
While the concept remains the same, there are distinct types of video transmitters for FPV. The traditional and still widely popular method is analog VTX, which transmits a continuous waveform. More recently, digital VTX systems have emerged, offering significant improvements in image quality and clarity, albeit often with a higher price tag and different characteristics regarding latency and signal degradation. We’ll delve deeper into these differences later, but for now, remember that the core job of any VTX is to get that video feed from your drone to your eyes.
Decoding VTX Specifications: Power, Frequencies, and Channels
Understanding the specifications of a VTX is crucial for selecting the right one for your flying style and environment. The key factors to consider are power output, frequency bands, and available channels. These elements directly impact your video range, signal clarity, and ability to fly with others without interference.
Learn more about what is a vtx? – what is a vtx?
Image source: static.wixstatic.com
VTX Power Output (mW): The Range Game
The power output of a VTX is measured in milliwatts (mW) and is one of the most significant factors determining the range and penetration capabilities of your video signal. Higher mW generally means a stronger signal, leading to greater range and better ability to penetrate obstacles like trees or buildings.
- 25mW: This is often the legal limit for FPV flying in many regions (like Europe) and is common for indoor flying, tiny whoops, or multi-pilot racing scenarios where close proximity and minimal interference are paramount. It offers decent range in open fields but struggles with obstacles.
- 200mW – 600mW: These are popular power settings for general outdoor freestyle flying and most drone racing. They offer a good balance of range, penetration, and power consumption. A 200mW VTX is often sufficient for most park flying, while 600mW provides a solid signal for longer distances and more challenging environments.
- 800mW – 1W+ (1000mW): High-power VTX units are typically used for long-range FPV flying, where maximizing signal reach is critical. While they offer impressive range, they also generate more heat and consume more power, requiring careful cooling and consideration for battery life. Additionally, exceeding legal power limits can lead to fines and legal issues in many countries, so always check local regulations.
Actionable Tip: Don’t always go for the highest power. More power means more heat and more battery drain. Choose the lowest power setting that provides a reliable signal for your specific flying conditions to reduce interference for others and prolong your battery life. For most recreational FPV pilots, 200-600mW is a sweet spot.
VTX Power Output vs. Typical Use/Range (Approximate)
The following table provides a general guideline for VTX power output and its suitability for different FPV scenarios. Note that actual range will vary significantly based on antenna quality, environment (obstacles), and receiver sensitivity.
| VTX Power (mW) | Approximate Open Field Range (meters) | Typical Use Cases | Considerations |
|---|---|---|---|
| 25mW | 100 – 300m | Indoor flying, Tiny Whoops, Multi-pilot racing (close quarters) | Low heat, very low interference, mandatory in some regions |
| 200mW | 300 – 800m | General outdoor freestyle, park flying, casual racing | Good balance, common starting point, moderate heat |
| 600mW | 800 – 1500m | Longer range freestyle, obstacle-rich environments, some racing | Strong signal, higher heat, more power draw |
| 800mW – 1000mW+ | 1500m – Several km | Long-range FPV, heavy penetration, specialized applications | Significant heat, high power draw, legal restrictions apply |
Frequency Bands and Channels: Finding Your Clear Airwave
Most FPV VTX systems operate on the 5.8GHz frequency band, which offers a good balance of signal penetration and antenna size. Within this 5.8GHz band, there are several sub-bands, each containing multiple channels. These channels are like different radio stations, allowing multiple pilots to fly simultaneously without interfering with each other’s video feeds.
Common 5.8GHz bands include:
- Band A: Older, less common, but still found on some legacy gear.
- Band B: Also known as “Band Fatshark” or “Band F,” commonly used with Fatshark goggles.
- Band E: Another standard band.
- Raceband (R-Band): This is the most popular band for drone racing. It features channels spaced further apart, reducing the chance of bleed-over interference between adjacent channels, allowing more pilots to fly closer together. Its channels are typically 37MHz apart, compared to 19MHz on standard bands.
- LowRace (L-Band): A newer band sometimes used to offer even more options for crowded race events.
Each band contains 8 channels, typically numbered 1 through 8. For example, you might be flying on “Raceband Channel 5.”
Actionable Tip: Always check with other pilots before powering on your drone, especially at events or flying spots. Use a frequency scanner if available, or simply ask what channels others are using. The golden rule of FPV is “don’t power on without knowing the airwaves are clear.” Powering up on someone else’s channel can crash their drone and is considered very poor etiquette.
Many modern VTX units have a “Pit Mode” feature, which reduces the output power to an extremely low level (e.g., 0.1mW) for setting up your drone without interfering with other pilots. This is an invaluable feature for multi-pilot scenarios.
Antennas and Their Crucial Role in VTX Performance
While the VTX unit itself is vital, its performance is intrinsically linked to the antenna attached to it. The antenna is responsible for converting the electrical signal from the VTX into radio waves and vice versa for the receiver. A poor antenna, or incorrect antenna usage, can severely degrade even the best video transmitter‘s performance.
Understanding Antenna Types: Linear vs. Circular Polarization
FPV antennas primarily come in two types of polarization:
- Linear Polarization (LP): These are simple, whip-style antennas, often resembling a straight wire or a dipole. They are inexpensive and lightweight. However, LP antennas are highly susceptible to “multipathing” – where radio waves bounce off objects and arrive at the receiver slightly delayed, causing signal degradation and “ghosting” in your video. They also suffer from signal loss if the transmitter and receiver antennas are not aligned perfectly.
-
Circular Polarization (CP): These antennas, such as Cloverleaf, Pagoda, or Axial Mode Helical (Patch) antennas, are the gold standard for FPV. CP antennas transmit signals in a helical (corkscrew) pattern, either Right-Hand Circularly Polarized (RHCP) or Left-Hand Circularly Polarized (LHCP).
-
Benefits of CP:
- Reduced Multipathing: The helical nature of the signal makes it much less susceptible to interference from reflections, resulting in a cleaner video feed, especially in environments with obstacles.
- Orientation Independence: Unlike LP antennas, CP antennas provide a consistent signal regardless of the drone’s orientation, making them ideal for acrobatic FPV flying.
- LHCP vs. RHCP: It is absolutely crucial that your VTX antenna and your receiver (VRX) antenna have the same polarization (both RHCP or both LHCP). If you mix them, you will experience significant signal loss, sometimes 90% or more, resulting in extremely poor video quality. This is also a technique used in racing: if you want to fly near someone without interference, you can use opposite polarizations.
-
Benefits of CP:
For most FPV applications, especially freestyle and racing, CP antennas are highly recommended due to their superior performance in mitigating multipath interference and providing a more robust signal.
Antenna Placement and Care: Maximizing Your Signal
Proper antenna placement and care are just as important as choosing the right antenna.
- Clear Line of Sight: Always try to position your VTX antenna in a location that provides the clearest possible line of sight to your receiver. Avoid placing it directly underneath carbon fiber plates, batteries, or other large components that can block or attenuate the signal.
- Protection: While durable, FPV antennas are not indestructible. Invest in protective mounts or tubes to shield your antenna from prop strikes and crash damage. A damaged antenna will severely degrade your video signal.
- Correct Orientation: For omnidirectional CP antennas (like cloverleafs), aim to keep them as vertical as possible, especially during forward flight, to maintain the best coverage pattern. For directional antennas (like patch antennas on your goggles), point them directly at your drone for maximum range.
- Connector Care: Ensure the SMA or RP-SMA connector on your VTX is securely tightened to the antenna. A loose connection can cause significant signal loss and even damage your VTX if it’s powered on without a proper load.
Critical Warning: Never power on your VTX without an antenna securely attached! A video transmitter needs to discharge its energy into an antenna. Without an antenna, the energy reflects back into the VTX, quickly overheating and permanently damaging the unit. This is one of the most common mistakes that kills new VTX units.
Advanced VTX Features and Smart Technologies
Modern VTX units come packed with advanced features that greatly enhance the FPV flying experience, making configuration easier and flight safer. These innovations often involve intelligent communication protocols and improved power management.
SmartAudio and Tramp HV: The Future of VTX Control
Gone are the days of fiddling with tiny buttons or DIP switches on your VTX to change channels or power levels. Today, most high-quality FPV VTX units integrate smart control protocols:
-
SmartAudio (ImmersionRC) & Tramp HV (Team BlackSheep): These are proprietary protocols that allow your Flight Controller (FC) to communicate directly with your VTX via a single wire (UART connection). This enables you to:
- Change Settings via OSD: Adjust your VTX‘s power level, frequency band, and channel directly from your FPV goggles using the On-Screen Display (OSD) menu within Betaflight, ArduPilot, or INAV. This is incredibly convenient, especially if your VTX is tucked away deep inside your drone.
- Pit Mode Control: Activate or deactivate Pit Mode remotely.
- Automated Channel Switching: At sanctioned events, race organizers can sometimes remotely change your VTX settings.
Actionable Tip: When purchasing a new VTX, prioritize one that supports SmartAudio or Tramp HV. This feature alone drastically improves the ease of use and flexibility of your FPV setup. Ensure your Flight Controller also supports these protocols (most modern FCs do).
Pit Mode and Power Management
We briefly touched on Pit Mode earlier, but its importance warrants further discussion, especially in multi-pilot scenarios.
- What is Pit Mode? When activated, Pit Mode reduces the VTX‘s power output to an absolute minimum (e.g., 0.1mW or less). This tiny amount of power is enough for your receiver to pick up a signal if it’s right next to the drone, allowing you to configure settings, check your camera feed, or troubleshoot without interfering with other pilots who are actively flying.
- Why it’s Crucial: At drone races or casual group flights, multiple pilots are using the same 5.8GHz frequency spectrum. Powering up a full-power VTX on a channel someone else is using will immediately cause severe interference, potentially leading to a crash. Pit Mode is a courtesy and a critical safety feature.
Actionable Tip: Always engage Pit Mode when on the ground setting up your drone at a flying spot, and only switch to full power when you are ready to take off and have confirmed your chosen channel is clear.
Analog vs. Digital VTX: A Shifting Landscape
While the discussion so far largely applies to both, it’s important to acknowledge the growing divide between analog and digital VTX systems.
-
Analog VTX:
- Pros: Lower latency (near-instantaneous video), significantly cheaper, smaller/lighter components, “graceful degradation” (signal gets fuzzy before cutting out completely, giving you time to react).
- Cons: Lower image quality (SD resolution), susceptible to static and interference.
- Current Status: Still the most common and accessible entry point into FPV, especially for racing and budget builds.
-
Digital VTX:
- Pros: Stunning HD image quality, better range (often), improved penetration, advanced features like OSD integration and recording capabilities.
- Cons: Higher latency (though improving), significantly more expensive (VTX, camera, and goggles), larger/heavier components, “hard cutoff” (signal can completely disappear without warning when out of range).
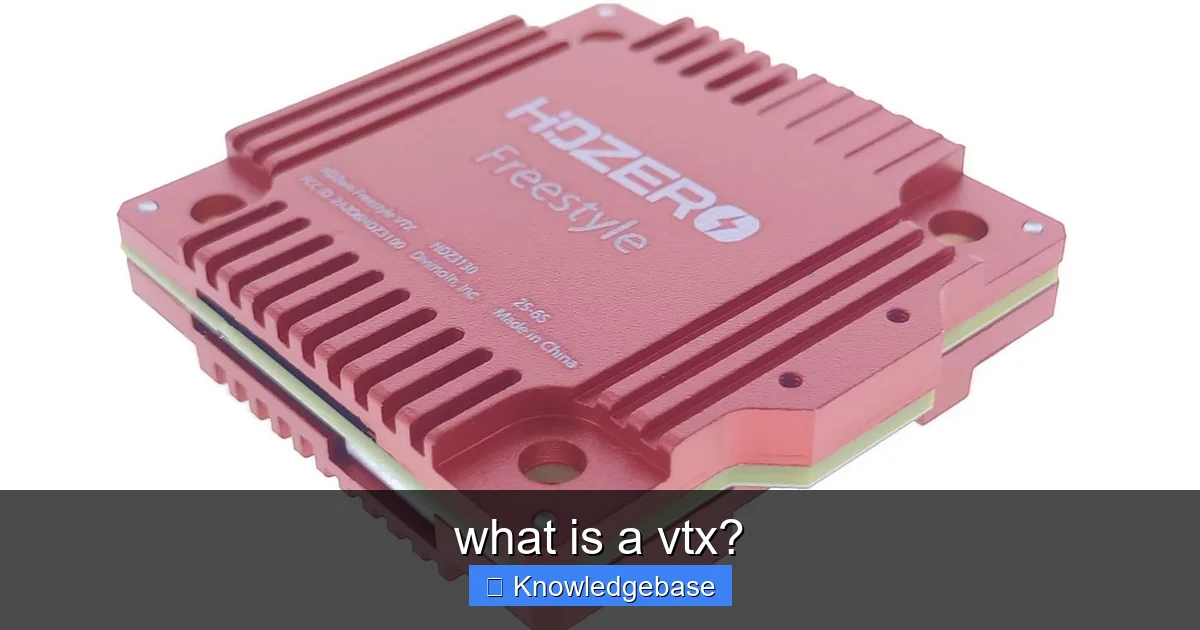
- Popular Systems: DJI FPV, Walksnail Avatar, HDZero. These are becoming increasingly popular for freestyle and cinematic FPV.
The choice between analog and digital depends on your priorities: low latency and budget (analog) vs. pristine image quality (digital). Many pilots eventually try both, or even have drones equipped with each system.
Installation, Best Practices, and Troubleshooting Your VTX
A properly installed and maintained VTX is key to a reliable FPV experience. Conversely, common installation mistakes or neglecting best practices can lead to frustrating video issues.
VTX Installation: Powering and Connecting
Installing your VTX involves connecting it to power and, if using smart control, to your Flight Controller (FC).
-
Power Connection:
- Most VTX units can be powered directly from your drone’s main battery voltage (VBat) or from a regulated 5V or 9V output on your FC or PDB (Power Distribution Board).
- Clean Power is Crucial: Noise on your power line can introduce lines and static into your video feed. If powering from VBat, consider adding a low ESR capacitor (e.g., 1000uF 25V) to your main power input or directly on the VTX‘s power pads to smooth out voltage spikes and filter noise.
- Voltage Match: Always check the voltage input range specified for your VTX. Powering a 5V VTX with VBat on a 4S or 6S drone will instantly destroy it. Using a regulated output from your FC/PDB (like 9V) often provides cleaner power than direct VBat.
-
Video Signal Connection:
- Connect the “Video Out” wire from your FPV camera to the “Video In” pad on your VTX.
- If you have an OSD (On-Screen Display) chip on your FC, the video signal will usually pass through the FC first (Camera -> FC -> VTX) so that OSD elements (like battery voltage, timer, RSSI) can be overlaid onto your video feed.
-
Smart Control Connection (SmartAudio/Tramp HV):
- Connect the dedicated “SmartAudio” or “Tramp” wire from your VTX to an available UART TX (Transmit) pad on your Flight Controller.
- Then, configure Betaflight (or your FC firmware) to recognize this UART as the peripheral for your VTX protocol.
Essential Tips for Optimal VTX Performance
Beyond correct installation, a few best practices can significantly improve your VTX performance and longevity:
- Keep it Cool: VTX units, especially higher-power ones, generate a lot of heat. Ensure good airflow around the unit. If it’s enclosed, consider using heatsinks or even mounting it in a location where it can benefit from propeller wash. Overheating can lead to reduced performance, signal dropouts, and premature failure.
- Never Power Without an Antenna: This bears repeating: a VTX requires a load to safely dissipate its RF energy. Operating it without an antenna for even a few seconds can cause irreversible damage. Always attach your antenna before connecting your drone’s battery.
- Secure Antenna Connection: Ensure your antenna is fully screwed onto the VTX connector (SMA or RP-SMA). A loose connection will degrade signal quality and can also reflect energy back into the VTX.
- Insulate! Exposed electronics can short circuit, especially if carbon fiber touches them. Use heat shrink, electrical tape, or protective mounts to insulate your VTX and its wiring from the frame.
- Check for Interference: Before flying, especially at new spots or with others, always check for active channels. A simple walkie-talkie or an FPV ground station with a channel scanner can help identify clear frequencies.
Common VTX Problems and Simple Solutions
Even with the best practices, you might encounter issues. Here are some common VTX problems and their solutions:
-
No Video Signal / Black Screen:
- Check Power: Is the VTX receiving power? Check wiring and connections to FC/PDB.
- Check Camera: Is the camera powered and working?
- Check Connections: Is the video signal wire correctly connected between the camera, FC (if applicable), and VTX?
- Antenna: Is the antenna securely attached to the VTX?
- Frequency/Channel Mismatch: Are your goggles/receiver set to the exact same band and channel as your VTX? Double-check.
-
Fuzzy Video / Static / Lines in Picture:
- Interference: Could be from other drones, Wi-Fi, or electrical noise on your drone (motors, ESCs).
- Power Filtering: Add a low ESR capacitor to your main power leads or the VTX power input.
- Antenna Issues: Check if your VTX or receiver antenna is damaged or has the wrong polarization (LHCP vs. RHCP).
- Distance/Obstacles: You might be too far away or behind too many obstacles for your current power setting.
- Wrong Channel: You might be on a nearby, but not exact, channel to another pilot.
-
Very Short Range:
- Low Power Setting: Ensure your VTX is not stuck in Pit Mode or a low power setting (e.g., 25mW).
- Antenna Quality/Damage: A cheap or damaged antenna will drastically reduce range.
- Antenna Polarization Mismatch: Ensure VTX and receiver antennas are both RHCP or both LHCP.
- Obstructions: Carbon fiber frame or other components blocking the antenna can severely limit range.
- Overheating: An overheating VTX will often throttle its power output.
Many of these issues can be systematically troubleshot by checking one component at a time, starting with the simplest and most common culprits.
Conclusion
The VTX is far more than just another component on your FPV drone; it’s the lifeline to your immersive flying experience. Understanding what is a VTX, how it operates, and the nuances of its specifications empowers you to build, configure, and troubleshoot your FPV system with confidence. From the power output that dictates your range to the frequency bands that keep you clear of interference, every aspect of your video transmitter plays a pivotal role in the quality and reliability of your video feed.
Whether you’re pushing the limits with high-speed racing or exploring scenic landscapes with cinematic grace, a well-chosen and correctly installed FPV VTX is absolutely essential. Remember the critical importance of selecting the right power, ensuring proper antenna polarization, and never powering up without an antenna connected. As FPV technology continues to evolve, with digital systems gaining traction, the core function of the VTX remains the same: translating your drone’s perspective into an unforgettable visual journey.
Embrace the knowledge, experiment with settings, and always fly responsibly. With a solid understanding of your VTX, you’re well on your way to experiencing the full thrill and freedom that FPV drone flying has to offer! Happy flying!
🎥 Related Video: Does VTX Power Really Affect FPV Range? | Quick Test Explained!
📺 MEPS-FPV
How much does VTX output power impact your FPV drone’s range? We tested it in real conditions—see the difference in seconds!
Frequently Asked Questions
What is a VTX?
A VTX, or Video Transmitter, is a crucial component in First-Person View (FPV) systems, commonly used in drones and RC vehicles. It takes the video signal from a camera and converts it into a radio frequency (RF) signal to be broadcast wirelessly. This allows the pilot to see what the drone sees in real-time, enabling immersive flight.
What does VTX stand for and what does it do?
VTX stands for Video Transmitter. Its primary function is to transmit the live video feed from a camera on an FPV drone or RC vehicle to a receiver, usually FPV goggles or a monitor. The VTX broadcasts this video signal wirelessly, allowing the pilot to experience the flight from the perspective of the aircraft.
How does a VTX transmit video for FPV?
The VTX receives an analog video signal from the FPV camera. It then modulates this video signal onto a high-frequency radio carrier wave. This RF signal is then sent through an antenna, broadcasting it wirelessly to the pilot’s FPV receiver, which demodulates the signal back into a viewable video image.
What are the key features to consider when buying a VTX?
When choosing a VTX, important features include its power output (measured in mW), which affects range and penetration, and the number of channels/bands it supports. Other considerations are its physical size, weight, input voltage, and whether it has features like SmartAudio or Tramp VTX control for easy channel and power changes.
What is VTX power output and why is it important?
VTX power output refers to the strength of the radio signal transmitted, measured in milliwatts (mW). A higher power output generally results in a stronger signal, providing greater range and better penetration through obstacles like trees or buildings. However, higher power also consumes more battery and can generate more heat, so it’s important to choose an appropriate level for your flying environment.
How do I ensure clear video transmission with my VTX?
To ensure clear video transmission from your VTX, always use high-quality, properly matched antennas on both your VTX and receiver. Keep your VTX antenna clear of obstructions and away from carbon fiber, and try to avoid flying in areas with significant radio interference. Additionally, ensure your VTX power is set appropriately for your environment and that your VTX is adequately cooled.


