Featured image for this comprehensive guide about what is an fpv transmitter?
Image source: icarusfpv.com
What is an FPV Transmitter?
Imagine soaring through the sky, weaving through trees, or racing around a track, all from the immersive, first-person perspective of your drone. This exhilarating experience is the essence of FPV (First Person View) flying, and at its heart lies a critical, yet often underestimated, piece of technology: the FPV transmitter. Without this vital component, your drone would be blind, and your thrilling aerial adventures would remain firmly on the ground.
For newcomers to the world of FPV, understanding the various acronyms and components can feel like learning a new language. You’ve heard of FCs, ESCs, motors, and cameras, but the FPV transmitter (often referred to simply as a VTX, or Video Transmitter) is the unsung hero that bridges the gap between your drone’s camera and your FPV goggles or screen. It’s the device that takes the raw video feed from your drone’s camera and broadcasts it wirelessly, allowing you to see exactly what your drone sees in real-time.
This comprehensive guide will demystify the FPV transmitter, breaking down its function, components, types, and how to get the most out of it. Whether you’re building your first FPV drone, upgrading an existing setup, or simply curious about how FPV works, you’ll gain a deep understanding of this essential piece of equipment. Let’s dive in and uncover the power behind your FPV vision!
Quick Answers to Common Questions
What exactly is an FPV transmitter?
An FPV transmitter is the crucial component on your drone that sends the live video feed from its camera directly to your FPV goggles or screen. It’s how you “see” what your drone sees in real-time!
Is an FPV transmitter the same as my radio controller?
No, they’re actually two different things! Your radio controller sends your flight commands *to* the drone, while the FPV transmitter’s sole job is to send the *video signal* *from* the drone back to your goggles.
Why do I need an FPV transmitter on my drone?
You absolutely need an FPV transmitter if you want to experience First-Person View flying! Without it, you wouldn’t get that immersive, real-time video feed that makes FPV so thrilling and precise.
How does an FPV transmitter actually send the video?
An FPV transmitter takes the analog video signal from your drone’s camera and broadcasts it wirelessly, typically on the 5.8GHz frequency, to your FPV goggles or monitor. Think of it as a tiny, personal TV station right on your drone!
Are all FPV transmitters the same, or do I need a specific one?
While many FPV transmitters function similarly, they come in various power outputs and form factors. You’ll typically choose an FPV transmitter based on your drone’s size, desired range, and whether you need specific features like pit mode.
📋 Table of Contents
- The Core Function: How an FPV Transmitter Works
- Key Components and Specifications of an FPV VTX
- Understanding FPV Transmitter Frequencies and Channels
- Power Output and Range: Finding Your Sweet Spot
- Advanced Features and Considerations for Your FPV Transmitter
- Installation, Best Practices, and Troubleshooting Tips
- Conclusion
The Core Function: How an FPV Transmitter Works
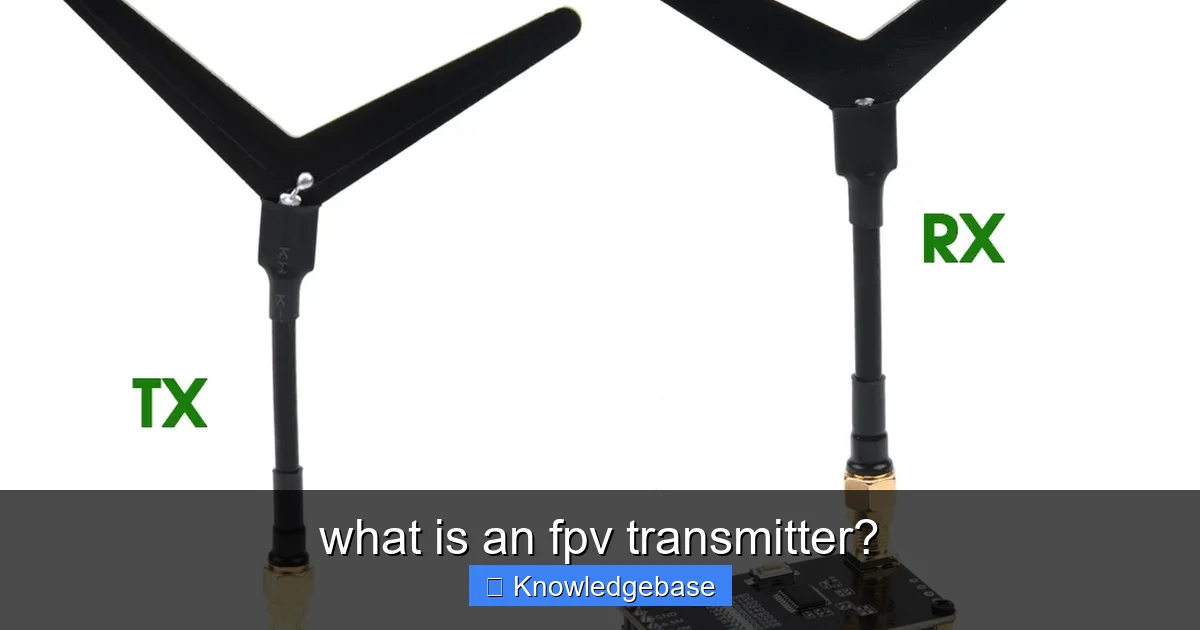
At its most fundamental level, an FPV transmitter (VTX) acts as a miniature broadcast station on your drone. Its primary job is to take the video signal generated by your FPV camera and convert it into a radio frequency (RF) signal. This RF signal is then transmitted wirelessly through an attached antenna, traveling through the air to be picked up by a compatible video receiver (VRX) in your FPV goggles or ground station monitor.
Learn more about what is an fpv transmitter? – what is an fpv transmitter?
Image source: ae01.alicdn.com
The process begins when your FPV camera captures the live footage. This analog video signal (typically NTSC or PAL format) is fed into the VTX. Inside the FPV VTX, a sophisticated circuit modulates this video information onto a specific radio frequency. Think of it like a radio station assigning its programming to a particular channel on your car radio. This modulated signal is then amplified and sent to the VTX antenna, which radiates the signal outwards.
| Feature | Description | Typical Specifications / Notes |
|---|---|---|
| **Primary Function** | Converts analog or digital video from an FPV camera into a radio signal. | Transmits live video feed wirelessly to FPV goggles or monitors. |
| **Operating Frequency** | The radio frequency band used for video transmission. | **5.8 GHz** (most common for FPV drones), less common: 1.2 GHz, 2.4 GHz. |
| **Output Power (mW)** | The strength of the transmitted video signal, determining range and penetration. | **25 mW** (legal limit in many regions), **200-800 mW** (common for racing/freestyle), **1W+** (long-range). |
| **Number of Channels** | The count of distinct frequencies within a band the VTX can broadcast on. | **40-48 channels** (e.g., Raceband, Boscam, Fatshark), crucial for avoiding interference. |
| **Control Protocol** | Allows flight controller to remotely configure VTX settings (power, channel, pit mode). | **SmartAudio** (TBS), **Tramp Telemetry** (ImmersionRC) – standard for modern FPV systems. |
| **Input Voltage** | The voltage range required to power the VTX module. | **5V** (for micro builds, regulated), **7-26V (2-6S LiPo)** (direct battery input for larger VTXs). |
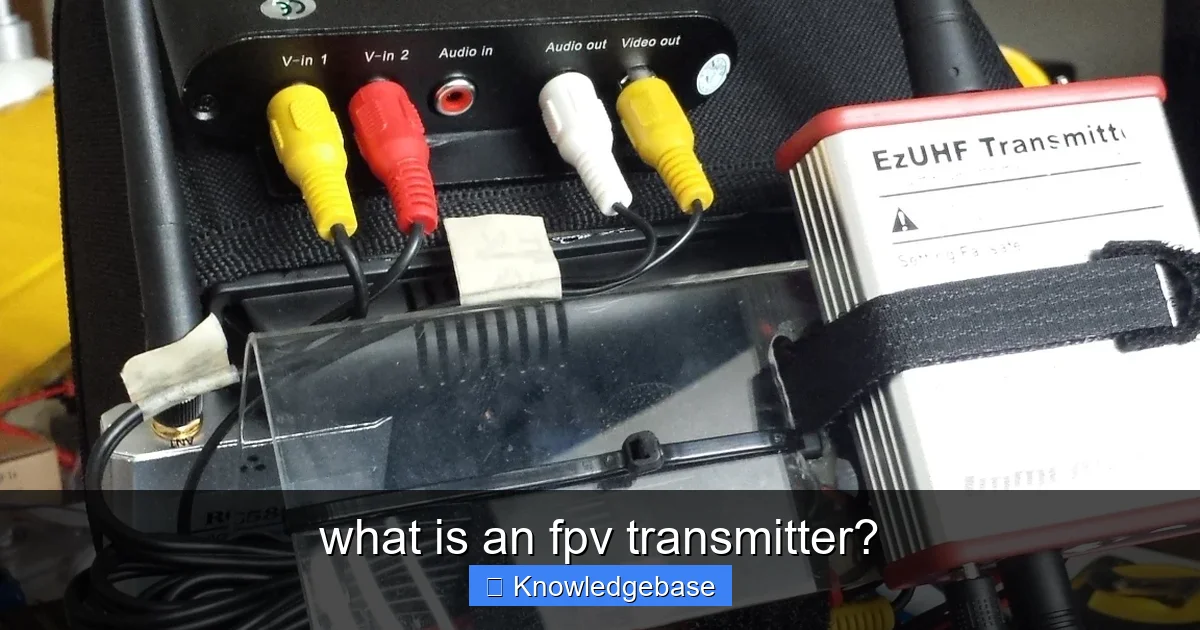
It’s crucial to understand that the FPV transmitter is distinct from your drone’s radio control (RC) transmitter. While both transmit signals wirelessly, they serve entirely different purposes and operate on different frequencies (though some all-in-one systems are emerging). The RC transmitter sends control commands to your drone (throttle, roll, pitch, yaw), usually on 2.4 GHz or 915 MHz, ensuring you can maneuver your aircraft. The FPV transmitter, on the other hand, is solely dedicated to sending the video feed, typically on the 5.8 GHz band for analog systems, providing your immersive view.
This real-time video transmission is what defines FPV flying. The low latency (minimal delay between the camera capturing an image and you seeing it) of modern FPV video transmitters is paramount, especially for fast-paced drone racing or freestyle maneuvers. High latency would make flying unpredictable and difficult, as your drone’s movements would appear delayed in your goggles.
The Video Signal Chain Explained:
- FPV Camera: Captures the live video footage.
- Flight Controller (FC) / On-Screen Display (OSD) (Optional but common): The camera’s video signal often passes through the FC, which overlays vital flight information (like battery voltage, current, flight mode) onto the video feed before it reaches the VTX. This integrated OSD is a game-changer for FPV pilots.
- FPV Transmitter (VTX): Takes the (optionally OSD-enriched) video signal, converts it to an RF signal, and broadcasts it.
- VTX Antenna: Radiates the RF signal into the air.
- Air: The medium through which the RF signal travels.
- VRX Antenna (on goggles/ground station): Captures the RF signal.
- Video Receiver (VRX): Demodulates the RF signal back into a viewable video signal.
- FPV Goggles/Monitor: Displays the video feed to the pilot.
Key Components and Specifications of an FPV VTX
While all FPV transmitters share the same core function, they come in various forms and boast different features. Understanding their key components and specifications is essential for selecting the right one for your build.
Learn more about what is an fpv transmitter? – what is an fpv transmitter?
Image source: learnassets.getfpv.com
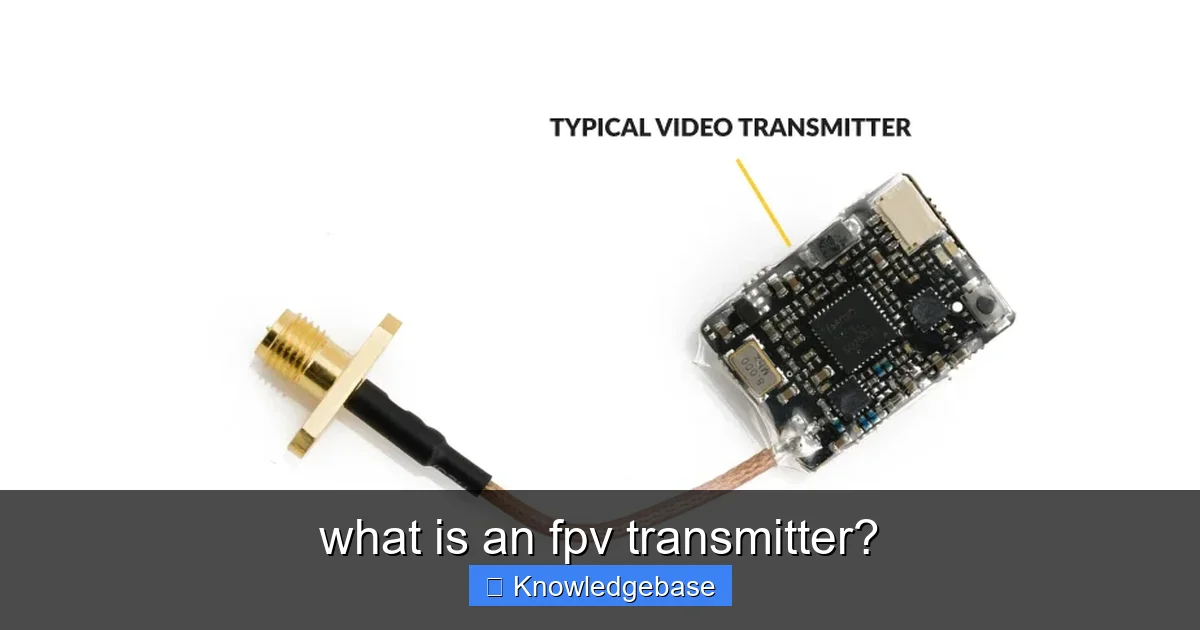
The VTX Board Itself
The VTX is a small printed circuit board (PCB) that houses the main chipset responsible for video modulation, power regulation, and frequency generation. Modern VTXs are incredibly compact, often no larger than a postage stamp, making them ideal for lightweight FPV drones. They typically feature mounting holes for easy integration into your drone’s stack or frame.
Antenna Connector (U.FL, MMCX, SMA)
The antenna connector is where your VTX antenna attaches. The type of connector is crucial as it determines which antennas you can use. Common types include:
- U.FL (or IPEX): Very small and lightweight, often found on tiny drones or VTXs where space is at a premium. Can be fragile if repeatedly connected/disconnected.
- MMCX: A step up in durability from U.FL, offering a more secure snap-on connection. Becoming very popular on modern micro and racing drones.
- SMA (SubMiniature version A): The most robust and common connector, often found on larger VTXs and ground station equipment. Comes in male and female versions, and sometimes “Reverse Polarity” (RP-SMA). Ensure your antenna matches the VTX connector type.
Choosing the correct connector ensures a strong, reliable connection between your video transmitter and its antenna, which is vital for clear video.
Power Input
An FPV VTX requires power to operate, usually directly from your drone’s main battery or a regulated 5V/9V supply from the flight controller or PDB (Power Distribution Board). VTXs have specific input voltage ranges (e.g., 7V-26V, or 2S-6S LiPo compatible). Always verify the voltage compatibility to prevent damage. Many modern VTXs feature robust voltage regulation and filtering to ensure clean power, which translates to cleaner video.
Video Input
This is where the video signal from your FPV camera (or flight controller’s OSD output) connects to the VTX. It’s typically a single wire carrying the analog video signal. Correctly wiring this is paramount for getting any picture at all.
On-Screen Display (OSD) Integration
As mentioned, many modern FPV setups route the camera’s video signal through the flight controller, which then overlays critical flight data like battery voltage, current draw, flight mode, and even GPS coordinates onto the video feed. The FPV transmitter then broadcasts this combined video stream, giving you real-time information directly in your goggles.
Telemetry Protocols (SmartAudio, TrampHV)
These protocols allow you to remotely control your VTX settings (like power output, frequency band, and channel) directly from your FPV goggles or your radio transmitter’s OSD menu. This is a massive convenience compared to fiddling with physical buttons on the VTX, especially when your drone is fully built. SmartAudio (developed by TBS) and TrampHV (developed by ImmersionRC) are the two most common protocols used to communicate with the FPV video transmitter.
Understanding FPV Transmitter Frequencies and Channels
The frequency and channel on which your FPV transmitter broadcasts are critical. Selecting the right one ensures you get clear video and avoid interfering with other pilots.
The Dominant 5.8 GHz Band
The vast majority of analog FPV transmitters operate on the 5.8 GHz frequency band. This band is popular for several reasons:
- Compact Antennas: The higher frequency allows for much smaller, lighter antennas, which is ideal for FPV drones where weight and size are critical.
- Good Data Rate Potential: While analog video is bandwidth-intensive, 5.8 GHz offers enough spectrum for relatively clear video.
- Reduced Interference: It’s less congested than lower frequency bands like 2.4 GHz (used by Wi-Fi, Bluetooth, and many RC control links), reducing the likelihood of interference from other devices.
However, 5.8 GHz also has its drawbacks: it’s more susceptible to obstacles (trees, buildings) and has shorter effective range compared to lower frequencies.
Frequency Bands (RaceBand, Fatshark, Boscam, etc.)
Within the 5.8 GHz spectrum, there are various “bands,” which are groups of specific channels. These bands are standardized to ensure compatibility between different VTX and VRX manufacturers. Common bands include:
- RaceBand: A popular band specifically designed for FPV racing. Its channels are spaced further apart to minimize interference between multiple racers operating simultaneously.
- Fatshark / ImmersionRC: Historically popular bands, often seen on older equipment or specific brands.
- Boscam: Another common set of channels, widely supported.
- E Band: Often referred to as Band E, another standard set of channels.
Most modern FPV transmitters support a wide array of these bands, giving you flexibility. It’s essential that your VTX and VRX (receiver in your goggles) are set to the exact same band and channel for successful video transmission.
Channels within Bands
Each band consists of multiple discrete channels. For instance, RaceBand typically has 8 channels (R1, R2, …, R8), each broadcasting on a slightly different frequency. When flying with others, pilots select different channels within the same band to avoid “stepping on” each other’s video signal, which would result in severe static and interference for everyone.
Importance of Channel Selection
Proper channel selection is not just about clear video; it’s also about courtesy and legality. In many regions, there are regulations regarding which frequencies and power outputs are permissible. Always check local laws regarding FPV video transmitters. For organized events, race directors will assign specific channels to each pilot to ensure fair play and prevent signal overlap. Mismanaging your VTX channel can lead to:
- “Ghosting” or “Bleed-through”: If your channel is too close to another pilot’s, you might see their video faintly in your goggles.
- Complete Loss of Video: If two pilots are on the exact same channel at similar power, their signals will nullify each other, resulting in severe static for both.
- Legal Trouble: Operating on restricted frequencies or at illegal power levels can have consequences.
Less Common Frequencies (1.2 GHz, 2.4 GHz)
While 5.8 GHz dominates, some pilots use other frequencies for specific applications:
- 1.2 GHz: Offers significantly better range and penetration through obstacles compared to 5.8 GHz. It’s often favored for long-range FPV flights. However, antennas are much larger, and it’s prone to interference from common 2.4 GHz RC control links, requiring separate control systems (like 433 MHz or 915 MHz LRS).
- 2.4 GHz: Less common for video in FPV drones due to heavy congestion from Wi-Fi, Bluetooth, and standard RC control links. While it offers good penetration, the interference potential is very high, making it unreliable for critical video feeds.
Power Output and Range: Finding Your Sweet Spot
The power output of your FPV transmitter, measured in milliwatts (mW), directly influences the range and penetration of your video signal. However, more power isn’t always better, and finding the “sweet spot” is key to optimal FPV flying.
Milliwatts (mW) Explained
Most FPV VTXs are adjustable, offering multiple power output levels. Common options include:
- 25mW: Often the legal limit in many regions (e.g., Europe) and standard for indoor flying or FPV racing where multiple pilots need to operate without interference. Offers sufficient range for typical race tracks (100-300 meters) and minimal heat generation.
- 200mW – 600mW: A versatile range for freestyle flying, general outdoor use, and medium-range exploration. Provides a good balance of range, penetration, and heat management.
- 800mW – 1000mW (1W) +: High-power options used for long-range FPV, flying in dense environments with many obstacles, or punching through thick foliage. These generate significant heat and require good airflow and robust voltage regulation.
Range vs. Power: Not a Linear Relationship
It’s important to understand that doubling your VTX power doesn’t necessarily double your range. The relationship is logarithmic. For example, going from 25mW to 200mW will provide a significant range increase, but jumping from 800mW to 1000mW might only yield a marginal improvement. Many other factors besides power influence range:
- Antenna Quality and Type: A high-quality, properly tuned antenna is often more impactful than simply cranking up the power.
- Obstacles: Trees, buildings, and even people absorb or reflect RF signals, drastically reducing range regardless of power.
- Receiver Sensitivity: A good FPV video receiver (VRX) with high sensitivity and diversity (using two antennas) can pick up weaker signals more effectively.
- Line of Sight (LOS): The clearest video and longest range are always achieved with an unobstructed line of sight between the VTX antenna and VRX antenna.
The 25mW Standard
For racing and indoor events, 25mW is the go-to power setting. It’s often a legal requirement, minimizes heat, and, most importantly, reduces the chance of interfering with other pilots. At 25mW, the signal doesn’t travel as far, meaning pilots can be closer without affecting each other’s video, crucial for multi-pilot scenarios.
Higher Power for Long Range/Penetration
If you’re flying long-range or in challenging environments, higher power settings on your FPV transmitter become necessary. However, they come with caveats:
- Increased Heat: Higher power output generates more heat. Without adequate cooling, an FPV VTX can overheat, leading to performance degradation or even permanent damage. Ensure your VTX has good airflow.
- Increased Power Draw: More power means more current drawn from your drone’s battery, slightly reducing flight time.
- Legal Restrictions: Be mindful of local regulations on maximum transmit power.
The Role of Antennas
The antenna connected to your FPV transmitter is just as critical as the VTX itself, if not more so. A poor antenna will severely limit your range and video quality, even with a high-power VTX. Key antenna concepts include:
- Circular Polarization (CP): Most FPV pilots use circularly polarized antennas (CPAs), either Right-Hand Circularly Polarized (RHCP) or Left-Hand Circularly Polarized (LHCP). CP antennas mitigate multipath interference (reflections of the signal bouncing off objects), which is a common cause of video breakup. Crucially, your VTX and VRX antennas MUST have the same polarization (e.g., both RHCP or both LHCP) for optimal performance.
- Omnidirectional vs. Directional: Most drone VTX antennas are omnidirectional (e.g., cloverleaf, pagoda), radiating signal in all directions. For ground stations, directional antennas (e.g., patch, helical) can be used to achieve greater range in a specific direction.
- Antenna Gain: Measured in dBi, higher gain antennas focus the signal more narrowly, increasing range in that direction but making them less forgiving if the drone isn’t perfectly aligned. Most drone antennas are lower gain (1-3 dBi) for broad coverage.
Video Receiver (VRX) Importance
Remember, the FPV transmitter is only half of the equation. A good video receiver (VRX) in your goggles or ground station is equally important. Modern VRXs often feature “diversity,” meaning they have two antennas and automatically switch to the one receiving the strongest signal, significantly improving video reliability, especially when combined with different antenna types (e.g., an omnidirectional and a directional antenna).
Advanced Features and Considerations for Your FPV Transmitter
Beyond the basics, modern FPV transmitters offer a range of advanced features and design considerations that can significantly enhance your FPV experience.
Pit Mode
Pit mode is an invaluable feature, especially for racing or group flying. When activated, the FPV VTX transmits at a very low power level, typically less than 1mW. This allows you to power up your drone, adjust settings, or troubleshoot issues without interfering with other pilots’ video feeds. Once you’re ready to fly, you can switch out of pit mode to your desired power level, usually via your radio or OSD menu.
SmartAudio/TrampHV (Revisited)
While touched upon earlier, the practical benefits of these telemetry protocols cannot be overstated. Imagine needing to change your VTX channel at a race event because someone else is on your frequency. Without SmartAudio or TrampHV, you’d have to land, unplug your battery, awkwardly press tiny buttons on the VTX, replug, and hope you hit the right combination. With these protocols, you simply navigate a menu in your goggles, select the new channel, and you’re good to go – often while the drone is still powered on and ready to fly. This convenience is a game-changer for serious FPV pilots.
Clean Power Solutions
Clean power is paramount for clean video. Electrical noise from motors, ESCs, or even the flight controller can introduce lines or static into your video feed. High-quality FPV transmitters often feature built-in LC filters (Inductor-Capacitor filters) or voltage regulators that help smooth out noisy power inputs. For older or simpler VTXs, external LC filters might be necessary to achieve pristine video quality.
Heat Dissipation
As VTXs become more powerful and compact, heat management becomes a significant design consideration. Excessive heat can degrade performance, reduce reliability, and even damage the component. Many VTXs now incorporate small heatsinks or are designed with larger surface areas to dissipate heat effectively. When installing your video transmitter, ensure it has adequate airflow, especially if you plan to use higher power settings.
Durability and Form Factor
FPV drones crash. A lot. Therefore, the durability of your components is important. Some FPV VTXs are enclosed in protective metal cases, while others rely on being mounted securely within the drone’s frame. Form factor also varies widely, from tiny VTXs designed for micro-drones to larger, more robust units for freestyle or long-range quads. All-in-one (AIO) VTXs, which combine the VTX with a camera or even the flight controller, are also popular for micro-builds, simplifying wiring but potentially making troubleshooting harder.
Digital FPV Systems
While this guide primarily focuses on analog FPV transmitters, it’s essential to acknowledge the rapid rise of digital FPV systems (e.g., DJI O3 Air Unit, HDZero, Walksnail Avatar). These systems offer vastly superior image quality (HD/1080p), better penetration, and often integrated recording. In digital systems, the “transmitter” component is typically an integrated part of an “air unit” that also includes the camera and sometimes a receiver for control. While the underlying physics of RF transmission remain, the user experience and component integration are quite different. For traditional “FPV transmitter” discussions, analog 5.8 GHz VTXs are still the dominant context.
Installation, Best Practices, and Troubleshooting Tips
Proper installation and adherence to best practices are crucial for getting reliable video from your FPV transmitter. Even the best VTX will perform poorly if installed incorrectly.
Wiring Diagram Basics
Connecting your FPV VTX is typically straightforward:
- Power (VCC): Connect to a suitable voltage source (e.g., 5V, 9V, or direct LiPo voltage if compatible). Ensure you’re providing clean power.
- Ground (GND): Connect to a common ground point.
- Video Input (VIN): Connect to the video output of your FPV camera or the OSD output from your flight controller.
- SmartAudio/TrampHV (Optional): Connect to a UART TX pad on your flight controller to enable remote control of VTX settings.
Always consult the specific wiring diagram provided by your VTX manufacturer, as pin layouts can vary.
Antenna Mounting
How you mount your VTX antenna has a significant impact on video quality and range:
- Clear Line of Sight: Position the antenna as high and as far away from carbon fiber, batteries, and other electronics as possible to minimize signal blockage.
- Protection: While keeping it clear, also protect it from prop strikes and crash damage. TPU mounts are excellent for this, offering both flexibility and security.
- Orientation: While omnidirectional antennas radiate in all directions, maintaining a mostly vertical orientation generally provides the best coverage, especially at a distance.
- Secure Connection: Ensure the antenna is tightly screwed onto the VTX connector. A loose connection can cause significant video degradation or even damage the VTX if powered without an antenna.
Powering Up Safely: Always Attach Antenna First!
This is a critical rule: NEVER power on your FPV transmitter without an antenna attached. An FPV VTX works by radiating energy. If there’s no antenna, that energy has nowhere to go and will reflect back into the VTX, causing it to overheat rapidly and often leading to permanent damage to the RF amplifier. Always connect your antenna before plugging in your drone’s battery.
Best Practices for Clean Video
- Keep Wires Tidy: Route VTX power and video wires away from noisy components like ESCs, motors, and high-current battery leads.
- Use LC Filters: If you’re experiencing lines in your video, an external LC filter can often clean up dirty power from the main battery.
- Match Antenna Polarization: Ensure both your VTX and VRX antennas are either RHCP or LHCP. Mismatched polarization severely degrades signal quality.
- Proper Channel Selection: As discussed, choose a clear channel, especially when flying with others.
- Insulate Exposed Wires: Prevent shorts by properly insulating all connections, especially those near carbon fiber.
Common Troubleshooting Scenarios
Even with careful setup, issues can arise. Here are some common problems and their solutions:
- “No Video” (Black Screen):
- Check VTX power: Is it receiving voltage?
- Check camera connection: Is the camera powered and properly connected to the VTX?
- Verify VTX/VRX channels: Are they on the exact same band and channel?
- Check antenna: Is it connected and not damaged?
- “Lines or Static in Video”:
- Power noise: Try an LC filter or power the VTX from a cleaner source.
- Loose antenna: Tighten connections.
- Interference: Change channel or power level. Check for nearby Wi-Fi or other RF sources.
- Damaged antenna: Inspect for bends or breaks in the elements.
- “Poor Range / Early Video Breakup”:
- Antenna issues: Damaged antenna, mismatched polarization, or poor mounting.
- Low power setting: Is your VTX on 25mW when you need more?
- Obstacles: Are you flying behind too many trees or buildings?
- VRX issues: Is your receiver working correctly? Are diversity antennas properly positioned?
- “Overheating VTX”:
- Insufficient airflow: Ensure the VTX isn’t completely enclosed.
- Too high power setting: If you don’t need maximum range, lower the power.
- Faulty VTX: Could be a manufacturing defect.
FPV Transmitter Power Output Comparison
To help you choose the right power setting for your needs, here’s a quick comparison:
| Power Output (mW) | Typical Range (Indicative, with good antennas/LOS) | Best Use Case | Key Considerations |
|---|---|---|---|
| 25mW | 100-300 meters | Indoor flying, FPV racing (multiple pilots), Legal limit in many regions | Minimal heat, low interference, shortest range. |
| 200mW | 300-800 meters | General freestyle, park flying, medium-range exploration | Good balance of range and heat, versatile. |
| 600mW | 800-1500 meters | Longer-range freestyle, light penetration flying | Noticeable heat, requires good airflow. |
| 800mW – 1000mW (1W) | 1.5km – 3km+ | Long-range cruising, heavy penetration (trees/buildings) | Significant heat, high power draw, check local regulations. |
*Note: Actual range varies greatly depending on environment, antenna quality, and receiver performance. These figures are illustrative.
Conclusion
The FPV transmitter is far more than just a simple component; it’s the lifeline of your FPV experience, translating your drone’s vantage point into the breathtaking, real-time visuals you see in your goggles. From its core function of converting video to RF signals, through its various components like antenna connectors and power inputs, to the critical aspects of frequency selection, power output, and advanced features like Pit Mode and SmartAudio, understanding this device is paramount for any serious FPV pilot.
Choosing the right FPV VTX involves balancing factors like power, form factor, features, and budget. Installing it correctly, adhering to best practices like attaching the antenna before powering on, and diligently troubleshooting issues will ensure you get the clearest, most reliable video feed possible. As the FPV world continues to evolve with the advent of digital systems, the principles governing wireless video transmission remain fundamental.
Armed with this comprehensive knowledge, you’re now better equipped to select, install, and optimize your FPV transmitter. Go forth, experiment, tune your setup, and most importantly, enjoy the incredible, immersive world that FPV flying offers. The skies await your vision!
🎥 Related Video: Which FPV transmitter/receiver to buy – FrSky/TBS Crossfire/ExpressLRS for beginners
📺 NordFPV
There are many radio or control protocols for FPV. Among the most popular are FrSky, Crossfire and the recently introduced …
Frequently Asked Questions
What is an FPV transmitter primarily used for?
An FPV transmitter, often called a VTX (Video Transmitter), is a crucial component on an FPV drone. Its main purpose is to send the live video feed from the drone’s camera directly to the pilot’s FPV goggles or screen, allowing for the immersive “first-person view” experience.
How does an FPV transmitter send video from the drone?
The FPV transmitter works by taking the analog video signal from the drone’s camera and converting it into a radio frequency (RF) signal. This RF signal is then broadcast wirelessly through an antenna, which is subsequently picked up by the receiver in the pilot’s FPV goggles or monitor.
What frequencies do FPV transmitters typically operate on?
Most FPV transmitters commonly operate on the 5.8 GHz frequency band, which provides good video quality with relatively small antennas. Some systems might also use 2.4 GHz for longer range applications, though 5.8 GHz remains standard for most racing and freestyle FPV drones.
Is an FPV transmitter the same as the drone’s remote control?
No, an FPV transmitter is distinct from your drone’s remote control (often called an RC transmitter or radio controller). The FPV transmitter (VTX) is mounted on the drone and sends video to your goggles, while the RC transmitter is held by the pilot and sends control commands to the drone.
What factors influence the range and signal quality of an FPV transmitter?
Several factors impact an FPV transmitter’s range and signal quality, including its power output (measured in mW), the quality and type of antennas used on both the transmitter and receiver, and environmental obstacles like trees or buildings. Interference from other wireless devices can also degrade the signal.
Can I adjust the settings of my FPV transmitter, such as channels or power?
Yes, most FPV transmitters allow you to adjust settings like the operating channel and power output. This is typically done through on-screen display (OSD) menus, physical buttons on the VTX, or digitally via protocols like SmartAudio or Tramp HV, which connect to the flight controller.


