Gone are the days of risky ladder climbs and tedious manual checks for roof inspections. Drones have revolutionized the way we assess the health of our rooftops, offering unparalleled safety, speed, and precision. But owning a drone is only half the battle; to truly get a clear picture of potential damage or wear, you need to master the best drone camera settings for roof inspection.
Optimizing your drone’s camera settings is crucial for capturing the high-quality images and videos needed to identify everything from cracked tiles to blocked gutters. We’re talking crisp, detailed visuals that make identifying issues a piece of cake, allowing you to make informed decisions without ever leaving the ground. In this article, we’ll dive into what makes for excellent aerial footage and review five top tools – from dedicated inspection cameras to feature-packed drones – that can help you achieve the clarity you need.
Understanding Essential Drone Camera Settings for Roof Inspection
Before we jump into our top picks, let’s briefly touch upon what makes for great inspection footage. The right camera settings will significantly impact your ability to spot details. Here’s what to look out for:
- Resolution: Aim for 4K video or at least 1080p HD photos for maximum detail. Higher resolution means you can zoom in on images without losing clarity.
- Frame Rate: For video, 30fps (frames per second) is generally good, but 60fps can provide smoother footage, especially if you’re flying fast or in windy conditions.
- Field of View (FOV): A wider FOV allows you to cover more ground, while a narrower one can help you focus on specific problem areas. Many drones offer adjustable lenses.
- Stabilization: A stable camera, often achieved through a mechanical gimbal and Electronic Image Stabilization (EIS), is non-negotiable for blur-free images, even if the drone encounters slight wind.
- Lighting & Exposure: Good lighting is key. Adjust ISO and shutter speed to prevent overexposed bright spots or underexposed shadows that could hide crucial details.
- Focal Range: Especially important for close-up work with borescope cameras; ensure your device can focus clearly at short distances.
Now, let’s explore some fantastic products that can help you nail those optimal settings for your next roof inspection!
Our Top Picks for Roof Inspection
Endoscope Borescope Camera with Light, 4.3″ IPS 1920P HD…

While not a drone, this endoscope camera is an absolute game-changer for detailed, up-close inspections once a drone has identified a potential issue. Think of it as your magnifying glass for those hard-to-reach nooks and crannies that drones can’t get to, like inside wall cavities near a suspected leak point or under eaves. Its high-definition display and powerful adjustable LED lights ensure you get crystal-clear visuals even in the darkest, tightest spaces, making it a perfect companion for a comprehensive roof inspection system. No Wi-Fi or smartphone needed here, just pure plug-and-play convenience!
- Key Features:
- 4.3-inch IPS screen with 170° wide viewing angle for real-time HD inspection.
- 8 adjustable LED lights and ultra-thin 0.31in diameter probe.
- IP67 waterproof rating for humid environments.
- 16.4FT semi-rigid cable that holds its shape.
- Ergonomic handle and rechargeable battery (3-4 hours continuous use).
- Optimal focal range of 1.2-3.9 inches for clearest images.
- Pros:
- Excellent for detailed, internal inspections where drones can’t reach.
- High-definition display provides clear visuals.
- Adjustable LED lights ensure visibility in dark areas.
- Long, semi-rigid cable offers great flexibility.
- No complicated setup (Wi-Fi/app free).
- Cons:
- Does not support photo/video capture directly.
- Limited to very close-range inspection; not for initial aerial assessment.
- User Impressions: Users love its ease of use and the clarity of the image for such a compact device. Many homeowners and DIY enthusiasts find it incredibly helpful for diagnosing household issues that would otherwise require tearing down walls or difficult access. The long battery life is also frequently praised.
- See it on Amazon here
Drone with Camera, 1080P HD FPV Camera, One Key Take…
This drone is a fantastic entry point for beginners looking to conduct basic roof inspections without breaking the bank. It comes equipped with a 1080P HD camera featuring a 90° adjustable lens, which is great for getting different perspectives of your roof. What truly makes it stand out for a novice is its optical flow positioning, ensuring a remarkably steady hover for clearer shots, even if you’re still getting the hang of flying. For those just starting out with aerial inspection, its user-friendly controls like one-key take-off and landing make learning a breeze.
- Key Features:
- 1080P HD camera with 90° adjustable lens for wider views.
- Optical flow positioning for stable hovering and clearer footage.
- Beginner-friendly controls: one-key take-off/landing, headless mode, 3 speed levels.
- Fun FPV modes via “Bokigibi” app (trajectory flight, circle fly, 360° flips).
- Comes with 2 batteries for up to 24 minutes of flight time.
- Lightweight (135g) and foldable design; no FAA registration required.
- Pros:
- Very easy to fly, ideal for beginners in roof inspection.
- Adjustable camera lens helps capture various angles.
- Stable flight thanks to optical flow positioning.
- Extended flight time with two batteries.
- Portable and does not require FAA registration.
- Cons:
- 1080P resolution might lack the fine detail of 4K for professional inspections.
- FPV connection can depend on phone signal quality.
- User Impressions: Customers frequently highlight how surprisingly stable this drone is for its price point, making it perfect for learning. The dual batteries are a major plus, allowing for more practice and exploration time. Its compact size and ease of transport are also often mentioned as benefits.
- See it on Amazon here
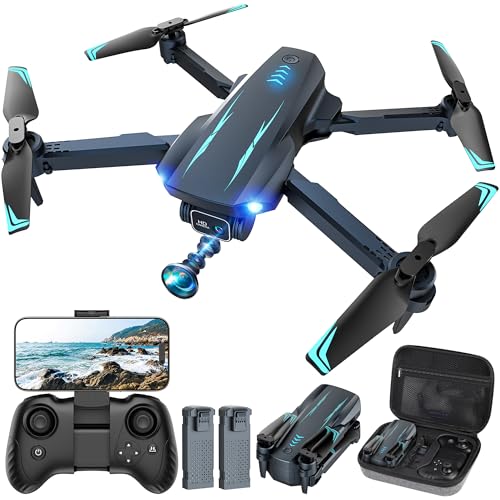
%CODE Bingchat Upgraded Professional Drones with Camera for…

Now, if you’re serious about your roof inspection game, the Bingchat Upgraded Professional Drone is in a league of its own. This beast offers truly professional-grade capabilities, boasting a real 4K HD camera stabilized by a 3-axis gimbal and EIS Anti-Shake technology. This combo is essential for achieving the best drone camera settings for roof inspection as it eliminates blur and captures incredibly sharp details, even in challenging conditions. Add to that its innovative payload release function, 360° laser obstacle avoidance, and an astounding 84 minutes of flight time, and you’ve got a powerhouse designed for extensive and safe aerial inspection.
- Key Features:
- Real 4K HD Camera with 3-Axis Gimbal & EIS Anti-Shake for stable, clear footage.
- 130° FOV lens, larger COMS sensor, and 50x digital zoom.
- 2025 New Upgraded Tablet Touch Screen Controller with Android system (Google Play support).
- Payload Release Function and 360° Laser Obstacle Avoidance.
- 84 minutes total flight time with two 11.1V 8000Mah batteries.
- 5 Miles long range & 2624 FT height transmission.
- Rainproof, Night Vision, Level 7 Wind Resistance, Low Battery alarm, Auto-return, and more smart functions.
- FAA Certificated Completed.
- Pros:
- Exceptional 4K camera quality with superior stabilization (gimbal + EIS).
- Advanced obstacle avoidance dramatically improves safety.
- Incredibly long flight time for extensive aerial coverage.
- Touch screen controller with Android system enhances usability.
- Robust wind resistance and rainproof design for varied conditions.
- FAA certified, offering peace of mind for commercial use.
- Cons:
- Higher price point due to professional features.
- Larger size and weight may require more careful handling.
- User Impressions: Professionals and serious enthusiasts are blown away by the camera quality and the extended flight duration. The obstacle avoidance is frequently lauded as a life-saver, preventing costly crashes. The Android controller is a huge hit, turning the drone piloting experience into something much more intuitive and versatile.
- See it on Amazon here
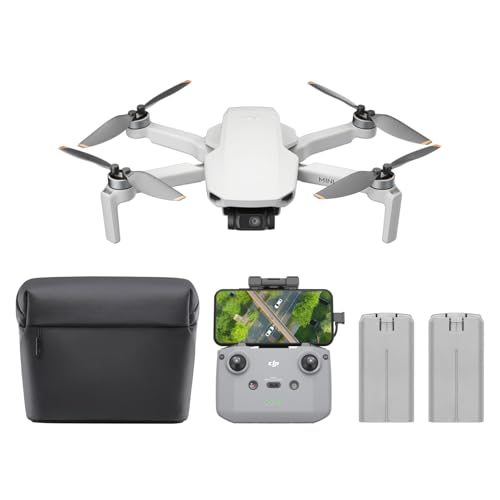
LANSAND Brushless Motor Drone with Camera for Adults 4K…

For those seeking a blend of high-quality imaging and user-friendliness without needing FAA registration, the LANSAND Brushless Motor Drone is an excellent choice. It delivers crisp 4K UHD pictures and 20481152 video, allowing for detailed aerial inspection* of your roof. What truly sets it apart are its powerful brushless motors, which not only ensure stable flight even in moderate wind conditions (a huge plus for consistent image quality) but also offer greater durability compared to brushed motors. Its robust flight stability and 120° FOV adjustable lens make it simple to capture comprehensive roof views.
- Key Features:
- Under 249g weight, no FAA registration required.
- 4K UHD Camera (38402160 photos, 20481152 video) with 120° FOV 90° adjustable lens.
- 2.4GHz Remote and 5GHz FPV Transmission (up to 490-720 ft range).
- Stable flight with powerful brushless motors and optical positioning.
- Easy for beginners: headless mode, 3 speed modes.
- Emergency alerts for out-of-control range/power or signal interruption.
- Fun APP control features (3D flips, auto rotation, filters, music).
- Two batteries provide up to 40 minutes of flight time.
- Pros:
- No FAA registration required, making it easy to get started.
- High-resolution 4K camera with an adjustable lens for versatile shooting.
- Brushless motors offer superior stability and durability, great for consistent footage.
- Good FPV transmission range for real-time monitoring.
- User-friendly for beginners with optical positioning and headless mode.
- Cons:
- Video resolution (2048*1152) is not full 4K, despite the 4K photo capability.
- FPV range might be shorter compared to professional models.
- User Impressions: Reviewers frequently commend the drone’s stability, attributing it to the brushless motors. The 4K photos are highly appreciated for detailed inspections, and the lack of FAA registration is a big selling point for many. Beginners find it incredibly forgiving and easy to control, which is essential for focused inspection work.
- See it on Amazon here
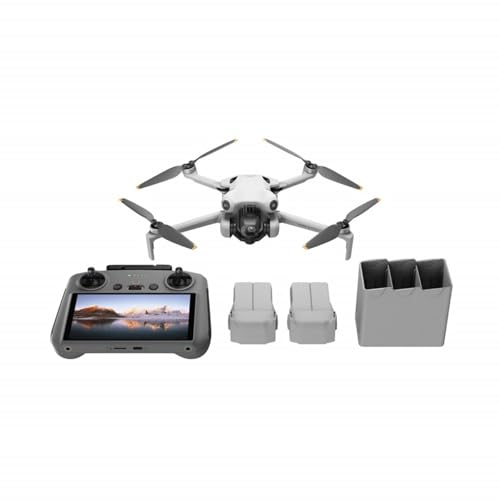
GPS Drones with Camera for Adults 1080P, 4.5″LCD Screen…

This GPS drone with its integrated 4.5″ LCD screen remote control offers a fantastic all-in-one package, especially for those who prefer not to rely on a smartphone for viewing footage. This dedicated screen makes flying and capturing roof inspection footage incredibly straightforward, enhancing the best drone camera settings for roof inspection by giving you a clear, dedicated display. Its reliable GPS functionality means you’ll never lose your drone and can utilize smart flight modes like “follow me” or “point-of-interest,” perfect for systematic aerial inspection patterns around a roof. Plus, its robust brushless motors and beginner-friendly features make it a solid choice for consistent performance.
- Key Features:
- 4.5″ LCD screen on the remote control for direct photo/video capture and FPV.
- 120° Wide-angle & 90° Electric Adjustable camera (1280*720 HD photos/videos on screen, up to 4K HD photos via smartphone).
- GPS Auto-Return Drone with Follow Me, Point-of-Interest (POI) flight, and Circle Flying.
- Quick Flight: no mobile phone connection needed, faster startup.
- GPS & Optical Flow System for precise hovering and stable flight.
- Beginner-friendly: Headless Mode, One key Start, Speed Adjustment.
- Under 250g, no FAA registration needed; foldable design with carrying case.
- 2200 mAh battery for 22 mins flight time; brushless motor for durability and wind resistance.
- Pros:
- Dedicated LCD screen on the remote eliminates smartphone reliance.
- Reliable GPS features enhance flight safety and automated inspection paths.
- Excellent stability from GPS and optical flow positioning.
- Brushless motors provide good wind resistance and longevity.
- Lightweight and foldable, making it highly portable.
- Cons:
- Native video recording resolution on the LCD screen is 720p (though 4K photos via smartphone).
- Single battery offers 22 minutes, which is decent but not as long as some competitors.
- User Impressions: Users love the convenience of the built-in screen, praising it for making flight and capture so much easier and faster. The GPS features are a big hit for peace of mind and for executing systematic roof inspections. Beginners find it very approachable, and the overall stability is frequently highlighted as a major advantage.
- See it on Amazon here
Tips for Achieving the Best Drone Camera Settings for Roof Inspection
To get the most out of your drone and its camera settings for roof inspection, consider these practical tips:
- Pre-Flight Checklist: Always check battery levels, propeller integrity, and clear the camera lens before taking off.
- Optimal Lighting: Fly on overcast days or during the “golden hours” (shortly after sunrise or before sunset) to avoid harsh shadows and glare, which can obscure details.
- Consistent Altitude: Maintain a consistent altitude and distance from the roof to ensure uniform image scaling and easier comparison of different sections.
- Systematic Flight Path: Plan your flight path to cover the entire roof systematically. Overlapping passes ensure no area is missed. Waypoint flying or circle modes (if available) are great for this.
- Manual Mode (if comfortable): For more advanced users, switching to manual camera settings allows for greater control over exposure, ISO, and shutter speed, perfect for adapting to tricky lighting conditions.
- Review On-Site: If possible, review images and video on a larger screen (like the Bingchat’s tablet controller or a laptop) immediately after the flight to ensure you’ve captured everything clearly.
FAQ Section
Q1: How do I choose the right drone for roof inspection?
A: Consider camera resolution (4K is ideal), flight time (longer is better for larger roofs), stability features (gimbal, GPS, optical flow), and ease of use (especially for beginners). Obstacle avoidance and wind resistance are also key for safety and image quality.
Q2: What are the essential camera settings for clear roof images?
A: Focus on high resolution (4K for photos/video), proper exposure (adjusting ISO and shutter speed to avoid over/underexposure), a stable frame (via gimbal or EIS), and choosing the right Field of View (FOV) to capture detail or wider areas as needed.
Q3: Is FAA registration required for drones used in roof inspection?
A: If your drone weighs over 0.55 pounds (250 grams), you generally need to register it with the FAA, even for recreational use. For commercial roof inspections, you’ll also need a Part 107 certificate. Drones under 250g (like some reviewed here) are often exempt from registration.
Q4: How does weather affect drone roof inspections?
A: Wind is the biggest factor, affecting stability and potentially leading to blurry images or even crashes. Rain can damage electronics, and extreme temperatures can impact battery life. Always check the weather forecast and avoid flying in adverse conditions.
Q5: What’s the best flight path for a thorough roof inspection?
A: A grid pattern is highly effective. Fly parallel lines across the roof, ensuring each pass overlaps the previous one by about 20-30% to guarantee full coverage. Also, consider specific passes around chimneys, vents, and edges for detailed close-ups.
Q6: Can I use a drone for commercial roof inspections?
A: Yes, absolutely! Drones are widely used for commercial roof inspections. However, for commercial operations in the U.S., you must possess an FAA Part 107 Remote Pilot Certificate. Always check local regulations for specific requirements.
Q7: What’s the difference between optical flow and GPS positioning?
A: GPS positioning uses satellite signals to maintain the drone’s position outdoors, offering precise hover and navigation over longer distances. Optical flow positioning uses downward-facing cameras to detect patterns on the ground, allowing the drone to hold its position accurately indoors or at lower altitudes where GPS signals might be weak. Many advanced drones combine both for superior stability.
Conclusion
Whether you’re a homeowner looking to keep an eye on your property or a professional offering roof inspection services, investing in the right drone or inspection camera, and understanding the best drone camera settings for roof inspection, will make all the difference. From beginner-friendly options with reliable stability to professional-grade machines with 4K gimbals and extended flight times, there’s a tool out there to meet your needs. By optimizing your aerial views, you’ll ensure safe, efficient, and highly accurate damage assessment every single time. Happy flying and inspecting!