Drones have become an essential part of our lives, whether we use them for photography, videography, or even for fun. One of the best drone brands available in the market is DJI. However, we know that accidents happen, and drones are not immune to them.
Crashing your drone can lead to significant damage, and one of the most common problems faced by drone enthusiasts is a broken or damaged arm. But don’t worry! You don’t have to let that ruin your day, as replacing your DJI drone arm is a straightforward process that you can do yourself. In this step-by-step guide, we’ll provide you with all the information you need to fix your drone arm in no time.
So, grab your tools and let’s get started!
Assessing the Damage to Your Drone Arm
If you’re experiencing issues with your drone’s arm, it’s important to assess the damage and determine if a DJI drone arm replacement is necessary. Damage to the arm can greatly impact the stability and flight of your drone, so it’s crucial to take care of any issues as soon as they arise. Signs of damage may include visible cracks or breaks, unusual noises during flight, or a rough landing.
If you suspect that your drone’s arm is damaged, it’s best to stop using it immediately and seek professional assistance. A reputable drone repair service can assist you in diagnosing and fixing any issues with your drone’s arm, ensuring that you can get back to flying safely and effectively. Don’t let a damaged arm keep you grounded – act quickly and address the issue head-on with a DJI drone arm replacement.
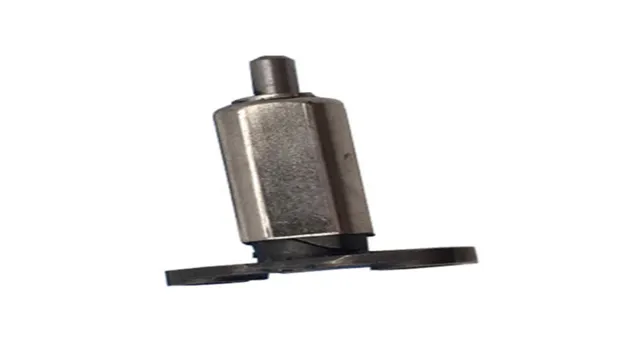
Identifying the Part You Need
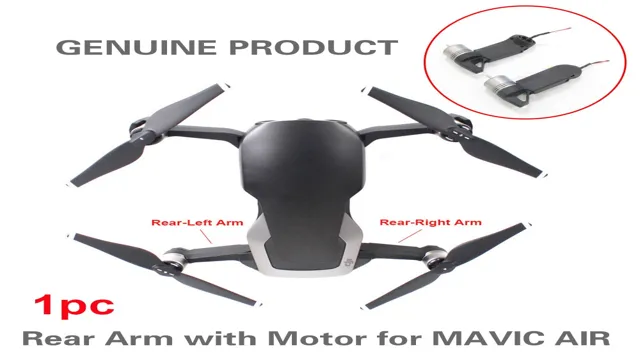
When you crash your drone, the first thing you need to do is assess the damage to the arms. Most drones have four arms, and each of them plays a critical role in keeping your drone stable during flight. So it is important to identify the damaged arm so you can replace it effectively.
Look for any visible cracks, breaks, or bends in the arm. If the arm is completely broken, you will need to replace it entirely. However, if the damage is minor, you may be able to repair it.
Whichever option you choose, make sure to choose the right arm for your drone model. This is crucial because different drone models require different arms, and using the wrong one could cause further damage or even lead to another crash. Taking the time to properly assess and identify the damage to your drone’s arms will ensure that you get the correct part needed for repair or replacement and get you back to flying in no time.
Ordering Your Replacement Arm
If you’re looking to replace a damaged arm on your drone, the first step is to assess the damage and determine the severity of it. Take a close look at the arm and see if there are any visible cracks, dents or other issues that could indicate structural damage. It’s also important to check the electronics in the arm to ensure they are still functioning.
Once you have a clear understanding of the extent of the damage, it’s time to order a replacement arm. Make sure you find the right one for your drone model and that it is compatible with the other components. ordering a replacement arm may seem daunting, but with some research and patience, you can get your drone back in the air and ready for your next adventure.
Tools You Will Need to Complete the Repair
If you need to replace the arm on your DJI drone, there are a few tools you will need in order to complete the repair. First, you will need a set of screwdrivers, including both Phillips and flathead options in various sizes. You may also need a set of pliers to help with removing and reattaching certain components.
Depending on the specific DJI model you are working with, you may also need a soldering iron and solder to connect the new arm to the drone’s wiring. It’s important to make sure you have all the necessary tools before attempting the repair in order to avoid causing any further damage to your drone. With the right tools and some patience, replacing a DJI drone arm is a manageable DIY task.
Required Tools
When it comes to repairing and maintaining electronic devices, having the right tools is essential. For this particular repair, you will need a few different tools to get the job done. Firstly, you will need a set of screwdrivers that fit the specific screws used in your device.
This is important to avoid stripping or damaging the screws and causing further problems. You may also need a spudger or plastic opening tool to gently pry open delicate parts without scratching or breaking them. A pair of tweezers can also come in handy for manipulating small parts and components.
Additionally, having a multimeter on hand can be helpful for testing electrical components and diagnosing any problems. By ensuring you have all the necessary tools before you begin the repair, you can avoid frustration and mishaps along the way and complete the job successfully.
Additional Tools to Consider
When it comes to repairing your device, having the right tools can make all the difference. In addition to the standard screwdrivers, tweezers, and prying tools, there are a few additional tools you may need to complete the repair. One essential tool is a heat gun, which is used to soften adhesives and make it easier to remove components without causing damage.
Another useful tool is an anti-static wrist strap, which can protect your device from electrostatic discharge (ESD) and prevent damage to sensitive components. Additionally, a magnifying glass or microscope can be helpful for identifying small parts and reading tiny markings on components. Finally, a set of spudgers, which are small pry tools, can help you safely remove delicate components without causing damage.
With the right tools at your disposal, you’ll be able to take on any repair with confidence and ensure that your device is working properly again in no time.
Safety Precautions to Keep in Mind
When it comes to repairing appliances at home, it is important to prioritize safety precautions to prevent accidents or injuries. Firstly, always ensure that the power supply is turned off before working on any appliance to avoid electrical shocks. Additionally, wearing protective gear such as gloves and goggles can protect you from possible sharp edges or debris.
As for the tools needed to complete the repair, it depends on the appliance. However, some common tools you might need include screwdrivers, pliers, and wrenches. When working with these tools, never force them and make sure they are in good condition to prevent any accidents.
Remember, taking proper precautions can ensure a successful repair and most importantly, keep you safe while doing it.
Replacing Your DJI Drone Arm
If you’re an avid drone pilot, then you know how important it is to keep your equipment in top condition – and that includes replacing any broken or damaged components. One crucial part of your drone is the arm, which supports the motor and propellers. If your DJI drone arm is damaged, then you’ll need to replace it as soon as possible to prevent further damage to your drone.
Luckily, replacing the arm is a relatively simple process that only requires a few tools and some patience. First, you’ll need to order a replacement arm from DJI’s website or another trusted supplier. Once you have the new arm, you’ll need to carefully remove the damaged arm from your drone and replace it with the new one, making sure to follow all safety precautions and guidelines.
With a bit of practice and care, you can have your DJI drone up and running in no time!
Step 1: Preparing Your Work Area
Replacing Your DJI Drone Arm can seem daunting if you haven’t done it before. It’s important to prepare your work area properly before starting the process. Make sure you have a clear and well-lit space, free from clutter or any distractions.
Gather all the necessary tools and equipment you’ll need, such as a screwdriver set, replacement arm, and any other parts required. Lay out a soft cloth or mat under your drone to prevent any damage to its body or components. Double-check that you have the right replacement arm for your specific DJI model.
Taking the time to properly prepare your work area will make replacing your DJI drone arm a smoother and more successful process.
Step 2: Removing the Damaged Arm
When it comes to replacing your damaged DJI drone arm, the first step is to remove the affected arm from your drone. This process may seem daunting, but with the right tools and instructions, it can be done effectively. Start by turning off your drone and removing the propellers from the damaged arm.
Then, use a hex key or screwdriver to remove the screws that hold the arm in place. Once you’ve removed the screws, carefully pull the arm away from the body of the drone. Be gentle to avoid damaging any other components.
Once the arm is removed, you can assess the extent of the damage and prepare to install the new arm. Remember to take your time and follow step-by-step instructions to ensure a successful replacement. With a little patience and care, you’ll have your DJI drone back up and flying in no time!
Step 3: Installing the Replacement Arm
Replacing your DJI drone arm can be a daunting task, but with a few simple steps and the right tools, it can be done easily. The first step is to remove the damaged arm from the drone by carefully unscrewing it from the body. Once the damaged arm is removed, it’s time to install the replacement arm.
Before installing the arm, make sure that the connectors and screws are in good condition. If you notice any damage, replace them before installing the new arm. Next, carefully align the arm with the insulation and attach it with screws.
Be sure to tighten the screws securely, but don’t overtighten as this can cause damage to the arm or the drone’s body. Once the replacement arm is securely in place, test the drone to make sure everything is functioning correctly. With a bit of patience and precision, you can easily replace a damaged DJI drone arm and get back to flying in no time.
Step 4: Testing Your Drone
If you own a DJI drone and find yourself needing to replace one of its arms, don’t worry – it’s a fairly straightforward process. The first step is to identify which arm needs to be replaced and order a replacement part from DJI or a certified retailer. Once you have the new arm, you’ll need to remove the old one from your drone.
Make sure to keep track of any screws or other small parts so you don’t lose them. Once the old arm is removed, carefully attach the new arm in its place. It’s important to make sure everything is securely fastened before testing your drone, both for safety reasons and to avoid damaging your equipment.
Once the new arm is in place, perform a few test flights to make sure everything is working properly. It’s always better to be safe than sorry, so take the time to do this step carefully and thoroughly.
Conclusion and Final Thoughts
In conclusion, replacing the arm of a DJI drone is no easy task, but luckily it can be done with the right tools and know-how. So if you happen to crash your drone and break an arm, don’t fret! Just remember to stay calm, follow the instructions, and soon enough you’ll be back up in the air. And as always, happy flying (and try to avoid crashing)!”
FAQs
How do I know if I need to replace an arm on my DJI drone?
If your DJI drone is not flying as it should, and you notice any physical damage to one or more arms, it may be necessary to replace the arm(s).
Can I replace the arms on my DJI drone myself?
Yes, you can replace the arms on your DJI drone yourself if you have the proper tools, knowledge, and experience. It is recommended that you follow a tutorial or seek professional help if you are unsure.
Where can I purchase replacement arms for my DJI drone?
Replacement arms for DJI drones can be purchased from most drone retailers as well as online marketplaces like Amazon and eBay.
How much does it typically cost to replace an arm on a DJI drone?
The cost of replacing an arm on a DJI drone varies depending on the model and type of drone. On average, replacement arms can cost between $20 to $100, not including any labor costs if you choose to have a professional replace the arm for you.
Is it possible to repair a damaged drone arm instead of replacing it?
In some cases, it may be possible to repair a damaged DJI drone arm instead of replacing it. However, the extent of the damage and type of drone will determine if repair is a viable option. It is recommended that you consult with a professional before attempting any repairs on your own.