Have you ever wanted to capture breathtaking aerial footage or race your drone to its limits, but struggled with radio connectivity issues? Look no further! Connecting your radio to your FPV drone can give you the control and confidence you need to get the most out of your flights. While it may seem daunting at first, with the right tools and a bit of patience, you can easily establish a reliable connection between your radio and drone. In this blog, we’ll walk you through the process step-by-step and provide tips for troubleshooting common issues.
Ready to take your aerial experience to the next level? Let’s get started!
Choose Compatible Radio Model
Connecting a radio to an FPV drone requires choosing a compatible radio model. Not all radios are compatible with all drones, so it’s important to do your research and make sure you get a radio that will work with your specific drone. One thing to consider is the frequency of the radio.
If the radio and drone use different frequencies, they won’t be able to communicate with each other. Another factor to look at is the protocol the radio uses. Different drone manufacturers use different protocols, so you need to make sure your radio is compatible with the protocol your drone uses.
Doing your due diligence in choosing the right radio model will ensure you can control your drone effectively and get the most out of your FPV experience.
Research and compare radio models for compatibility with your drone brand and frequency range.
When it comes to choosing a radio model for your drone, compatibility is key. Doing your research is crucial to ensure that the radio model you select is compatible with your drone brand and frequency range. Not all radio models work with all drones, so it’s essential to double-check before you make your purchase.
Some drones may use proprietary radio frequencies, while others may be more flexible. It’s crucial to understand what frequency range your drone uses and to verify that it’s compatible with the radio model you’re considering. Doing your homework will save you a lot of frustration and money in the long run.
Make sure you choose a radio model that’s compatible with your drone to ensure a seamless and enjoyable flying experience.
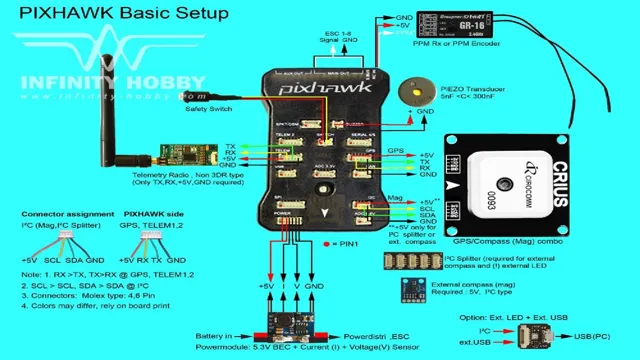
Install Radio Firmware and Set Channels
If you’re just starting out in FPV drone flying, it can be overwhelming to figure out how to connect radio to your drone and get it working properly. However, with a bit of guidance, this process can be straightforward. First, you’ll need to install the radio firmware onto your transmitter.
Once you’ve done this, you’ll need to set up the channels on your radio so that they correspond to your drone’s receiver. This can involve assigning different functions to different switches or knobs on your radio so that you can easily control your drone’s movements. By taking the time to properly set up your radio, you’ll be able to enjoy a more responsive and intuitive flying experience.
So, don’t be intimidated when it comes to connecting your drone and radio – with a bit of practice, you’ll be up in the air in no time!
Use manufacturer instructions to flash firmware and bind the radio to the drone and set channels for communication.
Installing radio firmware and setting channels is an essential process in getting your drone up and flying smoothly. The manufacturer’s instructions must be followed carefully to avoid any mishaps. First, it is crucial to flash the firmware to ensure that the radio is working correctly with your drone.
This process involves updating the software of the radio transmitter or receiver to the latest version. The firmware update can provide better performance, stability, and security for the radio equipment, making it less prone to errors or interference. Once the firmware is updated, the radio needs to be bound to the drone.
This process effectively pairs the radio and drone, ensuring that they communicate correctly with each other. It is also important to set the channels for communication between the radio and drone, ensuring that no interference occurs, causing signal loss or transmission failures. By carefully following the manufacturer’s instructions, you can confidently install the radio firmware, bind the radio to the drone, and set the correct channels for successful and safe flight.
Verify Connection and Test Range
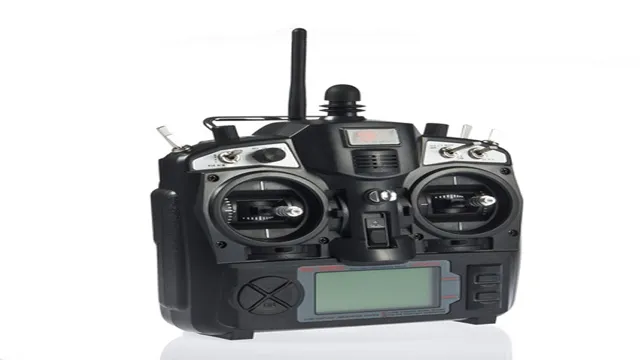
Connecting your radio to your FPV drone can be a bit tricky, but once you’ve done it a few times, it becomes second nature. The first thing you need to do to verify your connection is to turn on your radio and your drone. Once they’re both powered up, check that the LEDs on both devices are blinking.
This indicates that they’re transmitting and receiving signals. Next, go into your radio settings and make sure that the receiver is correctly bound to your radio. You can do this by selecting the bind option on your radio and following the instructions.
Once your receiver is bound, you can test the range by taking your drone outside and flying it around. Make sure to keep a close eye on your drone during this process, as crashes can happen. If you find that your range is limited, try adjusting the antenna on your receiver or moving the position of your radio.
With a little practice, you’ll be an expert at connecting your radio to your FPV drone.
Ensure successful connection and communication between radio and drone by performing pre-flight checks and testing range.
Before taking your drone off the ground, it is crucial to verify the connection between your radio and the drone. Be sure to perform a thorough pre-flight check before every flight to ensure communication between both devices. Even if you have flown your drone before, it is always recommended to double-check everything before each flight.
Testing the range is also an important aspect of the process. Taking your drone out of range could result in a loss of communication, causing it to crash and possibly damage the device beyond repair. Therefore, testing the range will give you an idea of how far the drone can fly before losing communication.
Keep in mind that things like weather conditions and obstacles may affect the range, so it is essential to stay aware of your surroundings and test the range periodically throughout your flight. By performing these pre-flight checks and testing the range, you can ensure a successful and enjoyable drone flying experience without any mishaps.
Troubleshoot Connection Issues
Connecting your radio to your FPV drone is essential for a successful and enjoyable flying experience. However, connection issues can occur and can be frustrating to troubleshoot. Firstly, ensure that your radio and drone are both on the same frequency band.
If they are not, you won’t be able to connect them. Secondly, ensure that your radio is bound to your drone. If it is not, you won’t be able to control your drone with the radio.
Thirdly, check that your antenna is securely connected to your radio and is pointing in the right direction. A poor signal can also cause connection issues. Lastly, check the batteries on both your radio and drone as low battery levels can lead to connection issues as well.
By checking these key areas, you can troubleshoot any connection issues and enjoy a seamless flying experience with your FPV drone.
Identify and troubleshoot connection issues with your radio, drone, or interference using manufacturer resources and support.
“connection issues”, “manufacturer resources and support” Having connection issues with your radio or drone can be frustrating, especially when you’re trying to use them for work or leisure. Fortunately, most manufacturers have resources and support available to help troubleshoot these issues. The first step in resolving any connection problem is to check for interference.
This could be caused by other electronic devices or even environmental factors such as weather conditions or geographical barriers. If interference is the issue, try moving to a different location or turning off other electronic devices. If this doesn’t solve the problem, it’s time to check the manufacturer’s resources and support options.
Many companies offer online forums, support articles and tutorials, and even customer service hotlines that can assist with troubleshooting and resolving any connection issues. Remember to always check the manufacturer’s website for the latest updates and firmware for your device. With a little time and patience, you can get your radio or drone back up and running smoothly.
Conclusion
In conclusion, connecting a radio to an FPV drone is like a tango dance between technology and creativity. It’s a match made in heaven where precision and finesse come together to create a symphony in the skies. By following the simple steps of pairing the radio and binding it to the drone, you can unleash your inner Maverick and take off on a thrilling flight adventure.
With your radio in hand and your drone in the air, the sky’s the limit – so embrace your flying prowess and connect that radio to your FPV drone like a pro!”
FAQs
What kind of radio do I need to connect to an FPV drone?
You can use any radio that supports the same protocol as your drone’s receiver, such as FrSky or Spektrum.
How do I know which protocol my drone’s receiver uses?
You can check the specifications of your drone or contact the manufacturer to find out which protocol your receiver uses.
Can I use a transmitter without a built-in receiver to connect to my FPV drone?
Yes, you can use an external receiver that connects to your transmitter and receives signals from your drone’s receiver.
Do I need any additional equipment to connect my radio to my FPV drone?
Depending on your specific setup, you may need a receiver that is compatible with your radio, as well as cables to connect the two. You may also need to configure the settings on both your radio and drone for proper communication.


