Are you a DJI Mini 3 Pro owner? Have you been experiencing issues with your SD card and need to format it? Fear not! Formatting an SD card on your DJI Mini 3 Pro is a simple process that can be done in just a few easy steps. In this blog post, we’ll guide you through the whole process and help you get your SD card ready to fly. Think of formatting your SD card like clearing out your closet – you need to get rid of the clutter to make room for new items.
Similarly, formatting your SD card clears out any unnecessary files or data left over from previous flights, making it ready for new footage. So, let’s get started and make sure your Mini 3 Pro is ready to capture those beautiful aerial shots!
Insert SD Card
If you’re planning to use an SD card with your DJI Mini 3 Pro drone, the first step is to insert it properly. The SD card slot is located on the left side of the drone, near the bottom. Make sure the gold contacts on the SD card are facing down and aligned with the slot, and gently push the card in until it clicks into place.
Once the SD card is securely inserted, you can format it using the DJI Fly app on your smartphone. To do this, go to the camera settings menu and select “format SD card.” This will erase all data on the card, so be sure to backup any important files before formatting.
Once complete, your SD card will be ready to use for video and photo storage. By following these simple steps, you can ensure that your DJI Mini 3 Pro is ready to capture all your aerial adventures with a properly formatted SD card.
Locate SD Card Slot on DJI Mini 3 Pro
If you’re looking to expand the storage on your DJI Mini 3 Pro, then inserting an SD card is the way to go. To do this, you’ll first need to locate the SD card slot on the drone. On the DJI Mini 3 Pro, the SD card slot is situated on the side of the drone, underneath a small flap.
To access the slot, you simply need to give the flap a gentle push and it will pop open, revealing the slot. Once you’ve located the slot, you can insert the SD card with ease. It’s important to make sure that the card is properly aligned with the slot before pushing it in.
Once it’s in, give it a little push to make sure it’s securely in place. With your SD card inserted, you’ll now be able to capture more footage and store more data than ever before.
Insert SD Card into DJI Mini 3 Pro
Inserting an SD card into your DJI Mini 3 Pro is a simple process that requires just a few steps. Firstly, turn off your drone and locate the slot on its side where the SD card goes. Open the compartment by sliding it out and insert the SD card into the slot.
Ensure that the card is properly oriented and that it clicks into place. Once it is securely inserted, slide the compartment back in and turn on your drone. The SD card will now be ready to use.
Remember that using an SD card can greatly increase the storage capacity of your DJI Mini 3 Pro and enable you to capture more photos and videos during your flights. Happy flying!
Format SD Card
If you’re using a DJI Mini 3 Pro drone and need to format your SD card, don’t worry – it’s actually a very simple process. To format your SD card, start by connecting your drone and SD card to your computer using a card reader. Make sure you back up any important files before beginning the formatting process because formatting will erase all data on the SD card.
Once you’ve backed up any important files, locate your SD card on your computer and right-click on it. From the dropdown menu, select “Format”. Follow the formatting instructions, which may vary depending on your computer’s operating system, and then click “Start”.
Allow the process to complete before disconnecting your SD card from your computer and resuming using it in your DJI Mini 3 Pro drone. Formatting your SD card on your DJI Mini 3 Pro drone is an important maintenance step that keeps your drone functioning properly. Keeping an empty, freshly formatted SD card in your drone helps ensure that your videos and photos are of high quality and that you won’t run out of storage space while flying.
By following these simple steps, you’ll be able to format your SD card easily and without any issues.
Power on DJI Mini 3 Pro
Powering on the DJI Mini 3 Pro is an exciting moment for any drone enthusiast, but before taking off, it’s important to format your SD card. By formatting your SD card, you’ll be able to optimize your drone’s storage space and ensure that each flight and recording goes smoothly. To do this, first, you’ll want to insert the SD card into the Mini 3 Pro.
Then, navigate to the settings menu and locate the storage option. Here, you’ll have the option to format your SD card, which will erase any data on it but create a clean slate for your drone’s new recordings. It’s essential to format your SD card, as doing so can improve the overall performance of your Mini 3 Pro and prevent any crashes or data loss while in flight.
So, before taking off to capture stunning aerial footage, remember to format your SD card for the best results.
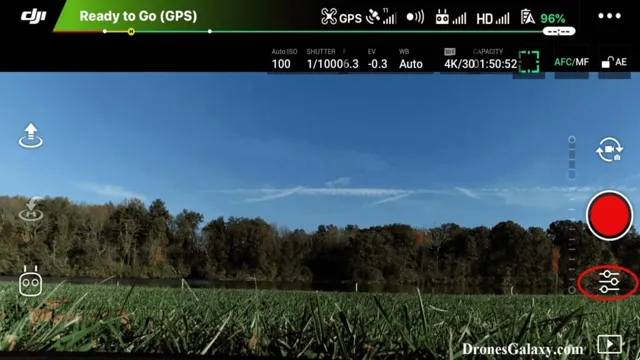
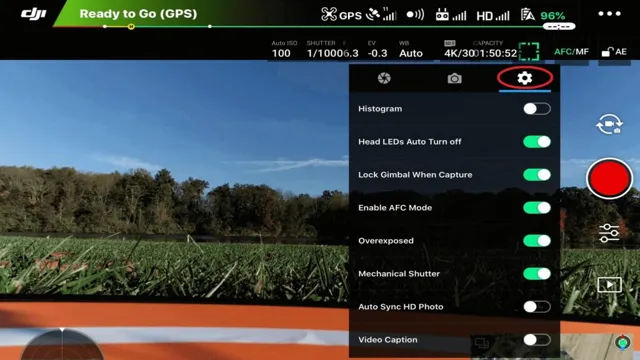
Access SD Card Formatting Menu
If you’re looking to format your SD card, it’s essential to understand how to access the formatting menu. Formatting your SD card can be extremely helpful in deleting all the data on it, getting rid of corrupted files, or changing the file system to make it compatible with your device. The easiest way to access the SD card formatting menu varies depending on the device you are using.
On Android devices, you can navigate to the Settings menu and select Storage options. From here, tap on the SD card option and select Format. For PC users, you can insert the SD card into your computer, navigate to the File Explorer, right-click on the SD card drive, and select Format.
Before formatting your SD card, make sure to back up all important data as this process will delete all files. Remember, formatting your SD card can help keep it running smoothly and efficiently.
Select Format Option
If you’re struggling to format your SD card, don’t worry! The process is easy and straightforward. The first step is to select the format option that works best for you. There are different options to choose from, including exFAT, NTFS, and FAT3
It’s essential to understand the differences between these formats to choose the best one for your device. FAT32, for example, is excellent for smaller devices such as smartphones and cameras, while exFAT and NTFS are ideal for larger storage devices such as external hard drives. Once you’ve chosen the format option, you can proceed with formatting your SD card.
Formatting is essential as it helps to remove any unwanted files or viruses from your SD card, and it also helps to free up space that you may need for new data. Remember to back up any important files on your SD card before formatting to avoid losing them. In conclusion, formatting your SD card is an easy process that requires you to select the best format option for your device and proceed with formatting.
By doing this, you can enjoy a clean and organized SD card that functions optimally.
Eject SD Card
If you’re wondering how to format an SD card on a DJI Mini 3 Pro, you’ve come to the right place! Formatting an SD card is an essential task for keeping your drone running smoothly and efficiently. To format an SD card on the DJI Mini 3 Pro, you will first need to eject the SD card from the drone’s camera. Simply turn off the drone’s camera and remove the SD card from its slot.
Then, using a card reader, connect the SD card to your computer and open File Explorer. Right-click on the SD card and select “Format.” This will erase all content from the card, so make sure to back up any important files before proceeding.
Finally, click “Start” to reformat the SD card and prepare it for use with your DJI Mini 3 Pro. With this simple process, you’ll be able to keep your drone running smoothly and capturing stunning aerial footage!
Turn off DJI Mini 3 Pro
When it comes to safely turning off your DJI Mini 3 Pro, one crucial step to remember is to eject the SD card from the drone. This is important because ejecting the card ensures that all your video footage and images are securely saved and won’t be corrupted or lost when removing it from the drone. To eject the SD card from the DJI Mini 3 Pro, simply locate the card’s slot on the side of the drone and gently push it inwards until it clicks.
Once the card is ejected, you can remove it from the drone and transfer the files onto your computer or other device. Remember to always wait until the drone is completely powered off before ejecting the SD card to avoid any potential data loss. Taking these steps will protect your data and ensure that you can continue capturing breathtaking footage and images with your DJI Mini 3 Pro, worry-free.
Remove SD Card from Slot
When it comes to removing an SD card from its slot, it’s important to take care and do it properly to avoid any potential damage or data loss. First and foremost, you should make sure that all running programs are closed, and any file transfers are completed. Once your device is ready, locate the SD card slot and gently push the SD card inward until you feel a slight click.
This will release the lock mechanism and allow the card to pop out slightly. You can then remove the card by pulling it out carefully and holding it by the edges to avoid any fingerprints or dust from getting in contact with the gold connectors. Remember to never pull the card out while it’s still being read or written to, as this may corrupt the data or even damage the card.
With the SD card safely removed, store it in a protective case or a dry, dust-free location to prolong its lifespan. By following these simple steps, you can safely eject your SD card and keep your data protected and intact.
Conclusion
Now that you’ve learned how to format your SD card on the DJI Mini 3 Pro, you can say goodbye to any pesky storage issues or footage mishaps. With these easy steps, your drone’s SD card will be formatted and ready to capture stunning aerial footage in no time. Remember, formatting your SD card regularly is essential for maintaining the health and longevity of your drone’s storage capacity.
So, what are you waiting for? Go ahead and format that SD card like a pro!”
FAQs
What is the process of formatting an SD card on DJI Mini 3 Pro?
To format the SD card on DJI Mini 3 Pro, insert the SD card into the drone’s SD card slot, then go to the camera settings in the DJI Fly app. From there, select the format option and follow the on-screen instructions.
Can any SD card be used with DJI Mini 3 Pro?
Yes, any Class 10 or UHS-1 SD card with a capacity of up to 256GB can be used with DJI Mini 3 Pro. However, it is recommended to use a high-quality SD card to ensure optimal performance and reliability.
Does formatting the SD card on DJI Mini 3 Pro erase all data on it?
Yes, formatting the SD card on DJI Mini 3 Pro will erase all the data on it. Therefore, it is recommended to backup the data before formatting the card.
Can DJI Mini 3 Pro format the SD card automatically?
No, DJI Mini 3 Pro does not have the auto-formatting feature. The user needs to manually format the SD card from the camera settings in the DJI Fly app.