
If you’re a proud owner of the DJI Mini 3 drone, you already know how important it is to keep your battery charged and ready for your next adventure. But with so many charging options available, it can be overwhelming to know which one is the best for your needs. Whether you’re a beginner or a seasoned pro, we’ve got you covered with some tips and tricks for charging your DJI Mini 3 battery.
In this blog, we’ll cover everything from the different charging options to how to ensure your battery lasts as long as possible. So, grab your drone and let’s get ready to charge!
Check Battery Level
One of the most important things you need to know about your DJI Mini 3 is how to charge its battery. Knowing the battery level is crucial for ensuring that you get the most out of your drone and avoid unexpected shutdowns during your flight. To check the battery level, simply turn on the drone and connect your mobile device to the remote controller via Wi-Fi.
Once connected, you can open the DJI Fly app and view the battery level indicator on the main screen. The indicator will display the percentage of battery remaining, which will give you an idea of how much flight time you have left. It is important to note that your DJI Mini 3 battery should be charged using the provided charger.
The charger has a built-in safety feature that ensures the battery is charged in a safe and efficient manner. By following these simple steps, you can ensure that your DJI Mini 3 is always ready for takeoff!
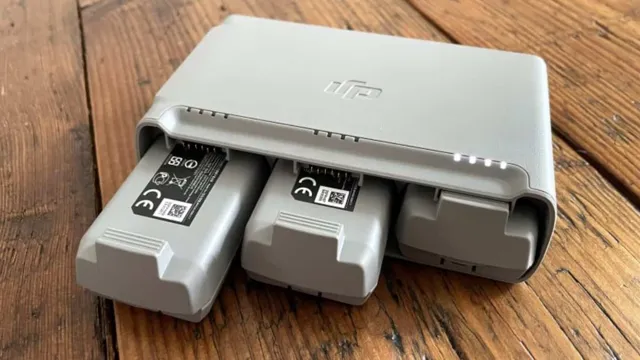
Method One: Using the Charging Hub
Before you start charging your drones using a charging hub, it’s crucial to check your battery’s current level. If your battery is fully charged, plugging it into the charger again won’t charge it, and that may damage the battery. To see the battery’s current status, press and release the battery button, and the LEDs on the battery will light up to show the battery level.
If all the LEDs are lit, the battery is fully charged, and you don’t need to charge it until you’ve used it again. If only some LEDs light up, the battery isn’t fully charged, and it’s safe to charge it without damaging the battery. Checking the battery level ensures that the charging process is smooth and efficient, giving you the most of your drone in the sky.
Method Two: Using the USB Cable
When using a USB cable to transfer files from your phone to your computer, it’s important to check your phone’s battery level beforehand. This may seem like an obvious step, but it can save you a lot of frustration down the line. If your phone dies in the middle of a file transfer, it can cause corruption or loss of data.
Additionally, if your phone is low on battery, it may not allow for file transfer at all. To check your battery level, simply look at the top of your phone’s screen or go into your phone’s settings. If your battery is low, make sure to charge it up before starting the transfer process.
Remember, taking the time to check your battery level can save you time and trouble in the long run.
Charging Time and Tips
If you’re wondering how to charge the DJI Mini 3 battery, it’s as simple as connecting the USB cable to the battery and plugging it into a power source. The battery takes approximately 90 minutes to fully charge, and it’s important to avoid overcharging your battery to maintain its longevity. To ensure that your drone battery is charged and ready to go, it’s recommended to charge it at least an hour before your flight.
Additionally, it’s a good idea to charge your battery to full capacity before storing it to avoid any damage from disuse. Remember to always use the designated USB cable and power source provided with your DJI Mini 3 to prevent any potential damage to your equipment.
Using a Power Bank
When it comes to using a power bank, one of the most common concerns people have is the charging time. The truth is, the charging time of a power bank can vary depending on its capacity and the device being charged. However, there are some tips you can follow to make the process faster.
First, make sure you are using a high-quality charging cable that is compatible with both the power bank and the device. Also, avoid using your device while it’s charging as this can slow down the charging process. Another tip is to keep the power bank cool while it’s charging as heat can affect its performance.
As for the duration of charging, it’s recommended to charge your power bank for a minimum of 3-4 hours to ensure it’s fully charged. By following these simple tips, you’ll be able to charge your device faster and efficiently.
Avoid Overcharging
When it comes to charging your devices, it’s important to avoid overcharging them. While it may seem like leaving your phone or laptop plugged in overnight is harmless, it can actually shorten the lifespan of your battery. To avoid overcharging, make sure you are using the right charging cable and adapter for your device, and keep an eye on the charging time.
Most devices should only take a few hours to reach a full charge. Additionally, try to avoid charging your device in extreme temperatures or humid environments, as this can also damage the battery. By taking these steps, you can ensure that your battery lasts longer and that your device stays in top condition.
Cold Weather Tips
When the weather gets colder, it’s important to keep in mind that charging your electronic devices will take longer than usual due to the change in temperature. To ensure that your devices charge properly in cold weather, it’s recommended that you keep them at room temperature or warmer before plugging them in. Additionally, it’s a good idea to use the original charger that came with your device, and to avoid using third-party chargers that may not be compatible or efficient in colder temperatures.
You should also avoid using your device while it’s charging in colder temperatures, as this can cause it to heat up and potentially damage the battery. By following these tips, you can help keep your devices charged and ready to use despite the colder weather conditions.
Checking Charging Status
When it comes to charging your DJI Mini 3 battery, the first step is to make sure that it’s actually low on power. To check the charging status, you’ll want to take a look at the LED lights located on the front of the battery. When the battery is fully charged, all four lights will be solid.
If one or more of the lights are flashing, that means that the battery is currently charging. It’s important to note that you should only use the included charging cable and adapter to charge your battery, as using third-party accessories can not only be dangerous but can also damage your battery. It’s also a good idea to charge your battery in a cool, dry place and to never leave it unattended while it’s charging.
By following these tips, you can help to ensure that your DJI Mini 3 battery stays charged and ready for your next adventure.
On the Charging Hub
When using a charging hub, it’s essential to keep track of the charging status of all devices connected to it. This will help prevent any unnecessary delays or damage that may occur due to overcharging or undercharging. Fortunately, most charging hubs come equipped with LED indicators that display the charging status of each corresponding device.
The colors of these LEDs vary depending on the manufacturer, but they generally include red, green, and blue. A red light indicates that the device is charging, and a green light means that it’s fully charged. On the other hand, a blue light may indicate that the device is not charging or is not connected properly.
By regularly monitoring the charging status of your devices, you can ensure that they’re charging correctly and won’t damage your devices in the process.
On the DJI Fly App
If you’re new to DJI drones, one of the first things you’ll need to learn on the DJI Fly App is checking the charging status of your batteries. Fortunately, this is a simple process that you’ll master in no time. Just tap on the battery icon within the app and you’ll see a screen displaying the current battery levels of all your batteries.
The charging level of each battery is displayed as a percentage, and if a battery is currently charging the app will display a charging icon next to the percentage. This is a great way to keep track of your battery charging progress without having to constantly check if the LED lights on the drone are flashing. With the DJI Fly App, you’ll always know the status of your batteries making it easy to plan your flights accordingly.
Conclusion
In conclusion, charging the DJI Mini 3 battery is as easy as pie, or perhaps as easy as taking a selfie with this fantastic drone camera. All you need to do is connect the batteries to the charging hub, plug it into a power source, and wait for the LED indicators to turn green. Once they do, your DJI Mini 3 will be ready to take flight once again.
So, go ahead and charge it up, and get ready for some amazing aerial footage that you can show off to your friends with pride!”
FAQs
What is the recommended way to charge DJI Mini 3 battery?
The recommended way to charge the DJI Mini 3 battery is using the provided USB cable and AC power adapter. Make sure the battery and charging equipment are compatible.
How long does it take to fully charge DJI Mini 3 battery?
It takes approximately 90 minutes to fully charge the DJI Mini 3 battery using the provided charging equipment.
Is it safe to charge DJI Mini 3 battery using a third-party charger?
It is not recommended to charge DJI Mini 3 battery using a third-party charger as it may cause damage to the battery.
Can DJI Mini 3 battery be charged while flying the drone?
No, DJI Mini 3 battery cannot be charged while flying the drone. The battery needs to be removed and charged using the provided charging equipment.