Featured image for this comprehensive guide about what is a fpv camera?
Image source: learnassets.getfpv.com
Have you ever dreamed of soaring through the sky like a bird, dipping and weaving with unparalleled agility, seeing the world from a truly first-person perspective? For a long time, this was the stuff of science fiction, but today, it’s the thrilling reality for millions of enthusiasts worldwide, thanks to a remarkable piece of technology: the FPV camera.
If you’re delving into the exhilarating world of drones, remote-controlled vehicles, or virtual reality, you’ve likely encountered the term "FPV." It stands for First-Person View, and at its heart lies a specialized camera that acts as your eyes in the sky. Unlike a standard camera designed purely for recording high-definition footage, a FPV camera is engineered for a very specific purpose: to transmit real-time, low-latency video directly to your goggles or screen, giving you an immersive, cockpit-like experience.
This comprehensive guide will demystify the FPV camera, exploring its core purpose, internal workings, the critical distinctions between various types, essential specifications, and how to choose and optimize the perfect "eye in the sky" for your adventures. Whether you’re a seasoned pilot looking to deepen your understanding or a curious newcomer asking "what is a FPV camera?" – you’ve come to the right place. Prepare to unlock the secrets behind the window to unparalleled aerial freedom.
Quick Answers to Common Questions
What exactly is an FPV camera?
An FPV camera is a specialized miniature video camera designed to capture and transmit live video footage from your drone or RC vehicle directly to goggles or a screen. It’s purpose-built for “First Person View” flying, making you feel like you’re actually in the cockpit!
Why do I need an FPV camera for my drone?
You need an FPV camera to unlock true immersive flying! It provides the real-time perspective essential for navigating quickly, flying through obstacles, and performing exciting aerial maneuvers that are tricky or impossible with just line-of-sight flying.
How does an FPV camera send video to my goggles?
An FPV camera connects to a video transmitter (VTX) on your drone, which then broadcasts the camera’s video signal wirelessly. This signal is picked up by a receiver in your FPV goggles or screen, giving you an instant, live view from your drone.
Is an FPV camera the same as a regular drone camera for recording?
Not exactly! While some FPV cameras can record, their main job is live, low-latency video transmission for piloting. They prioritize speed and good performance in changing light over high-resolution recording, unlike action cameras.
What’s the most important thing to look for in an FPV camera?
Low latency and excellent image quality in various lighting conditions are crucial for an FPV camera. Low latency means less delay between what the camera sees and what you see, which is vital for precise control and reactive flying.
📋 Table of Contents
- Unpacking the Core: What Exactly is an FPV Camera?
- The Anatomy of an FPV Camera: Key Components and How They Work
- Analog vs. Digital FPV Cameras: A Crucial Divide
- Beyond the Basics: Essential FPV Camera Specifications to Understand
- Choosing Your Eye in the Sky: Factors to Consider When Selecting an FPV Camera
- Optimizing Your FPV Camera Experience: Tips for Setup and Performance
- Conclusion
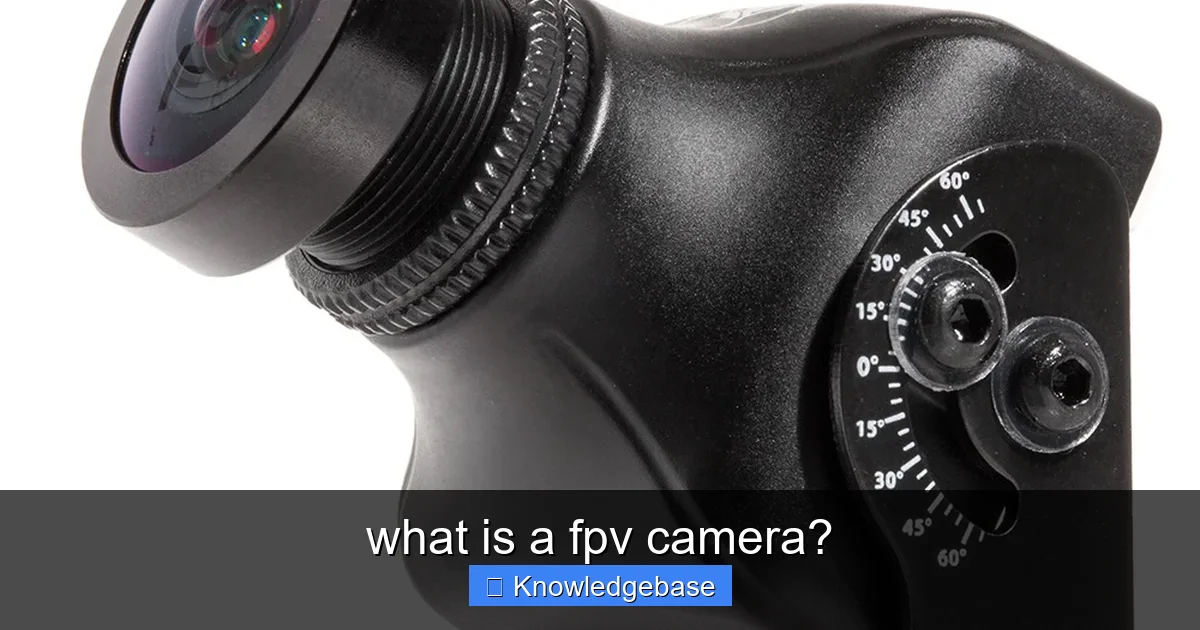
Unpacking the Core: What Exactly is an FPV Camera?
At its most fundamental level, a FPV camera is the visual conduit between the pilot and their remote-controlled vehicle, most commonly a drone. It’s not simply a camera that records video; it’s a sophisticated piece of equipment meticulously designed to provide a live, real-time video feed with minimal delay (latency) to the pilot. This low latency is absolutely critical, as it allows for precise control, especially in high-speed racing, intricate freestyle maneuvers, or navigating complex environments.
Learn more about what is a fpv camera? – what is a fpv camera?
Image source: projectgo.pro
Unlike a standard action camera like a GoPro, which prioritizes high-resolution recording, vibrant colors, and advanced stabilization, a FPV camera prioritizes speed and responsiveness above all else. Imagine trying to drive a car if there was a half-second delay between pressing the accelerator and the car responding – it would be impossible. The same principle applies exponentially to flying a drone at 100+ MPH through a race gate. The pilot needs to see what’s happening *now*, not a fraction of a second ago.
| Characteristic | Description/Purpose | Typical FPV Application Value |
|---|---|---|
| **Latency** | The delay between video capture and display in goggles. Crucial for real-time control. | Extremely low: typically **<10-25ms** for analog, **<30-60ms** for digital systems. |
| **Resolution** | The clarity and detail of the image output. | Analog: **700-1200TVL** (TV Lines). Digital: **720p to 1080p**. |
| **Sensor Type** | The technology used to convert light into an electrical signal. | Predominantly **CMOS** (modern, good low light); some **CCD** (better dynamic range, less “jello” effect). |
| **Field of View (FOV)** | The angular extent of the scene captured by the camera’s lens. | Wide, typically **120° to 170°**, for maximum situational awareness during flight. |
| **Aspect Ratio** | The proportional relationship between the width and height of the image. | **4:3** (traditional, preferred by many racers) or **16:9** (widescreen, matching modern goggles/screens). |
The journey of FPV cameras began quite humbly, often repurposing small, CCTV-style cameras. However, as the demand for better performance grew, manufacturers started designing cameras specifically for FPV applications. These purpose-built cameras are characterized by:
- Ultra-low Latency: Often measured in single-digit milliseconds, ensuring an almost instantaneous visual response.
- Robustness: Built to withstand crashes and rough landings, which are an inevitable part of FPV flying.
- Compact Size and Lightweight Design: To minimize impact on drone performance, battery life, and flight dynamics.
- Specific Field of View (FOV): Generally wide-angle lenses to give pilots a broad perspective, crucial for situational awareness.
- Excellent Low-Light Performance and Wide Dynamic Range (WDR): To handle rapid changes in lighting conditions, such as flying from bright sunlight into shadows or under obstacles.
In essence, a FPV camera is the dedicated visual sensor that translates the physical environment into an actionable, real-time video stream, empowering pilots to experience flight in a truly immersive and intuitive way. It’s not about capturing cinematic masterpieces (though many FPV pilots also carry a separate action camera for that); it’s about seeing, reacting, and controlling.
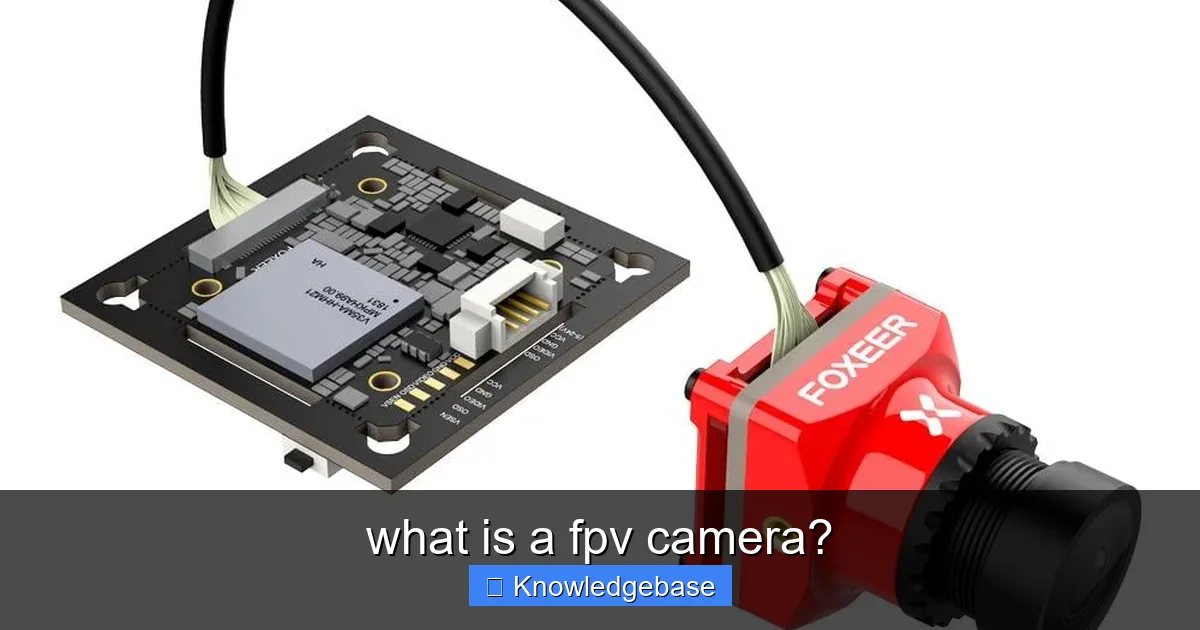
The Anatomy of an FPV Camera: Key Components and How They Work
While outwardly simple, a FPV camera is a marvel of miniaturized engineering. Understanding its core components helps explain why specific models perform differently and how they contribute to the overall FPV experience. Let’s break down the essential parts:
Learn more about what is a fpv camera? – what is a fpv camera?
Image source: smadja.co.kam.wpwithus.com
Image Sensor: The Eye’s Retina
This is where light is converted into an electrical signal. There are two primary types found in FPV cameras:
- CMOS (Complementary Metal-Oxide-Semiconductor): Currently the most common due to their affordability, lower power consumption, and generally good performance. Modern CMOS sensors have significantly reduced the "jello" effect (rolling shutter distortion) that plagued older models. They offer excellent image quality and WDR.
- CCD (Charge-Coupled Device): Once the gold standard for FPV due to their superior global shutter (no jello effect) and natural color reproduction. However, they are more expensive to manufacture, consume more power, and generally have poorer low-light performance compared to modern CMOS sensors. Most new FPV cameras today utilize CMOS technology.
Lens: Focusing the World
The lens gathers light and focuses it onto the sensor. FPV camera lenses are typically wide-angle, ranging from 1.8mm to 2.8mm focal lengths, providing a Field of View (FOV) between 120° and 170°. A wider FOV offers more peripheral vision, which is great for situational awareness, while a narrower FOV can make obstacles appear further away, aiding in precise navigation.
- M8 vs. M12 Mounts: These refer to the thread size of the lens. M12 lenses are larger and more common, offering better light gathering and image quality. M8 lenses are smaller, found on nano-sized cameras.
- Interchangeability: Many FPV cameras allow for lens swaps, letting pilots customize their FOV.
Image Processing Unit (ISP): The Camera’s Brain
This tiny chip processes the raw data from the sensor, performing crucial tasks like:
- Wide Dynamic Range (WDR): An essential feature for FPV, allowing the camera to expose both very bright and very dark areas of an image simultaneously, preventing blown-out highlights or crushed shadows.
- Noise Reduction: Cleaning up the image, especially in low light.
- Color Balance and Exposure Control: Adjusting the image to look natural and well-exposed.
On-Screen Display (OSD): Critical Flight Data
Many FPV cameras feature an integrated OSD chip that overlays vital flight information directly onto your video feed. This can include:
- Battery voltage (critical for FPV!)
- Flight timer
- Pilot name
- Artificial horizon
- Current channel/band
This information is invaluable for safe and informed flying, helping pilots monitor their drone’s status without looking away from the flight path.
Housing: Protection and Mounting
FPV cameras come in various standardized sizes:
- Nano: Smallest (e.g., 14x14mm), for tiny drones like Whoops.
- Micro: Common (e.g., 19x19mm), fits many freestyle and racing frames.
- Mini: Larger (e.g., 22x22mm), often found on older or larger setups, offering more space for internal components.
The housing is typically made from durable plastic or metal and includes mounting holes or brackets to securely attach the camera to the drone frame, often allowing for angle adjustment.
Power Input and Output: Connectivity
An FPV camera requires power, usually 5-12V DC, which it receives from the drone’s flight controller or a dedicated voltage regulator. It also has a video output lead (typically a single yellow wire for analog) that connects directly to the Video Transmitter (VTX), which then wirelessly sends the video signal to your FPV goggles or screen.
Each of these components plays a vital role in delivering the real-time, immersive visual experience that defines FPV flying. Understanding their function empowers pilots to make informed choices when selecting and configuring their setup.
Analog vs. Digital FPV Cameras: A Crucial Divide
The world of FPV video transmission is broadly divided into two major camps: analog and digital. Both serve the same ultimate purpose – providing a first-person view – but they achieve it through fundamentally different technologies, each with its own set of advantages and disadvantages. Understanding this divide is essential when asking what is a FPV camera and how it will integrate into your system.
Analog FPV: The Established Workhorse
For over a decade, analog FPV has been the backbone of the hobby. It uses a standard analog video signal (NTSC or PAL) transmitted over a 5.8 GHz radio frequency. The setup typically involves:
- An analog FPV camera capturing the image.
- A Video Transmitter (VTX) converting the camera’s signal into radio waves.
- A Video Receiver (VRX) in the FPV goggles or monitor converting the radio waves back into a video signal.
Pros of Analog FPV:
- Ultra-Low Latency: This is analog’s strongest suit, often achieving latency figures under 20ms, sometimes even single digits. This makes it ideal for high-speed racing and aggressive freestyle where instant feedback is paramount.
- Affordability: Analog systems are significantly cheaper to purchase and maintain, making them an excellent entry point for beginners.
- Graceful Degradation: As signal quality worsens (due to distance or interference), the image doesn’t suddenly cut out. Instead, it degrades gracefully with static and breakup, allowing the pilot a chance to react and recover.
- Compact and Lightweight: Analog cameras and VTXs are typically very small and light, suitable for even the tiniest drones (e.g., "Whoops").
Cons of Analog FPV:
- Lower Image Quality: The resolution is comparable to old CRT televisions, meaning a grainy, less detailed image.
- Susceptible to Interference: Analog signals are prone to "multipathing" (signal reflections) and interference from other 5.8 GHz devices, leading to static, color shifts, and signal loss.
- Limited Penetration: Analog signals struggle to penetrate obstacles like trees or buildings, leading to rapid signal degradation.
Digital FPV: The High-Definition Future
Digital FPV systems, spearheaded by technologies like DJI FPV, Walksnail Avatar, and HDZero, represent the cutting edge. They transmit a digitally encoded, high-definition video signal, offering a vastly superior visual experience.
- A digital FPV camera (often integrated with the VTX) captures an HD image.
- A dedicated digital VTX encodes and transmits the digital video and control data.
- Digital FPV goggles (which often contain a built-in receiver and display) decode and display the HD video.
Pros of Digital FPV:
- Crystal-Clear HD Image: The most compelling advantage is the stunning, high-definition video quality (720p, 1080p, or even higher). This dramatically improves situational awareness and immersion.
- Improved Penetration & Range: Digital systems often have better obstacle penetration and longer reliable ranges compared to analog, thanks to advanced encoding and error correction.
- Less Interference: Digital signals are less prone to the visual static and breakup seen in analog, offering a cleaner image until the signal cuts out completely.
- Integrated OSD: Digital systems often offer more comprehensive and visually appealing OSD overlays directly integrated into the system.
Cons of Digital FPV:
- Higher Latency: While constantly improving, digital systems generally have higher latency than analog, typically ranging from 25-60ms. For some elite racers, this difference can be noticeable.
- Higher Cost: Digital FPV systems (cameras, VTXs, and especially goggles) are significantly more expensive than their analog counterparts.
- "Hard Cut" Instead of Graceful Degradation: When a digital signal degrades too much, it tends to pixelate heavily or cut out entirely, rather than gradually fading with static. This can be more disorienting.
- Larger and Heavier: Digital camera/VTX units are generally larger and heavier, making them less suitable for micro-drones.
Comparison Table: Analog vs. Digital FPV Cameras
| Feature | Analog FPV Camera & System | Digital FPV Camera & System |
|---|---|---|
| Image Quality | Lower resolution, grainy (e.g., 600-1200TVL) | High-definition, clear (e.g., 720p, 1080p) |
| Latency | Ultra-low (5-20ms typical) | Moderate to Low (25-60ms typical, constantly improving) |
| Cost | Significantly lower (entry-level friendly) | Significantly higher (premium investment) |
| Weight/Size | Very compact and lightweight | Larger and heavier |
| Signal Degradation | "Graceful" (static, breakup) | "Hard cut" (pixelation, freeze, blackout) |
| Interference | More susceptible to static/lines | More robust, less visual interference |
| Application | Racing, aggressive freestyle, micro-drones | Freestyle, cinematic, general immersive flying |
The choice between analog and digital heavily depends on your priorities: do you value absolute lowest latency and affordability for competitive flying, or are you willing to invest more for unparalleled visual clarity and immersion? Both systems continue to evolve, offering incredible experiences for pilots.
Beyond the Basics: Essential FPV Camera Specifications to Understand
Once you’ve understood the fundamental distinction between analog and digital, diving into specific camera specifications becomes crucial for making an informed choice. These metrics define the performance and characteristics of your "eye in the sky."
Latency: The Holy Grail of FPV
As mentioned, latency is the delay between the camera capturing an image and that image being displayed in your goggles. It’s measured in milliseconds (ms). For FPV, lower is always better:
- Below 20ms: Considered excellent, essential for precision racing and aggressive freestyle. Most analog systems fall into this category.
- 20-40ms: Good for most freestyle and general flying. Many modern digital systems are achieving this.
- Above 40ms: Can feel sluggish and lead to overcorrection, making precise control difficult.
Manufacturers constantly strive to reduce latency, as even a few milliseconds can impact a pilot’s performance and feel.
Field of View (FOV): Your Peripheral Vision
The FOV describes how much of the scene the camera can see. It’s determined by the lens’s focal length. FPV cameras typically have a wide FOV, ranging from 120° to 170°.
- Wider FOV (e.g., 170°): Provides more peripheral vision, great for situational awareness, especially in open areas or freestyle. Makes obstacles appear further away.
- Narrower FOV (e.g., 120-130°): Can make obstacles appear closer and larger, which some racers prefer for judging gates more accurately.
Your preference here is subjective and often depends on your flying style.
Aspect Ratio: The Shape of Your World
The aspect ratio refers to the proportional relationship between the width and height of the video image. The two main types are:
- 4:3: A squarer image, traditionally common in analog FPV. It fills the vertical space of many older FPV goggles well.
- 16:9: A wider, more cinematic image, standard for most modern screens and HD content. Many digital FPV systems default to 16:9.
It’s crucial to match your camera’s aspect ratio to your FPV goggles’ native display. Mismatched aspect ratios can lead to a stretched or squeezed image, or black bars, distorting your perception of distance and speed.
Shutter Type: Global vs. Rolling
This refers to how the image sensor captures light:
- Global Shutter: The entire image sensor captures light simultaneously. This eliminates the "jello" effect (wobbly video) often caused by vibrations, especially when quick turns are made. CCD sensors inherently have a global shutter.
- Rolling Shutter: The sensor captures the image line by line, from top to bottom. This can lead to the "jello" effect or skewing during fast motion or vibration. Most modern CMOS sensors use a rolling shutter, but advancements have significantly minimized these artifacts.
While global shutter is technically superior for motion, modern rolling shutter CMOS cameras are often so good that the difference is negligible for most pilots, especially with good vibration dampening.
Wide Dynamic Range (WDR): Conquering Light Extremes
WDR is a vital feature for FPV. It allows the camera to simultaneously capture details in both very bright and very dark areas of a scene. Without good WDR, flying into the sun would leave the foreground as a silhouette, and flying into shadows would result in a black void. WDR helps balance these extremes, providing a more usable and less fatiguing image.
TV System: NTSC vs. PAL
These are analog video standards:
- NTSC: Used primarily in North America, Japan, and parts of South America (30 frames per second, 525 lines).
- PAL: Used in Europe, Asia, Australia, and Africa (25 frames per second, 625 lines).
For analog FPV, your camera, VTX, and goggles should all be set to the same TV system. Most modern FPV cameras are switchable between NTSC and PAL, or automatically detect the system. In digital FPV, this distinction is less critical as the signal is digitally encoded.
Resolution: Clarity of Detail
For analog cameras, resolution is often measured in TV Lines (TVL), ranging from 600TVL to 1500TVL. Higher TVL means more detail, though the ultimate limiting factor is the analog transmission system itself. For digital FPV, resolution is measured in pixels (e.g., 720p, 1080p), offering a significantly sharper image.
Size & Mounting: Fitting Your Frame
Cameras come in Nano (14x14mm), Micro (19x19mm), and Mini (22x22mm) sizes. Ensure your chosen camera physically fits your drone’s frame and mounting system. Smaller cameras are lighter and suitable for micro-drones, while larger ones may offer slightly better performance due to more space for components.
Understanding these specifications allows you to compare different FPV cameras effectively and select one that best suits your flying style, drone setup, and personal preferences.
Choosing Your Eye in the Sky: Factors to Consider When Selecting an FPV Camera
With a deeper understanding of what is a FPV camera and its various technical aspects, the next logical step is learning how to choose the right one for your needs. This isn’t a one-size-fits-all decision; your ideal camera will depend on several crucial factors.
Drone Type & Size: Form Factor Matters
The physical size and design of your drone heavily dictate the appropriate camera size.
- Tiny Whoops & Micro Drones (65mm-100mm): These require the smallest and lightest cameras, typically Nano-sized (14x14mm). Weight is critical for these small platforms.
- Freestyle & Racing Drones (3-inch to 7-inch): Most common drones will fit Micro-sized (19x19mm) FPV cameras, which offer a good balance of performance and size. Some larger frames can accommodate Mini-sized cameras if preferred.
- Cinematic & Long-Range Drones: While traditional FPV cameras are still used for piloting, these drones might also carry a larger action camera (like a GoPro) for high-quality recorded footage. The FPV camera here still needs to prioritize latency for control.
Always double-check your drone frame’s camera mounting bracket specifications before purchasing.
Flying Style: What Kind of Pilot Are You?
Your preferred way of flying significantly influences the camera features you’ll prioritize.
- Competitive Racing: Ultra-low latency is paramount. Pilots often prioritize analog systems for their sub-20ms delay. A slightly narrower FOV might be preferred for precise gate navigation, making obstacles appear closer.
- Aggressive Freestyle: Low latency is still very important, but excellent WDR to handle rapidly changing light (e.g., flying under trees, into the sun) and a wide FOV for situational awareness are also highly valued. Both analog and digital systems can excel here depending on pilot preference for image quality vs. latency.
- Cinematic & Cruising: While latency is still a factor for smooth control, a higher priority might be given to image quality, good color rendition, and WDR for a more visually pleasing experience. Digital FPV systems truly shine here with their HD feeds.
- Beginner/Casual Flying: Affordability, durability, and ease of setup are key. Analog systems are often recommended for their lower cost and graceful signal degradation, which can be less disorienting than a digital "hard cut."
Budget: How Much Are You Willing to Spend?
FPV cameras range widely in price:
- Entry-Level Analog Cameras: Can be found for as little as $15-$30, offering basic but functional performance.
- Mid-Range Analog Cameras: ($30-$60) offer better sensors, WDR, and features.
- Digital FPV Cameras: These are significantly more expensive, often costing $70-$150+ for the camera/VTX unit alone, not including the specialized digital FPV goggles (which can be $400-$1000+).
Remember that the camera is just one part of your FPV system. Factor in the cost of your VTX, goggles, and antennas when budgeting.
Goggle Compatibility: A Non-Negotiable Match
This is arguably the most critical factor. Your FPV camera MUST be compatible with your FPV goggles (or monitor):
- Analog Camera + Analog Goggles: If you have traditional analog goggles, you need an analog camera and VTX.
- Digital Camera + Digital Goggles: If you’re using a digital system (e.g., DJI, Walksnail, HDZero), you need a camera and VTX from that specific ecosystem, along with compatible digital goggles.
There are no "hybrid" goggles that seamlessly work with both analog and all digital systems natively without adapters or modules. Some digital goggles (like DJI Goggles 2/V2) can accept an analog signal via an external module, but this means you’d need an analog VTX and camera on your drone for that feed. Be absolutely certain your camera and viewing device are compatible.
Durability & Protection: Expect the Unexpected
Crashing is an integral part of FPV, especially as you learn. Look for cameras with:
- Robust Housings: Often made of strong plastics or lightweight metals.
- Lens Protection: Some cameras come with integrated lens protectors, or you can print TPU mounts for extra safeguarding.
- Conformal Coating: While not common on the camera itself, ensuring your electronics are protected against moisture can prevent shorts.
By carefully considering these factors, you can narrow down the vast array of FPV cameras available and confidently choose the "eye in the sky" that best suits your needs, ensuring a more enjoyable and effective FPV experience.
Optimizing Your FPV Camera Experience: Tips for Setup and Performance
Simply knowing what is a FPV camera and choosing one isn’t the end of the journey; optimizing its setup and performance is crucial for the best possible flying experience. A well-configured camera can make a significant difference in clarity, responsiveness, and overall enjoyment.
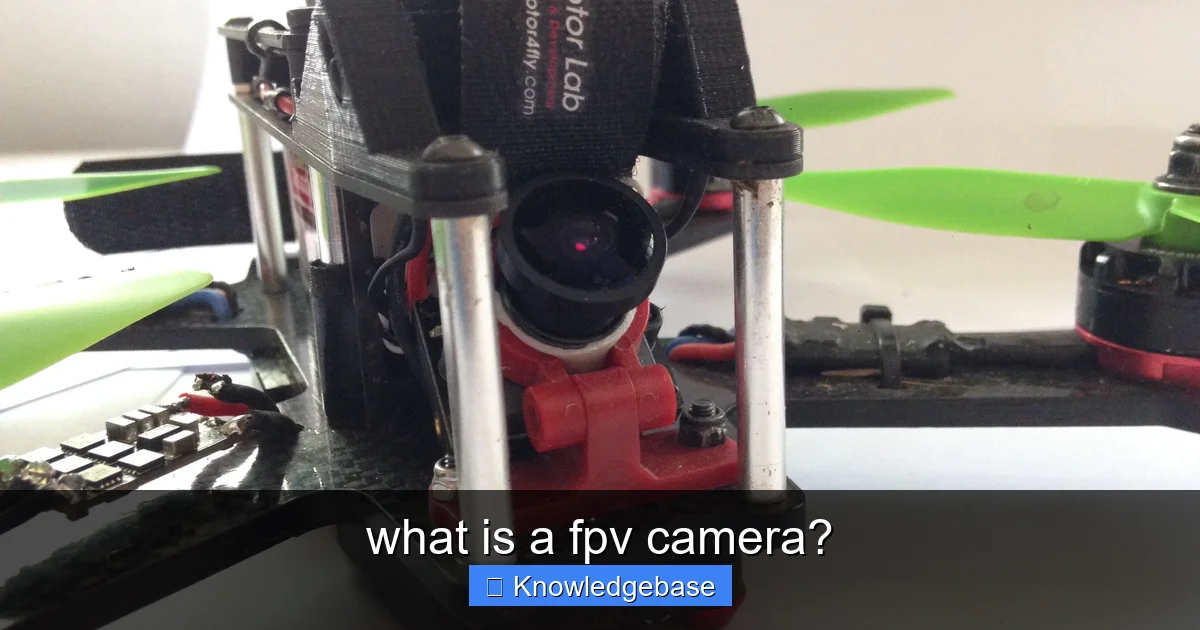
Proper Mounting: Stability is Key
How you mount your FPV camera directly impacts video quality and durability.
- Secure Fit: Ensure the camera is tightly secured in its mount to prevent vibration, which can cause "jello" effect even with a global shutter or good CMOS sensor.
- Vibration Dampening: Some frames include soft-mounting options or TPU (thermoplastic polyurethane) mounts which naturally absorb vibrations. Utilize these where possible.
- Adjustable Angle: Most FPV camera mounts allow you to adjust the camera’s tilt angle.
- Low Angle (0-15 degrees): Good for slow, precise flying or hovering, provides a level view.
- High Angle (20-45+ degrees): Essential for fast-forward flight. As the drone tilts forward, a higher camera angle keeps your horizon visible. Adjust this based on your average flying speed.
- Protection: Use TPU camera guards or protective plates around your camera to shield it from impacts during crashes.
Powering Your Camera: Clean and Stable
A stable power supply is vital for a clear video feed.
- Correct Voltage: Always power your camera within its specified voltage range (e.g., 5-25V). Exceeding this will burn it out.
- Clean Power: "Dirty power" (electrical noise from motors/ESCs) can introduce lines or static into your video. If you experience this, install an LC filter (inductor-capacitor filter) between your power source and the camera/VTX to smooth out the voltage.
- Dedicated Regulator: Some setups use a dedicated 5V or 12V regulator on the flight controller to provide clean power to the camera and VTX.
OSD Configuration: Tailoring Your Information
If your camera has an OSD, take time to configure it to display the information most useful to you.
- Essential Data: Battery voltage, flight timer, and RSSI (Received Signal Strength Indicator for control link) are highly recommended.
- Personalization: Add your pilot name, a custom logo, or adjust the position of elements to your preference.
- Clutter Management: Don’t overload your screen. Only display information that genuinely aids your flying, keeping the view as clear as possible.
Camera Settings (Via OSD Joystick or Controller): Fine-Tuning Your Image
Most FPV cameras come with a small joystick or button board (often connected temporarily) that allows you to access and adjust various image settings. Digital systems often have these settings accessible through the goggle menu.
- Brightness & Contrast: Adjust these to suit your personal preference and ambient light conditions.
- Sharpness: Too high can introduce noise; too low makes the image soft. Find a balance.
- WDR/BLC (Backlight Compensation): Experiment with these settings to optimize how the camera handles extreme light changes. "Strong" WDR might be good for constantly flying between light and shadow.
- Color Settings: Adjust saturation, tint, and white balance to achieve natural-looking colors that you prefer.
- Exposure Settings (AGC – Automatic Gain Control): This controls how the camera adjusts to light. Some pilots prefer to reduce AGC in very bright conditions to prevent the image from becoming too washed out.
- Scene Modes: Some cameras offer predefined scene modes (e.g., "Sunny," "Cloudy") that optimize settings for different conditions.
It’s often helpful to save a "day" and "night" or "sunny" and "overcast" profile if your camera supports it, to quickly switch settings.
Lens Care and Maintenance: Keeping a Clear View
- Keep it Clean: Dust, fingerprints, and dirt on the lens will degrade your image. Use a soft microfiber cloth and lens cleaning solution (not household cleaners).
- Check for Damage: After a crash, inspect the lens for cracks or scratches. A damaged lens can often be replaced.
- Secure Connections: Periodically check that all cables to the camera are securely plugged in and free from damage.
Troubleshooting Common Issues: Quick Fixes
- "Jello" or Wobble: Usually caused by vibrations. Check motor balance, prop balance, and camera mounting.
- Static/Lines in Analog Feed: Often dirty power (add LC filter), bad antenna, or interference.
- Image Freezes/Blackouts (Digital): Typically a signal strength issue. Check antenna placement, VTX power, or move closer to the drone.
- No Image: Check all power connections, VTX power, and camera input voltage. Ensure camera and goggles are on the same channel/band (for analog) or paired correctly (for digital).
By diligently applying these optimization tips, you’ll not only enhance the performance of your FPV camera but also significantly improve your overall FPV flying experience, making every flight clearer, more responsive, and more immersive.
Conclusion
From the foundational question of "what is a FPV camera?" to the intricacies of its components, the critical distinction between analog and digital, essential specifications, and practical optimization tips, we’ve journeyed deep into the heart of this remarkable technology. The FPV camera is far more than just a lens and a sensor; it is the pilot’s unwavering gaze, the window into an extraordinary realm of flight, precision, and immersive adventure.
Whether you’re tearing through race gates at breakneck speeds, executing gravity-defying freestyle maneuvers, or simply enjoying a tranquil cinematic cruise, your FPV camera is the indispensable tool that transforms a remote-controlled drone into an extension of your own senses. It bridges the gap between pilot and machine, granting you an unparalleled perspective and an intimate connection to the skies.
As the technology continues to evolve, pushing the boundaries of clarity, latency, and reliability, the future of FPV promises even more breathtaking experiences. So, arm yourself with this knowledge, choose your "eye in the sky" wisely, and prepare to embark on an incredible journey where the world unfolds before you in a truly first-person view. The sky is no longer the limit; it’s your playground.
🎥 Related Video: FPV #13 – FPV Cameras for Dummies
📺 CAPTAIN DRONE
This is episode #13 of my FPV beginner series. In this episode I show you how easy it is to add an FPV Camera to your Drone, …
Frequently Asked Questions
What is an FPV camera?
An FPV camera is a specialized video camera designed to provide a real-time, first-person view from a drone or RC vehicle to the pilot. It captures live footage that is then transmitted wirelessly to FPV goggles or a monitor, allowing the pilot to “see” as if they were onboard the craft.
How does an FPV camera work?
The FPV camera captures live video feed, which is then sent to a video transmitter (VTX) on the drone. The VTX wirelessly broadcasts this signal to the pilot’s FPV goggles or screen, displaying the camera’s perspective in real-time. This low-latency transmission is crucial for responsive control during flight.
Why is an FPV camera essential for drone flying?
An FPV camera is absolutely essential for “First Person View” flying, enabling pilots to navigate their drone from an immersive, onboard perspective. This direct visual feedback allows for precise control, high-speed maneuvers, and an engaging flight experience, particularly for racing, freestyle, or cinematic piloting.
What features should I look for in an FPV camera?
When choosing an FPV camera, key features include low latency for responsive control, good image quality (resolution, dynamic range), and robust build for crashes. Consider its form factor (micro, mini, standard), aspect ratio (4:3 or 16:9), and compatibility with your FPV system (analog or digital).
Can an FPV camera record video?
Generally, a standard FPV camera is designed solely for transmitting live video feedback and does not have built-in recording capabilities. For recording high-quality flight footage, pilots typically mount a separate action camera, like a GoPro or a dedicated “naked” action camera, alongside their FPV camera. Some digital FPV systems might offer DVR functionality within their goggles or air unit.
Are there different types of FPV cameras?
Yes, FPV cameras primarily come in two main categories: analog and digital, which determine the video signal and system compatibility. They also vary in size (micro, mini, standard) to fit different drone frames, and offer different aspect ratios (4:3 or 16:9) to match pilot preferences and display types.


