So, you’ve finally decided to take the leap into the exciting world of FPV drone flying! But before you can soar through the skies, you need to bind your X9D to your drone. Don’t worry if you’re feeling a little overwhelmed – we’ve got you covered. In this blog post, we’re going to walk you through the process step-by-step, so you can get up and flying in no time.
So, grab your X9D, your drone, and let’s get started! Think of your X9D as the steering wheel of your drone – without it, you won’t be able to control your aircraft. Binding it to your drone is a crucial step that will ensure your drone responds to your commands. Fortunately, it’s a straightforward process that you can easily do yourself.
Whether you’re a beginner or a seasoned pro, binding your X9D to your drone is an essential skill that will get you one step closer to FPV flying success.
What You Will Need
If you’re new to the world of FPV drones, you’ll quickly discover the importance of binding your transmitter to your drone. One popular transmitter option is the x9d. To bind your x9d to your drone, you’ll need a few things.
First, make sure your drone and transmitter are compatible. You’ll also need a fully charged battery for your drone and transmitter, a binding cable, and your manual for both your drone and transmitter. It’s also important to have a clear, open space free from obstacles to avoid any interference during the binding process.
With these items in hand, you’re ready to bind your x9d to your drone and take your FPV flight to new heights.
X9D Transmitter
If you’re looking to invest in an X9D transmitter for your hobby or job, there are a few things you’ll need to consider. Firstly, you’ll need to ensure that the transmitter is compatible with your device or drone. Many transmitters come with a range of protocols that allow for compatibility with multiple devices, but it’s important to check this before making a purchase.
Additionally, you’ll need to think about the type of batteries and charger you’ll need. Some X9D transmitters come with rechargeable batteries and a charging cable, while others require external batteries that will need to be purchased separately. Finally, you may want to consider purchasing a protective case or bag to keep your transmitter safe during transport.
With these considerations in mind, you’ll be well-equipped to make an informed purchase and enjoy the benefits of your X9D transmitter.
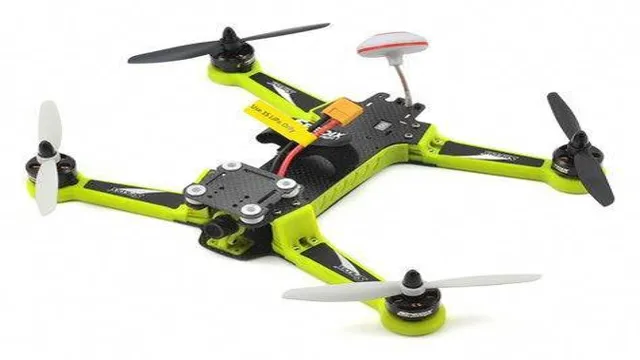
FPV Drone
If you’re interested in FPV drone racing or just taking some epic aerial footage, then you’ll need a few things to get started. First and foremost, you’ll need a decent drone that can handle the rigors of FPV flying. Look for one that has a durable frame, strong motors, and a good flight controller.
Next, you’ll need a reliable FPV system, including a camera and video transmitter/receiver. You may also want to invest in a pair of FPV goggles to enhance the flying experience. Other essential accessories include batteries, a charger, and spare parts for repairs.
Before taking to the skies, make sure you check local drone regulations and find a suitable flying location. With these basics, you’ll be well on your way to experiencing the thrill of FPV drone flying.
Receiver
To set up a receiver, you will need a few key items. First, a receiver itself is necessary; this will allow you to route the audio and video signals from your devices to your TV or home theater system. You’ll also need speakers, an HDMI cable to connect your devices, and possibly a subwoofer if you want to boost the low-end sounds in your audio.
Additionally, you may need to purchase a universal remote that can control both your receiver and other electronic devices in your home theater setup. It’s important to choose a receiver with enough inputs and outputs to accommodate all of your devices, as well as to choose speakers that are compatible with your receiver’s power output and impedance. With these items in hand, you’ll be well on your way to enjoying high-quality audio and video in your home theater.
Bind Plug
One of the essential tools for every FPV pilot is the bind plug. To bind your FPV transmitter to your receiver, you’ll need to use a bind plug. This simple device is made up of a small piece of plastic with two metal prongs that fit into the receiver’s bind port.
The bind plug’s purpose is to put the receiver into bind mode so that it can be paired with the transmitter. To use a bind plug, you’ll need to make sure that your receiver is in bind mode and that your transmitter is turned off. Plug the bind plug into the receiver’s bind port, then connect the power supply to the receiver.
Once the receiver is powered up, it will go into bind mode, which means that it is ready to be paired with the transmitter. Turn on your transmitter and put it into bind mode, and the binding process between the transmitter and receiver will begin. Once paired successfully, remove the bind plug, and your receiver is now ready to receive signals from your transmitter.
Investing in a good quality bind plug is crucial to ensure a secure and stable connection between your FPV transmitter and receiver, which is vital for a successful and enjoyable FPV flight. It’s a small investment that can save you from the headache of losing control of your quadcopter mid-flight and crashing it down.
Prepare Your Equipment
Are you ready to bind your FrSky X9D radio transmitter to your FPV drone? Make sure you have all the necessary equipment before you start. First, ensure that your transmitter battery is fully charged. You don’t want to run out of juice in the middle of the binding process.
Next, make sure your drone is powered on and in binding mode. Check your drone’s manual to confirm the correct procedure for binding. You will also need a binding cable that matches the specific type of connection on your receiver.
Double-check that you have the correct cable before you begin. With these items in hand, you’re ready to start the binding process and get your drone up in the air.
Turn Off Your FPV Drone
Preparing your equipment is an essential step before turning on your FPV drone. It is crucial to ensure that all the parts are in good condition, and the batteries are fully charged. Before flying, you must inspect the drone’s frame, motors, and cameras to ensure they are free from damage and functioning correctly.
One of the critical components to check is the drone’s antennas, which play a vital role in communicating with your controller, so always ensure that they are straight and securely attached. Furthermore, it is vital to check your controller and ensure that its battery is charged too. Other essential accessories to prepare include your goggles or screen, which will allow you to see what the drone sees while flying.
By taking the time to prepare your equipment, you can significantly reduce the risk of accidents or technical difficulties during your flight. So, always remember to check everything before turning on your FPV drone.
Insert Bind Plug Into Receiver
To prepare your equipment for binding, one essential step is to insert a bind plug into the receiver. This plug serves as a temporary connection between the receiver’s signal and ground pins, clearing out any prior binds or programming. It ensures that the transmitter and the receiver can communicate with each other correctly by ensuring that they use the same protocols.
To insert the bind plug, first switch off your transmitter, and ensure it is not connected to any power source or battery. Find the bind port on the receiver and insert the bind plug into it. Once inserted correctly, power up the receiver, and the LED light on it should start flashing to show that it’s ready for binding.
With this done, your receiver is all set for binding your transmitter. This step is essential to ensure that your equipment is ready for use and performs excellently when in operation.
Plug In Battery To Your FPV Drone
Before taking off with your FPV drone, it’s crucial to ensure that your equipment is properly prepared. One of the most important steps is to plug in the battery to your drone. First, make sure that the battery is fully charged and that you have the correct battery for your drone model.
It’s also important to check the polarity of the battery before plugging it in. Once you have confirmed the correct battery and polarity, locate the battery compartment on your drone and securely plug in the battery. This is an important step in ensuring a successful flight and preventing any potential accidents or malfunctions.
So don’t forget to properly prepare your equipment and plug in the battery before taking off on your FPV adventure.
Bind X9D and FPV Drone
If you’re new to FPV drone flying, you may be wondering how to bind your X9D transmitter to your drone. Binding is the process of pairing your radio transmitter to your drone, allowing them to communicate with each other and enabling you to control your aircraft. To start, make sure your X9D and drone are both turned off.
Next, locate the bind button on your drone’s receiver and press and hold it down. While holding the bind button down, turn on your drone. Once the LED light on the receiver starts flashing, release the bind button.
Now, turn on your X9D transmitter and navigate to the bind menu. Choose the appropriate channel (usually CH1), and press the bind button. Your drone’s LED light should stop flashing and turn solid once it has successfully bound to your transmitter.
With the binding process complete, you’re now ready to fly your FPV drone with your X9D radio transmitter. Happy flying!
Turn On X9D Transmitter
If you’re new to flying an FPV drone, binding it to your X9D transmitter might seem a bit daunting. But don’t worry, it’s actually a simple process. First, turn on your X9D transmitter and move the sticks and switches around to make sure it’s working properly.
Then, put your drone into bind mode by following the instructions in its manual or on its manufacturer’s website. Once the drone is in bind mode, go to the model setup menu on your X9D transmitter and follow the instructions to bind the two devices. This process may vary slightly depending on your specific drone and transmitter, so be sure to read the manuals carefully.
With successful binding, you’ll be ready to fly your drone using your X9D transmitter!
Set Your Transmitter to D16 Mode
If you’re new to FPV drone flying, you may be wondering how to bind your X9D transmitter to your drone. One crucial step is to set your transmitter to D16 mode. This mode is a newer protocol that provides better range and reliability than older modes, such as D
To set your transmitter to D16 mode, you need to navigate to the Model Setup menu and select the Protocol option. From there, you can choose D16 and save your settings. Once you’ve set your transmitter to D16 mode, you’re ready to bind it to your drone.
To do this, you will need to put your drone’s receiver into binding mode and follow the binding procedure outlined in your drone’s user manual. Remember, binding your transmitter to your drone is essential for establishing a reliable control link between the two, so take your time and follow the instructions carefully.
Press and Hold Bind Button on TX
If you’re new to flying FPV drones, binding your drone to your transmitter (TX) can seem like a daunting task. However, with a bit of practice, you can have your X9D and FPV drone bound together in no time. To get started, begin by powering on both your TX and drone.
Next, locate the bind button on your TX and press and hold it down. While holding down the button, power on your drone by connecting it to its battery. You’ll usually see some indication that your drone is in bind mode, such as flashing lights or beeps.
Once in bind mode, release the bind button on your TX, and your controller should now be connected to your drone. It’s essential to keep in mind that the process can vary depending on your specific drone or transmitter, so always refer to your user manual for detailed instructions.
Plug in the Battery in your Receiver
If you’re new to the world of FPV drones, binding your radio transmitter (such as the X9D) with your drone’s receiver may seem like a daunting endeavor. But don’t worry! Binding these two components together is actually a simple process that can be done in just a few steps. First, ensure that your FPV drone is powered off and that your X9D transmitter is turned on and in bind mode.
Next, locate the bind button on your drone’s receiver and hold it down while plugging in the battery. Release the bind button once the LED light on the receiver begins to flash rapidly. Now, you’ll need to navigate to the bind option in your X9D transmitter’s menu.
Depending on your specific model, this may be located in different areas of the menu. Once you’ve located the bind option, select it and wait for the LED light on the receiver to turn solid. Congratulations! Your X9D transmitter is now bound to your FPV drone’s receiver.
Remember, it’s important to always test your controls and range before takeoff to ensure a safe and successful flight.
Release the Bind Button
If you’re looking to bind your X9D and FPV drone, the first thing you’ll need to do is release the bind button. This can be a little tricky if you’re not familiar with the process, but don’t worry – it’s actually quite simple once you get the hang of it. Start by turning on your X9D and your drone.
Then, go into the menu on your controller and select the bind option. This will put your X9D into bind mode, which means it’s ready to connect with your drone. Now, press and hold the bind button on your drone – usually located near the receiver – until you see the LED light start flashing.
This means your drone is also in bind mode, and it should now connect with your X9D. Once you see a steady green light on both your drone and controller, you’ll know they’re bound and ready to fly. Happy flying!
Troubleshooting Tips
If you’re having trouble binding your X9D to your drone FPV, don’t worry! There are a few troubleshooting tips you can try before giving up completely. First, make sure that your transmitter and receiver are on the same frequency. You can check this by looking at the LED lights on both devices.
If they are different colors, then they are on different frequencies and won’t be able to bind. Next, check that the bind plug is installed correctly and snugly in the receiver. If it’s loose or not in the right slot, the bind process won’t work.
Also, be sure to check that all of your settings are correct in the radio software before attempting to bind. And finally, make sure that your battery is fully charged and connected properly. Sometimes a loose or low charge battery can cause problems with binding.
With these troubleshooting tips, you should be able to get your X9D to bind with your drone FPV.
Check for Loose Cables
“Check for Loose Cables” is a crucial troubleshooting tip that you must keep in mind to avoid any technical difficulties. Often, loose cables can lead to disrupted connections, slow performance, or even permanent damage to your device. It might be a daunting task to check every cable, but it doesn’t take long to fix the problem.
All you need to do is make sure that the cables are secured tightly to their respective ports. Remember that even a small force can accidentally pull out a cable from its connection, causing inconvenience later on. So, whenever you detect a problem, first check for loose cables before seeking further technical assistance.
A little caution and care can go a long way in keeping your devices safe and running smoothly.
Ensure Your X9D is in Range of FPV Drone
When flying an FPV drone with your X9D controller, it is crucial to ensure that your X9D is within range of your drone. If your X9D is out of range, you may lose control of your drone, resulting in a crash. To troubleshoot this issue, start by checking the antenna on your X9D.
Make sure that the antenna is fully extended and pointing straight up. Next, check the battery level of your X9D. If the battery is low, it may not be transmitting as effectively as it should be.
Another thing to consider is the environment in which you are flying. If there are many obstacles or interference from other devices, this can affect the range of your X9D. Finally, consider upgrading your antenna if you need a more extended range.
With these troubleshooting tips, you should be able to ensure that your X9D is in range of your drone and prevent any potential crashes.
Verify Battery Levels in Your Devices
When it comes to troubleshooting common tech issues, checking battery levels in your devices is a crucial step. Low battery can cause a plethora of problems, including slow performance, shutdowns, and even data loss. To avoid these issues, take the time to verify the battery levels in your devices.
Most devices show battery percentage or level indicators in the settings or home screen, so it should be easy to check if your device is running low on juice. If you find that the battery level is indeed low, plug in the device to charge it up or replace the batteries if necessary. Remember, taking a few seconds to check your battery levels can save you a lot of time and frustration down the road!
Conclusion
Wrapping up our tutorial on how to bind your X9D with your drone for FPV goodness, we hope you’ve learned the ins and outs of creating the perfect connection. Remember, always keep your antennas pointed in the right direction and make sure to give your equipment some love and attention. Whether you’re soaring through the skies or enjoying a low-key flight, a good bind can make all the difference.
Happy flying!”
FAQs
What is x9d and why is it important for FPV drone flying?
The x9d is a popular remote control used in FPV drone flying. Its advanced features and customizable settings make it a preferred choice for pilots who want full control over their drone.
How do I bind my x9d to my FPV drone?
To bind your x9d to your FPV drone, turn on both the controller and the drone, then put the controller into bind mode. Follow the steps listed in your drone’s manual to complete the binding process.
What are some common x9d settings I should adjust for better flying performance?
Adjusting settings such as endpoints, expo, and rates can greatly improve your flying performance with an x9d controller. It’s recommended to research and test different settings to find what works best for your flying style.
I’m having trouble binding my x9d to my FPV drone. What can I do?
Make sure both your controller and drone are fully charged and within range of each other. Double-check that you are following the correct binding steps listed in your drone’s manual. If you’re still having issues, reach out to the manufacturer or an online community for additional troubleshooting assistance.


