
Are you looking to take your drone flying experience to the next level? Do you dream of soaring through the air, performing flips and tricks with ease? FPV freestyle flying might just be for you. But first, you need the right equipment. Building an FPV freestyle drone can seem like a daunting task, but with the right guidance and a bit of perseverance, anyone can do it.
In this blog, we’ll cover everything you need to know to build your own FPV drone, from choosing the right components to assembling them and setting up your first flight. So fasten your seatbelt, put on your goggles, and let’s get started!
Introduction
If you’re looking to build an FPV freestyle drone, there are a few important things you’ll need to consider. First and foremost, you’ll need to choose the right parts for your build. This includes everything from the frame and motors to the camera and video transmitter.
You’ll also need to decide on a flight controller and electronic speed controllers (ESCs), as these will control the drone’s movements in the air. Once you have all the parts, it’s time to start the assembly process. This can be a bit tricky, as you’ll need to solder everything together and make sure each component is properly secured.
But with a bit of patience and practice, you should be able to get your new drone up and running in no time. So if you’re ready to take your flying skills to the next level, building an FPV freestyle drone is definitely worth considering.
What is FPV Freestyle?
FPV Freestyle is a captivating and thrilling new sport that is rapidly gaining popularity across the globe. In simple terms, it involves flying drones using First Person View (FPV) goggles and performing a variety of acrobatic maneuvers with them. Freestyle pilots use their advanced drone flying skills to weave their drones through obstacles, perform daring dives and flips, and execute gravity-defying maneuvers to create stunning aerial displays that are both mesmerizing and exhilarating to watch.
The sport effectively combines the adrenaline rush of extreme sports with the excitement of technology and creativity. With its rapidly growing popularity, FPV Freestyle is quickly becoming a favorite among drone enthusiasts and action sports fans alike.
Why Build Your Own Drone?
As technology advances, drones have become extremely popular, leading many people to consider building their own. But why should someone build their own drone? Well, firstly it can be a fun and rewarding experience, allowing you to learn about the many components and intricacies of drone technology. Additionally, building your own drone can also be more cost-effective than buying one, as it allows you to customize the drone to your specific needs and budget.
Furthermore, creating your own drone gives you complete control over its features and capabilities, allowing you to use it for a variety of purposes, including aerial photography, videography, and even search and rescue missions. Building a drone is also a great way to challenge yourself and develop new skills. It allows you to experiment with different designs, components, and technologies.
In short, building your own drone can offer a unique and thrilling experience, while also providing you with a powerful tool for various applications.
Step 1: Choose Your Components
If you’re looking to build a FPV freestyle drone, the first step is to choose your components carefully. You’ll need a high-quality frame that is lightweight and durable, as well as powerful motors that can provide the speed and maneuverability you need for impressive tricks. A good flight controller is also essential, as it will allow you to fine-tune your drone’s performance and ensure it stays stable in the air.
Don’t forget to consider your camera and transmission system too, as these will determine the quality of the video feed you receive while flying. Take your time researching and selecting the best components for your needs, and you’ll be well on your way to building an amazing FPV freestyle drone. With these components, you can design a drone that is fast, agile, and capable of capturing high-quality video footage of all your flights.
So, let’s choose your components and start the journey of building your own FPV freestyle drone!
Flight Controller, ESC, and Motors
When building your own drone, the first step is to choose the right components. The flight controller, ESC, and motors are three of the most important parts you need to focus on. The flight controller is like the brain of your drone, controlling its movements and stability, while the ESC (Electronic Speed Control) regulates the speed of the motors.
The motors, on the other hand, are responsible for generating the necessary lift to get your drone off the ground. It is essential to choose components that are compatible with each other to ensure optimal performance. Also, you need to consider factors like weight, power consumption, size, and budget while selecting components.
Choosing the right components for your drone is the foundation of building a successful and stable drone that performs well in the air and satisfies your requirements.
Frame and Propellers
When it comes to building your own drone, the choice of frame and propellers is crucial. The frame is essentially the foundation of your drone, and it needs to be sturdy enough to withstand any high-speed impacts or rough landings. There are a variety of materials to choose from, such as carbon fiber or aluminum, but ultimately it comes down to your personal preference and budget.
As for the propellers, they are responsible for generating the thrust required to lift off the ground and maneuver the drone in the air. Choosing the right propellers can greatly impact the performance of your drone, and you’ll need to consider factors like size, pitch, and material. It’s important to do your research and choose quality components that are compatible with your other hardware.
With the right frame and propellers, you’ll be well on your way to building a high-performance drone that can handle any challenge.
FPV Camera and Transmitter
When it comes to building a customized FPV drone, selecting the right components from the outset is critical for ensuring the best performance. One of the most important components is your FPV camera and transmitter. These two elements work together to send live video footage from your drone to your FPV goggles, allowing you to pilot your drone with greater accuracy and control.
Choosing the right camera and transmitter can be overwhelming, given the sheer number of options available on the market. However, there are a few key factors to consider when making your selection. One important consideration is the resolution of the camera.
Higher resolution cameras offer clearer images, which can be especially important for racing drones where split-second decisions are paramount. Another factor to consider is the transmitter power, which determines the range and quality of the signal. It’s essential to choose a transmitter that is powerful enough to transmit a clear signal to your goggles, particularly if you plan to fly at longer distances.
By keeping these key factors in mind, you can choose the FPV camera and transmitter that are the best fit for your intended use and drone design.
Step 2: Assemble Your Drone
Now that you have all the necessary components for your FPV freestyle drone, it’s time to put them together. Assembling your drone takes patience and attention to detail, but it’s also an exciting part of the process. First, start by mounting the flight controller onto the frame.
Next, attach the ESCs to the arms of the frame and connect them to the flight controller. Then connect the motors to the ESCs and attach the propellers. Make sure to double-check all connections and tighten all screws to prevent any loose components during flight.
Now it’s time to add the camera and transmitter. Mount the camera onto the top plate of the frame and the transmitter onto the back. Finally, attach the antenna to the transmitter.
Once everything is secured and connected, you can move on to calibrating your drone and configuring the settings. With all your hard work, you’re on the way to experiencing the thrill of flying your own customized FPV freestyle drone.
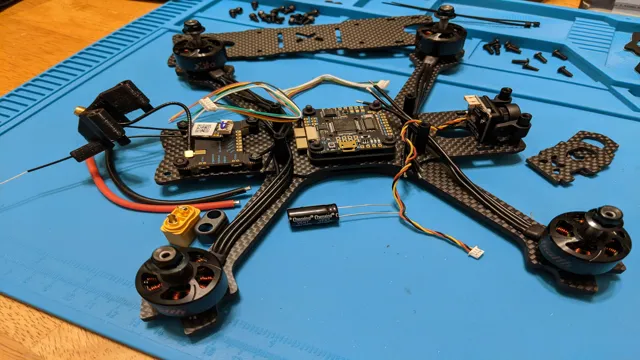
Wiring and Soldering
Once you have all of your drone components and tools ready, the next step is to assemble your drone. Here comes the fun part, we will start by wiring and soldering the different parts together. This will ensure the most reliable and efficient connection between the components to avoid any unwanted disconnections during flight.
You need to make sure to carefully follow the manufacturer’s instructions to ensure all parts are connected accurately. Soldering is a crucial step that requires a lot of concentration and patience; even the tiniest mistake can lead to damage or broken electronic components. Remember to test each connection as you go, without connecting the battery to avoid any unintentional damage.
Once the wiring and soldering are complete, it’s time to move onto the next step and configure the flight controller firmware. So, let’s dive in and start assembling your dream drone.
Mounting Components to Frame
When it comes to assembling a drone, the process can be exciting yet nerve-wracking, especially when it comes to mounting the components onto the frame. The key is to ensure that the frame is secure, lightweight, and easy to maneuver. The first step is to select the right frame that fits your specific needs.
You want to choose a frame that can accommodate all of your components, such as the motors, ESCs, and flight controller. Once you have your frame, you’ll need to attach the motors to the arms, making sure to line them up correctly. It’s best to use screws and nuts to secure the motor to the frame, and you can even use rubber spacers to prevent any vibrations from interfering with the flight.
The next step is to attach the ESCs to the arms and connect them to the motors. With these steps completed, you’ll be well on your way to assembling your drone and preparing for takeoff.
Configuring Flight Controller and ESCs
Assembling your drone can be a thrilling process that requires patience and a bit of technical skill. To get started, you will need to configure your flight controller and electronic speed controllers (ESCs) correctly. The flight controller is the brain of your drone, while the ESCs are responsible for controlling the speed and direction of your motors.
When choosing a flight controller and ESCs, make sure they are compatible with each other and your drone’s setup. Once you have everything you need, connect your flight controller and ESCs according to your manufacturer’s instructions, ensuring that they are properly calibrated and configured. Double-check your wiring and connectors before testing your drone’s motors.
A poorly configured flight controller or ESCs could cause your drone to malfunction, so take the time to do it properly. With a well-configured flight controller and ESCs, you’ll be ready to take to the skies in no time!
Step 3: Test and Adjust
Now that you’ve assembled your FPV freestyle drone, it’s time to test it out and make any necessary adjustments. Start by finding an open, safe area where you can fly the drone. Turn on your transmitter and ensure that all the controls are working properly.
Next, power up the drone and test its responsiveness to your commands. Take it for a test flight and pay close attention to any issues or irregularities you might encounter. This is the time to adjust the drone’s settings, such as the PID values or the camera angle.
Don’t be afraid to take your time and make multiple test flights, tweaking the drone until it feels just right. Remember, building a freestyle drone is all about customization and experimentation, so embrace the process and have fun!
Calibrating Flight Controller and ESCs
Now that you have gone through the process of setting up your flight controller and ESCs, it’s time for the final step: testing and adjusting. This is a critical step in ensuring your drone can fly smoothly and safely. Start by checking that your drone is level and secure on a flat surface.
Then, power up your equipment and check the motor spin direction against the instructions provided by your manufacturer. Next, check the motor response to throttle inputs, making adjustments as necessary to ensure that all motors respond equally. Finally, conduct a test flight, paying attention to any vibrations or uneven flight behavior, which could be an indication of incorrect ESC calibration.
Make small adjustments as needed until you achieve a stable flight. Remember, taking the time to properly calibrate your flight controller and ESCs is crucial for your drone’s performance and overall safety.
Testing and Tweaking Performance
Once you have implemented your website optimization strategy, it’s important to test and tweak performance to ensure that your efforts are paying off. This is where step 3 comes in: test and adjust. By testing how your website performs, you can identify areas that need improvement and make adjustments to optimize your website further.
One way to test your website’s performance is to use performance testing tools like Google’s PageSpeed Insights, which can help you identify areas of your website that need improvement. Another way to test performance is to ask for feedback from users. This can be done through surveys or by simply asking users for feedback directly.
By testing and adjusting your website’s performance, you can ensure that your website is running smoothly and effectively, which can lead to increased traffic and engagement. So, take the time to test and adjust your website’s performance, and you’ll be on your way to a more successful website.
Conclusion
Building an FPV freestyle drone may seem like a complicated and daunting task, but with some patience, persistence, and the right tools, anyone can do it. Just think of it as putting together a puzzle where the end result is an adrenaline-fueled flying experience that will leave you breathless and eager for more. So grab your soldering iron, strap on your goggles, and join the ranks of drone pilots soaring through the sky like a bird, except with a lot more technology involved.
“
Enjoy Your New FPV Freestyle Drone
After all the hard work and anticipation, it’s time to take your new FPV freestyle drone for a spin and see what it can do. But before you dive straight into the action, it’s important to test and make necessary adjustments to ensure optimal performance and safety. Start by testing the drone’s balance and stability in a controlled environment such as an empty field or park.
Take note of any issues with drifting or tilting and troubleshoot accordingly. Experiment with different flight modes and adjust the settings to find the perfect balance between speed and agility. Additionally, test the drone’s range to avoid any unexpected disconnections during flight.
Once you’ve ensured that everything is in working order, it’s time to strap on your goggles and take to the skies. Remember to always prioritize safety, have fun, and take regular breaks to avoid fatigue. Happy flying!
FAQs
What parts do I need to build a FPV freestyle drone?
A typical FPV freestyle drone would require a frame, flight controller, ESCs, motors, propellers, a camera, video transmitter, receiver, and battery.
Can I use any camera for my FPV freestyle drone?
No, you need a specialized FPV camera that can handle fast motion and low latency. Examples of FPV cameras include the RunCam Racer and Foxeer Predator.
Do I need to be an expert to build a FPV freestyle drone?
While some technical knowledge and experience with electronics can be helpful, there are many beginner-friendly tutorials and guides available online that can assist you in building your first drone.
How do I choose the right propellers for my FPV freestyle drone?
The type of propellers you need will depend on the size and power of your motors, as well as the type of flying you plan to do. You can use online calculators or consult with experienced builders for guidance on choosing the right propellers.


