
Flying drones has become an increasingly popular hobby and a lucrative profession. The emergence of First Person View (FPV) technology has revolutionized the drone game and taken it to new heights. FPV provides an immersive experience that allows pilots to fly and maneuver their drones as if they were their own eyes in the sky.
Building your own drone with FPV equipment can be a fun and challenging project that requires research, patience, and some technical skills. In this blog, we will share some tips and tricks on how to build a drone with FPV technology and explore the different components needed to get started. So put on your thinking cap, grab a cup of coffee, and get ready to dive into the world of drone building.
Overview
Building your own drone for FPV (first-person view) can be an exciting and rewarding experience for any drone enthusiast. To begin, you will need to choose a frame that fits your desired specifications, such as size and weight. Next, select the appropriate motors, flight controller, and propellers based on the frame and desired performance.
Adding a camera and video transmitter for FPV will allow you to see what the drone sees in real-time. It’s important to ensure that all components are compatible and properly connected. Once you assemble all the parts, you can program the flight controller, test the drone’s performance, and make any necessary adjustments.
Building a drone for FPV can be a challenging yet fun project for anyone interested in the technology and gives a greater understanding of how drones work. Just remember to follow all local regulations on drone flights and safety.
What is FPV?
FPV, which stands for First Person View, refers to the experience of piloting a remote-controlled vehicle, usually an unmanned aerial vehicle (UAV), from the perspective of the onboard camera. FPV involves using specialized video goggles or a screen to view the live feed from the camera, providing a more immersive and realistic experience. This technology has become increasingly popular among hobbyists and professionals alike, as it allows for precise control and maneuvering of the vehicle, as well as the capture of stunning aerial footage that would be impossible to achieve with traditional cameras.
Whether you’re a drone enthusiast looking to take your flying skills to the next level, or a filmmaker wanting to capture breathtaking aerial shots, FPV is an exciting and rapidly evolving field with endless possibilities.
Types of Drones for FPV
When it comes to FPV (First Person View) flying, choosing the right drone is crucial for the best experience. There are several types of drones for FPV, each catering to different styles and preferences. Racing drones are built for speed and agility, with smaller frames and high-performance components.
Camera drones, on the other hand, are designed for aerial photography or videography, with larger and more stable frames to accommodate high-quality cameras. Freestyle drones are a mix of racing and camera drones, emphasizing acrobatic moves and creative flying styles. Lastly, cinematic drones are larger and more expensive, with the ability to carry heavy cameras for professional filmmaking projects.
Overall, choosing the right type of drone depends on your personal goals and preferences for FPV flying.
Parts Required
To build a drone with FPV, you will need a few essential parts. First of all, you will need a frame to hold all the components together. The frame should be durable and lightweight, and there are various options available, such as carbon fiber or aluminum.
You will also need a flight controller to control the drone’s movement, which serves as the drone’s brain. Ensure you choose a reliable flight controller that is compatible with your selected components. Another critical component is the ESC( Electronic Speed Controller), which links with the motor.
Choose an ESC that can handle your selected motor’s power requirements, as well as the flight controller you’re using. Also, consider the motor and propellers, battery, and FPV camera to complete your drone build. Make sure you choose a high-definition camera for the best FPV experience.
These essential components will serve as the foundation of your drone build and provide you with a successful outcome.
Frame
When building a bike frame, it’s important to have all the necessary parts in order to ensure a smooth and safe ride. Here are some of the essential components needed for a bike frame: Frame tubes – These are the main structural components that make up the frame.
Typically made from steel, aluminum, or carbon fiber, they connect at the joints to form the frame structure. Bottom bracket – This is the central part of the frame where the pedals attach.
It’s important to select a bottom bracket that matches the crankset you plan to use. Headset – This is the part of the bike that allows the fork and the front wheel to turn.
Choosing the right headset is important since different frames require different types. Dropouts – These are the parts of the frame where the rear wheel attaches.
They come in a variety of sizes and shapes, so it’s important to select the ones that will fit your wheel axle. Cable guides – These are small pieces of the frame that guide the bike’s cables to the appropriate locations.
They help keep everything organized and prevent the cables from rubbing against the frame. Having the right parts for your bike frame is crucial for a successful build. By selecting quality components and ensuring they all fit together correctly, you’ll have a solid and safe foundation for all your future rides.
Flight Controller
If you’re planning on building a drone, you’ll need to know about the flight controller – the device that manages the drone’s movement, navigation, and other functions. To build a reliable drone, you need a good flight controller, and fortunately, you can buy high-quality controllers from a variety of sources. Some of the key parts required for a flight controller include a microcontroller (usually an ARM processor), sensors (such as accelerometers and gyroscopes), and communication modules (such as Bluetooth or Wi-Fi).
These components work together to provide the drone with stability and flexibility, allowing you to control its movements and performance. Whether you’re building a drone for fun or professional purposes, investing in a good flight controller is essential for achieving the results you want.
Motors and Propellers
When it comes to building a drone, it’s important to understand what parts are required to make the motors and propellers function properly. Firstly, you’ll need to choose the right motor size based on the size and weight of your drone. A motor’s size is measured in millimeters and its power in KV.
Depending on your drone’s size, you’ll want a motor with the appropriate KV rating to ensure it has enough power to lift off the ground. In addition to the motor, you’ll also need propellers. These come in different sizes and shapes, and also need to be chosen based on the size and weight of your drone.
Propellers are typically labeled with two numbers: one for the length and one for the pitch. The length refers to the distance from the center of the hub to the tip of the blade, while the pitch refers to how steeply the blade is angled. By selecting the right motor and propeller combination, you can achieve an optimal balance of power and efficiency for your drone.
ESC
ESC If you’re looking to build your own robot or control a motor with a micro-controller, one essential part you’re going to need is an ESC or electronic speed controller. An ESC is a small device that controls the speed of a brushless motor by regulating the frequency and strength of the electrical signals it sends to the motor. To get started, you’ll need an ESC that is compatible with your motor, battery, and micro-controller.
Choose an ESC with enough amperage to handle the current draw of your motor, and be sure to check the voltage rating to ensure it matches your battery pack. Keep in mind that different ESCs may have different programming methods and protocols, so you’ll need to verify your micro-controller can communicate with your specific ESC. Once you have your ESC chosen and installed, you’re ready to start programming your robot or motor control system.
With the right ESC and programming, you’ll be able to control motor speed, direction, and even braking with precision and accuracy.
Camera
For all avid photographers, it’s essential to have the right camera parts to capture the best shots. Whether you’re a beginner or professional, knowing the basic parts of a camera can help you choose the best setup to suit your needs. The lens is the most critical part of a camera, as it captures the image you want to capture.
You can choose from prime or zoom lenses, depending on the type of photography you plan on doing. The camera body contains the sensor, which captures the image reflected through the lens. You can choose from various sensor sizes depending on your budget and preferences.
The viewfinder is where you can see the image you’re capturing, and it’s essential to choose a good one for accurate framing. A memory card stores the photos you capture and depends on the storage capacity you’d need. The battery is another crucial part of the camera, and it’s wise to have at least one extra to avoid running out of power in the middle of a shoot.
Choosing the right camera parts can enhance the quality of your photos, whether it’s for recreational or professional purposes.
Transmitter and Receiver
If you’re considering building a transmitter and receiver, there are a few parts you’ll need to make it work properly. First things first, you’ll need an antenna. This is what sends and receives the signals that are being transmitted.
You’ll also need a modulator and a demodulator. The modulator converts the data or audio signal into a waveform that can be transmitted, while the demodulator does the opposite and converts the received signal back into the original data or audio. Additionally, you’ll need a power supply to provide power to the transmitter, as well as a microphone or audio source to input the audio signal.
On the receiving end, you’ll need a speaker or headphones to output the audio signal. Keep in mind that the specific parts and components you need will depend on the type of transmitter and receiver you want to build, so it’s important to do your research and figure out what will work best for your specific project. With the right parts and some knowledge of electronics, building a transmitter and receiver can be a rewarding and fun project to undertake.
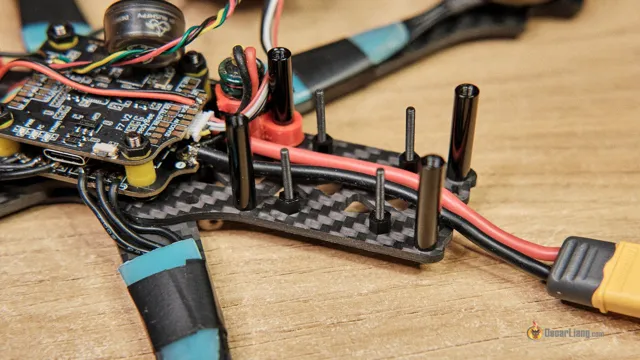
Assembly
Building your own drone for FPV flying is an exhilarating and challenging experience, but with the right guidance and tools, it can be a rewarding endeavor. The first step is to research and select the right components for your drone, including the frame, flight controller, motors, propellers, camera, and transmitter. Once you have all the necessary parts, the assembly process begins.
Start by mounting the flight controller onto the frame and connecting it to the motors and electronic speed controllers. Next, attach the camera and transmitter to the frame, ensuring proper placement and alignment. Finally, add the propellers and make sure they are tightened securely.
Before your first flight, don’t forget to check and calibrate all the components and test the drone in a safe, open area. With patience and practice, you can enjoy the thrill and freedom of flying your very own FPV drone.
Step-by-Step Guide to Assemble Your Drone FPV
Assembling your own drone is an exciting project with a rewarding end result. Here’s a step-by-step guide to help you assemble your drone FPV with ease. The first step is to gather all the required parts, including the frame, motors, propellers, battery, flight controller, and camera.
Make sure to inspect each component to ensure that they are all functioning and undamaged. Then, start by attaching the motors to the frame and securing them in place with screws. Next, mount the flight controller and connect it to the motors.
Install the propellers carefully, ensuring they are in the right position and securely attached. Attach the battery and camera to the drone, and check all the wiring connections. Finally, perform a thorough check of your drone to ensure everything is in working order before attempting to fly it.
By following these simple steps, you’ll be able to assemble your drone FPV with ease and enjoy the thrilling experience of flying it.
Calibration and Settings
When it comes to building your own drone for first-person view (FPV) flying, calibration and settings are important factors to consider. Assembling the drone correctly is crucial, but ensuring that it’s calibrated correctly and has the appropriate settings is equally important. Calibration can refer to the gyro calibration, which helps stabilize the drone in flight.
This process involves keeping the drone level while turning it on and allowing it to calibrate itself. Additionally, some drones require a manual calibration where you move it through several axes to ensure it’s properly balanced. On the other hand, settings refer to the camera, video transmitter, receiver, and flight controller.
It’s important to understand how to optimize each of these components to achieve the desired performance and functionality in flight. By investing time in calibrating and adjusting your drone’s settings, you’ll be able to achieve a smoother, more reliable flying experience. So, take the time to properly calibrate your drone and adjust its settings for the ultimate FPV flying adventure.
Calibrating Your Flight Controller
Calibrating your flight controller is an essential step to ensure stable and accurate drone flights. Calibration involves adjusting the sensors on the flight controller to ensure they operate correctly. Most flight controllers have an auto-calibration feature, which automatically adjusts the sensors when starting up.
However, it’s always good to double-check the settings manually. Calibration should be done periodically, especially after any major crashes or damages to the drone. Additionally, adjusting the flight controller’s settings can also impact the drone’s behavior during flight.
Settings that can be adjusted include PID (Proportional – Integral – Derivative), throttle, and angle. It’s crucial to understand each setting and how they impact the drone’s performance. Regular calibration and adjustment of settings will help ensure a smooth and safe flight while flying your drone.
Adjusting Flight Settings for FPV
When it comes to FPV flying, it’s important to calibrate your flight settings to ensure a smooth and stable flight. One important setting to adjust is your PID tuning, which controls the response of your quadcopter to your input. This involves tweaking your proportional, integral, and derivative controls to get the right balance for your aircraft.
Another key setting to consider is your camera angle, which affects how you see the world from your drone’s perspective. Adjusting this angle can help you fly more comfortably and avoid crashes. Finally, you’ll want to make sure your failsafe settings are properly configured, so your aircraft will return home if you lose signal or encounter other issues.
By taking the time to adjust these settings, you can improve your FPV flying experience and get the most out of your quadcopter.
Flying Your Drone FPV
If you’re looking for a thrilling way to experience your drone flights, then you should definitely give FPV (First-Person View) flying a try. But before you can start soaring through the skies, you’ll need to build a drone that’s FPV-ready. First, you’ll need to select a high-quality FPV camera and transmitter.
You’ll also need a pair of FPV goggles that will allow you to see exactly what your drone sees. When it comes to building the drone itself, you’ll need to choose a frame that’s sturdy yet lightweight, as well as a powerful motor and propeller combination. Don’t forget to add an antenna for your transmitter as well.
Once you have all the necessary equipment, it’s time to put it all together and start practicing your FPV flying skills. But be careful – flying your drone FPV can be an incredibly exciting yet challenging experience that requires a lot of practice and patience.
Tips for Flying FPV
Flying FPV can be a thrilling experience, but it requires some skills and preparation. To begin, you need to select the right drone and equip it with a quality camera and a First-Person-View system. Once you’re ready to take off, it’s vital to familiarize yourself with your drone’s capabilities and limitations.
Start by flying your drone in a wide-open space, away from obstacles or people. Gradually increase the drone’s speed and height to build your confidence and skills. Remember to always keep your drone in sight and maintain a safe distance from any obstacles or restricted airspace.
To make the most of your FPV experience, try flying in different weather conditions and experimenting with different aerial maneuvers. Keep in mind that flying FPV is a never-ending learning process, so don’t get discouraged by mistakes – they are all part of the fun. With these tips in mind, you’ll be soaring the skies in no time!
Precautions and Safety Measures
When it comes to flying your drone FPV (First Person View), there are some precautions and safety measures that you should be aware of to avoid any accidents or damages. Firstly, always ensure that your drone is fully charged and the battery is in good condition before taking off. It’s also important to fly in a suitable environment that is open and away from people and buildings.
Always maintain visual contact with your drone and avoid flying near airports or restricted areas. Additionally, it’s a good idea to have propeller guards installed to prevent any potential harm to people or objects. Lastly, make sure to familiarize yourself with the laws and regulations of your area regarding drone use, as breaking these rules can result in fines or legal consequences.
Remember, safety should always be your top priority when flying your drone FPV.
Conclusion
In conclusion, building your own FPV drone may seem like an intimidating task, but with the right tools, resources, and a bit of patience, it can be a rewarding experience. Not only will you have a better understanding of how your drone works, but you’ll also have the satisfaction of creating something unique to your own style and preferences. So grab your soldering iron and get to work, because the sky’s the limit when it comes to building your own FPV drone! Happy flying!”
FAQs
What are the main components required to build an FPV drone?
The main components required to build an FPV drone are a frame, flight controller, motors, ESCs, FPV camera, transmitter, receiver, battery, and propellers.
Can I build an FPV drone without any prior experience in building drones?
Building an FPV drone without any prior experience can be challenging, but it’s not impossible. There are plenty of tutorials and online resources available to guide beginners through the process.
How do I choose the right FPV camera for my drone?
When choosing an FPV camera for your drone, consider factors such as resolution, field of view, latency, and low-light performance. You may also want to consider whether you want a CCD or CMOS sensor.
What is the maximum range of an FPV drone?
The maximum range of an FPV drone varies depending on the transmitter and receiver used. With a good transmitter and receiver setup, you can expect to get a range of several kilometers. However, it’s important to note that flying beyond your line of sight is illegal in most countries.
Can I fly my FPV drone indoors?
Yes, you can fly your FPV drone indoors, but make sure you have enough space and take safety precautions. Indoor flying can be challenging because of obstacles and signal interference, so it’s important to start with a smaller drone if you’re a beginner.


