
Are you looking to change the motor direction of your FPV drone? Maybe you’ve realized that your drone’s flight performance isn’t as optimal as it could be. Or you’ve upgraded your motors and need to adjust their rotation direction. Whatever the reason may be, changing motor direction is an essential skill every drone pilot should have in their toolkit.
Not all drones have the same layout, and motor direction may vary depending on the manufacturer. However, the process of changing motor direction is relatively simple and can be done without requiring advanced technical knowledge. In this blog, we’ll take a closer look at the steps involved in changing motor direction for your drone and the tools you’ll need to achieve it.
We’ll discuss the implications of rotating your motors in different directions and the impact it has on your drone’s flight performance. By the end of this blog, you should have a clear understanding of how to change motor direction and the benefits that come with it. So buckle up and get ready to learn how to take your FPV drone flying experience to the next level by changing motor direction.
Tools Required
If you’re looking to change the motor direction on your FPV drone, there are a few tools you’ll need. Firstly, you’ll require a soldering iron and solder. You’ll also need a heat shrink tube to cover the newly soldered connections.
Additionally, you’ll need a hex key set to remove any screws holding the motor in place. It’s also useful to have a multimeter to test the connections and ensure everything is working correctly. You may also need a wire cutter and stripper to remove any old connections and prepare the wires for the new ones.
It’s important to have these tools on hand before attempting any modifications to your drone, as it can be frustrating to have to stop in the middle of the process to go buy missing tools. With the proper tools, changing the direction of your motors should be a straightforward process.
Screwdriver
When it comes to fixing things around the house or tackling a DIY project, having the right tools is crucial. One tool that is commonly found in any toolbox is a screwdriver. But what type of screwdriver do you need? That depends on the type of screw you are working with.
Some common types of screwdrivers include flathead, Phillips head, and Torx. Flathead screwdrivers have a single flat blade and are used for screws with a simple slot in the head. Phillips head screwdrivers have a cross-shaped tip and are used for screw heads with an X-shaped indentation.
Torx screwdrivers have a star-shaped tip and are commonly used in electronics and automotive work. It’s important to have a variety of screwdrivers on hand to ensure that you can work with any type of screw you encounter. And don’t forget to make sure your screwdrivers are the correct size for the screw head to prevent damage.
With the right tools and a little know-how, you can tackle any project with confidence!
Pliers
When it comes to working on projects around your house or workspace, having the right tools is essential. Pliers are one of the most commonly used tools for a variety of tasks. Whether you’re gripping onto something tightly or need to bend wire, pliers are the way to go.
There are different types of pliers that you’ll need for specific jobs, such as needle-nose pliers for precision work and wire-cutting pliers for electrical work. When purchasing pliers, make sure they’re comfortable to hold and of good quality. Cheap pliers may seem like a good deal, but they’re likely to wear out quickly and break.
By investing in high-quality, durable pliers, you’ll be able to get the job done efficiently and effectively. Don’t let a lack of tools slow down your progress. Make sure you have a good set of pliers in your toolbox so you can take on any project with confidence.
Locating the Motor Wires
Changing the direction of your FPV drone motor can be crucial in ensuring the best possible flying experience. Locating the motor wires is the first step towards achieving this goal. To do this, you’ll need to take a look at your drone’s user manual to determine which wires correspond to the motor.
Most drones will have a color-coded system for the motor wires, making it easier to identify them. Once you have located the wires, you can then proceed to swap their positions to change the motor direction. It’s essential to take note of the changes you make and the direction you want the drone to move in, as this will impact your flying experience significantly.
Don’t forget to double-check your work before taking to the skies and have fun flying your newly configured drone!
Remove the Cover Plate
After removing the cover plate, it’s important to locate the motor wires to ensure safe and proper installation. The motor wires are typically located near the motor and are color-coded for easy identification. The most common colors used for motor wires are black, white, and red.
The black wire is often the common wire and should be connected to the power source. The white wire is the neutral wire and should also be connected to the power source. The red wire is the hot wire and should be connected to the switch.
It’s important to double-check the color-coding to avoid any errors during installation that could cause damage or injury. Always consult the manufacturer’s instructions and seek professional help if needed. So, while locating the motor wires, make sure to take all necessary safety precautions to ensure a smooth and safe installation process.
Locate the ESC and Motor Wires
Locating the motor wires is an essential aspect of setting up your drone’s ESC (Electronic Speed Control). The ESC and motor wires are necessary for controlling the drone’s speed and movement. Therefore, it’s important to ensure that the wires are correctly identified and connected to prevent malfunctioning and crashes.
Typically, the ESC wires come with three wires, and each wire is color-coded. The color coding is a standard industry practice: red for positive, black for negative, and a third color that varies between manufacturers. In comparison, the motor wires come in pairs, and each wire within the pair has a color designated to it.
Typically, you’ll find the colors blue, black, and white for each pair. One wire within the pair is the negative, while the other is the positive wire. To locate the motor wires, look for where they connect to the drone’s circuit board, and they are usually labeled with their designated colors.
Understanding how to identify and locate these wires will make setting up your drone’s ESC easy and stress-free.
Chaning Motor Direction
If you’re looking to change the motor direction on your FPV drone, it’s important to follow the proper steps. First, identify which motor you want to change the direction of. Then, disconnect the motor from the flight controller.
Depending on your drone’s setup, you may need to reverse the motor’s direction by switching any two of the three motor wires. Take caution when doing this, as reversing a motor’s direction can cause it to spin the opposite way and potentially damage your drone. Additionally, make sure to recalibrate the drone’s gyro to ensure that it registers the motor’s new direction correctly.
With these steps, you can confidently change the motor direction of your FPV drone and improve the performance of your flying experience.
Identify the Motor Direction
Changing the motor direction can be tricky, especially if you’re not familiar with the wiring or the circuitry. However, it can be easily done with the right tools and a bit of knowledge. The first step is to identify the direction the motor is currently spinning.
You can do this by looking at the rotation arrow on the motor or by manually spinning the motor and observing the direction. Once you know the current motor direction, you can proceed to change it by flipping the wires connected to the motor. Switching the location of the two wires will reverse the direction of the motor.
It’s important to note that not all motors are reversible, so it’s important to check the manufacturer’s instructions or consult with an expert before attempting to change the direction. With some practice and patience, you can easily change the motor direction to fit your specific needs.
Switch any two Motor Wires
If you need to change the direction of your electric motor, then swapping any two wires can do the trick. It might sound too simple, but sometimes, simple solutions are the most effective. Before switching any wires, make sure the motor is disconnected from the power source to avoid any accidents.
Once disconnected, open the junction box and identify the leads or wires connected to the motor. These can be color-coded or marked with letters such as T1, T2, and T To change the direction of the motor, swap any two leads.
For example, if T1 is connected to red and T2 to blue, swap those connections so that T1 is now connected to blue and T2 to red. By doing this, the motor will rotate in the opposite direction from before. It’s that easy! Just remember to double-check your connections before turning the motor back on.
Re-attach the Cover Plate
Changing the motor direction in your appliance is a little trickier than just flipping a switch, but it’s not too difficult to do yourself. Once you’ve located the motor, you’ll need to loosen the cover plate screws to access the motor’s wiring. Once you’ve done this, locate the wires that control the direction of the motor and swap them over.
That way, the electrical current will flow the other way around, reversing the motor’s direction. Once you’ve done this, simply reattach the cover plate using the screws you removed earlier. It’s important to make sure everything is securely tightened and in the correct position before testing the motor.
If you’re not confident in your electrical skills, it’s always best to consult a professional. With a little know-how, however, reversing the motor direction in your appliance is a simple and effective way to fix issues with rotation.
Testing the Motor Direction
So you want to change the motor direction on your FPV drone? Well, it’s not as complicated as it may seem! The first step is to check your drone’s user manual to find out which motor needs to be reversed. Once you’ve determined which motor needs to be reversed, you can follow these simple steps. First, locate the motor wires coming out of the flight controller and determine which color wire corresponds to which motor.
Then, locate the motor wires coming out of the ESC (Electronic Speed Controller) for the motor in question. Identify the two wires that correspond to the motor’s direction and swap them. Finally, test the motor by turning on your drone and verifying that the motor is spinning in the correct direction.
If you swapped the wires correctly, the motor should now spin in the opposite direction. Don’t forget to double-check your work before taking your drone for a test flight! Changing the motor direction on your FPV drone can be done quickly and easily, allowing you to customize your drone’s flight performance to your liking.
Power ON the Drone
Powering on your drone is an exciting moment, but it’s important to test the motor direction to ensure your drone flies correctly. Doing so is relatively easy, whether it’s a DIY or manufactured drone. To start, power on the drone and ensure the propellers are not attached.
You don’t want any unnecessary accidents! Next, hold the drone steady and increase the throttle just a bit. You should feel a slight vibration as the motors start to spin. Observe each motor to make sure they are spinning the correct direction.
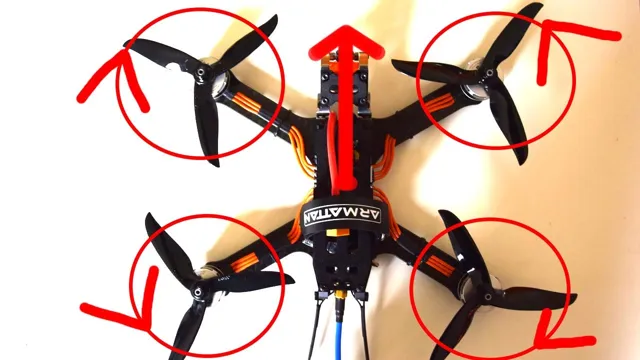
A drone’s motor directions can be different based on the design, so it’s always important to refer to the manual if you’re unsure. Moreover, checking motor direction is an essential first step when building or repairing a drone. Without getting this correct, you’ll find your drone will not ascend “as advertised”.
Checking the motor direction is simple and ensures a successful flight so that you can enjoy your drone to its fullest potential.
Check if Motors are Spinning Correctly
Assembling a robotic device requires careful attention to detail. One important step to check if the motors are spinning correctly. The direction of the motor rotation plays a vital role in ensuring the robot’s movement is smooth and consistent.
To test the motor direction, you can try powering on the motors one at a time and observe the rotation. If the motor rotates in the opposite direction, you will need to reverse the polarity of the motor’s power supply. A simple way to do this is to swap the wires attached to the motor.
Another method is to use a motor controller to reverse the motor’s direction. Checking the motor direction is crucial in ensuring that the device moves as intended while also preventing any damage to the motor itself. With a bit of testing and attention to detail, you can ensure that your robot’s motors are spinning correctly in no time.
Conclusion
Congratulations, you’ve successfully learned how to change the motor direction on your FPV drone! With this new knowledge, you’ll be able to take on even more daring angles and maneuvers, impressing your friends and dominating the skies. Keep in mind, though, that changing motor direction is not enough to make you a true aerial ace. It takes practice, skill, and a bit of luck (and maybe some spare parts) to become a master of FPV flying.
So get out there, keep experimenting, and happy flying!”
FAQs
What is the process to change the motor direction of an FPV drone?
To change motor direction on an FPV drone, you need to access the motor control settings on your flight controller and reverse the direction of the motor spin. This can typically be done through the drone’s software or via the remote control.
Is it possible to change the motor direction of an FPV drone during flight?
No, it is not possible to change motor direction during flight. You will need to land your drone safely and make the necessary adjustments through the flight controller software.
What happens if you don’t change the motor direction of your FPV drone?
If you don’t change the motor direction of an FPV drone, you risk the drone not flying properly and potentially crashing. The motors need to work together in the same direction to maintain stability and level flight.
Can changing the motor direction of an FPV drone affect its performance or battery life?
Changing the motor direction of an FPV drone should not affect the overall performance or battery life of the drone. However, it is important to properly configure the new motor direction to ensure smooth operation.


