Are you a drone enthusiast looking to take your flying experience to the next level? Building an FPV drone might just be the perfect project for you. But where do you even begin? Don’t worry, we’ve got you covered with this step-by-step guide. Firstly, let’s break down what FPV means.
FPV, or First Person View, is a type of flying where the pilot wears goggles that provide a live video feed from the drone’s camera, giving a true immersive experience. Building an FPV drone from scratch can be daunting, but it’s also exciting to have full control over the parts and the final product. This guide will cover everything you need to know to build your own FPV drone, including selecting the right components, assembling them, and getting ready for your first flight.
We’ll also dive into some tips and tricks for flying FPV like a pro, so you can start capturing stunning aerial footage. Think of building an FPV drone like putting together a puzzle. Each piece has a specific place, and they all need to work together seamlessly.
But don’t worry, we’ll make sure you have all the pieces you need and show you how to fit them together correctly. Whether you’re a seasoned drone builder or just starting out, building an FPV drone is a fun and rewarding experience that will take your flying to new heights. So, let’s get started!
Tools and Equipment
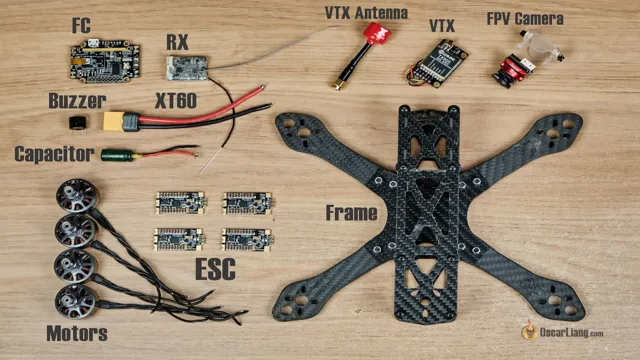
Assembling an FPV drone can seem like a daunting task, but with the right tools and equipment, it doesn’t have to be that difficult. The first thing you’ll need are the drone’s components, such as the frame, motors, ESCs, flight controller, camera, and transmitter. You’ll also need a soldering iron, solder, wire cutters, a receiver, and a battery.
Once you have all of the components, start by attaching the motors to the frame using the screws provided. Then, connect the ESCs to the motors and the flight controller. Solder the wires between the components carefully, making sure not to damage any of them.
The camera and transmitter should also be mounted onto the frame and wired up. Finally, attach the receiver and battery, ensuring that everything is wired up correctly and securely. Once everything is connected, double-check that the transmitter is working correctly and that the drone is responding to your commands properly.
With the right tools and patience, you can have your very own FPV drone in no time.
What You’ll Need
Before starting any project, you need to ensure that you have all the necessary tools and equipment to get the job done right. When it comes to woodworking, there are a few essential tools that you’ll need to have on hand. Firstly, you’ll need a saw – whether it’s a hand saw or a power saw, this is one of the most important tools as it allows you to cut the wood to the desired size and shape.
You’ll also need a set of chisels, which are used for carving and shaping the wood, and a hammer to help you drive nails and fixings into place. Depending on the specific project you are working on, you may also need a drill, a router, sandpaper, and various clamps and screws. Don’t forget to invest in safety gear as well, such as gloves, goggles, and a dust mask, to help protect yourself during the woodworking process.
By having the right tools and equipment on hand, you can ensure that your woodworking project will be a success.
Choosing the Right Tools
When it comes to any job or project, having the right tools and equipment is crucial to getting the job done efficiently and effectively. A screwdriver can’t do the job of a hammer, just like a paintbrush can’t be used for sanding. It’s essential to research and invest in quality tools that match the specific task at hand.
Using the wrong tools not only makes the job more difficult but also increases the risk of injury. It’s also important to maintain and properly store tools to prolong their lifespan. By investing in the right tools and taking care of them, the work can be completed more smoothly and with better results.
Remember, investing in quality equipment is an investment in quality work.
Frame Assembly
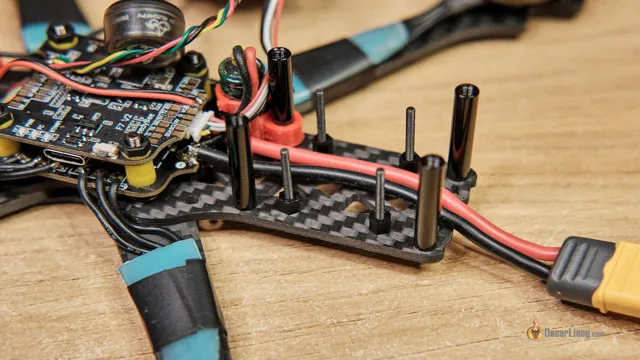
If you’re just starting out with FPV drone building, you might be wondering how to assemble the frame. The first step is to gather all the materials you need, including the frame kit, screws, and a screwdriver. Next, you’ll want to lay out all the pieces and identify which parts go where.
It’s important to follow the instructions carefully, as each frame kit is different. Once you’ve figured out where everything goes, you can start screwing the pieces together. Make sure to tighten each screw enough so that it’s secure, but not so much that you strip the threads.
It’s also a good idea to double check that everything is level and straight as you’re putting it all together. Once you’ve finished assembling the frame, you can move on to the next step in building your FPV drone. With a little patience and attention to detail, you’ll soon have a fully functional drone ready to take flight!
Attaching the Arms
Attaching the arms is an essential part of the frame assembly process. Before starting, make sure to have all the necessary parts, including the arms, bolts, and washers. Begin by attaching the arms to the frame’s base using the bolts and washers.
Tighten them securely but don’t over-tighten. Once the arms are attached, it’s time to connect them to the backrest. You may need someone’s assistance at this point to help hold the backrest in place while attaching the arms.
Ensure that all bolts and washers are securely tightened. An improperly attached arm can be a safety hazard, so it’s essential to take your time and ensure everything is connected correctly. With the arms securely attached, the frame assembly is nearing completion, and your project is starting to take shape.
Mounting the Flight Controller
In order to assemble a drone, one of the most important steps is mounting the flight controller onto the frame. The flight controller is essentially the “brain” of the drone, responsible for processing data from all of the sensors and making adjustments to keep the drone stable in flight. When mounting the flight controller, it is important to take the time to carefully secure it to the frame, using either screws or double-sided tape.
It’s also important to make sure that the flight controller is oriented correctly, with the correct side facing up, as this can affect the drone’s performance. Overall, taking the time to properly mount the flight controller is essential for ensuring that the drone is able to fly safely and smoothly.
Connecting the ESCs
When assembling your drone, connecting the Electronic Speed Controllers (ESCs) is an important step. The ESCs are responsible for controlling the speed and direction of the drone’s motors. To connect the ESCs, you first need to identify the motor they are associated with.
Each ESC should have three wires, which correspond to the motor’s three wires. You then need to solder the wires together in the correct sequence. It’s essential to take your time and ensure that the wires are securely connected and insulated to prevent any short circuits.
Once all of the ESCs are connected, you can test your drone’s motors to ensure they’re operating smoothly and evenly. This process may seem daunting, but with proper attention to detail and careful handling of equipment, you can connect the ESCs with no trouble.
Installing the Electronic Components
When it comes to assembling an FPV drone, one of the most important steps is installing the electronic components. This process can seem overwhelming at first, but with a little patience and some basic knowledge of electronics, it’s actually quite straightforward. First, you’ll need to mount the flight controller on the frame using standoffs or screws.
Be sure to orient it correctly according to the manufacturer’s instructions. Next, you’ll need to connect the ESCs (electronic speed controllers) to the motor leads and the flight controller using RC connectors or soldering. It’s important to double-check that these connections are secure and oriented correctly.
Then, you’ll need to connect the receiver to the flight controller and program it to recognize your transmitter inputs. Finally, you’ll need to attach the camera and video transmitter to the frame, making sure they are securely mounted and free from vibrations. With these electronic components in place, your FPV drone will be ready to fly!
Mounting the Camera and VTX
Now that we’ve got the frame assembled and the flight controller in place, it’s time to mount the camera and VTX. First, let’s take a closer look at the camera. The camera is a crucial component of the build as it will provide us with a live video feed of our drone’s flight.
We want to make sure the camera is securely mounted, with a clear view ahead for smooth video recording. To mount the camera, we will use a small metal bracket mounted to the front of the frame. This bracket will hold the camera in place, and we can adjust the angle to ensure we get the perfect shot.
Next up is the VTX, which stands for Video Transmitter. This device will send the video feed from the camera to our goggles or a monitor. To mount the VTX, we will use a small strap that wraps around the frame.
We want to make sure that the VTX is positioned in such a way that it is easily accessible if we need to change any settings, but also protected so that it won’t get damaged during the flight. Overall, mounting the camera and VTX may seem like a small step in the build process, but it’s actually quite important to get these components right. A securely mounted camera with a clear view ahead will ensure smooth video footage, while a properly mounted VTX will ensure that we have a strong and stable video feed throughout the flight.
So take your time and make sure you get it right!
Attaching the Antennas
When it comes to installing electronic components like antennas, there are a few things to keep in mind. First, make sure that the antenna is compatible with your device and the frequency you plan to use. It’s also important to attach the antenna correctly, as an incorrect installation could result in poor reception or damage to the device.
Depending on the type of antenna you’re using, you may need to connect it to a cable or other connector. Be gentle but firm when attaching the antenna, and make sure that it’s securely fastened. Once your antenna is attached, test it out to ensure that you’re getting the desired signal strength.
By taking your time and being careful during the installation process, you can ensure that your electronic components function optimally and provide the best possible performance.
Connecting the Receiver
When it comes to installing the electronic components of your receiver, it may seem overwhelming at first, but don’t worry! With a little bit of patience and following the instructions, you can have it up and operational in no time. First, you’ll want to carefully unpack all of the components and lay them out in a cleared area. Next, connect the wires according to the provided diagram, making sure to match the positive and negative connections.
It’s also essential to power off all devices before connecting and double-checking all connections before powering on. Once everything is connected correctly, make sure to follow the receiver’s instructions for tuning and calibration. Remember that taking the time to ensure everything is set up correctly can make all the difference in the performance of your receiver.
So, go ahead, take your time, and enjoy your new receiver!
Finalizing the Build and Setup
Now that we have reached the end of the build and setup of our FPV drone, it’s time to finalize everything before taking to the skies. The first thing you want to do is check all the connections to ensure everything is secure and in place. Next, you’ll want to make sure your flight controller and transmitter are paired correctly.
This will enable the transmitter to communicate with your drone, allowing you to control it. Once confirmed, it’s time to stick on the final stickers and decals to give your drone that personal touch. Don’t forget to also test the video transmission to ensure everything works as it should.
Finally, it’s time to take to the skies and see what your new FPV drone can do. Remember, always fly safely and within legal guidelines. With that, our guide on how to assemble an FPV drone comes to an end, and we hope you have found it helpful and informative.
Happy flying!
Adjusting the PID Settings
After putting together your 3D printer, it’s time to fine-tune its settings to optimize its performance. One crucial step is adjusting the PID settings of your printer. The PID (Proportional, Integral, Derivative) controls the printer’s temperature and helps maintain a stable thermal environment for printing.
Adjusting the PID settings involves finding the values for Kp, Ki, and Kd that correspond to the ideal temperature conditions for your printer. This process requires first measuring your printer’s response to different temperature changes and then inputting those findings into the printer’s firmware. Properly tuning the PID settings ensures that your printer produces consistent, high-quality prints.
So, don’t skip this step and take the time to carefully adjust the PID settings for your printer’s specific needs.
Calibrating the ESCs and Flight Controller
After completing the physical build of your drone, it’s time to start the final setup phase by calibrating the ESCs and flight controller. ESCs are essential components of your drone that control the motors’ speed and direction. Any misconfiguration can lead to erratic flight behavior or even crashes, so it’s crucial to calibrate them correctly.
To start, connect the ESCs to the flight controller and then connect the flight controller to your computer. Using the calibration software, you can configure each ESC to ensure that they all operate at the same speed and direction. Additionally, the flight controller needs calibration to help it recognize the range of motion of every input.
This is typically done in the software settings, and it entails moving the drone in all directions to check if the controller responds accordingly. Calibration helps to make sure that the components of your drone are working together seamlessly, ultimately providing the stability and control you need while flying.
Flying Your FPV Drone
If you’re interested in getting into FPV drone flying, the first step is to assemble your own drone. While it may seem overwhelming at first, there are plenty of guides and tutorials out there to help you through the process. First, you’ll need to gather all the necessary components, such as the frame, motors, flight controller, and camera.
Make sure all the components are compatible with each other to ensure smooth operation. Next, you’ll need to assemble the frame and attach the motors, making sure everything is secure and properly aligned. Once you’ve assembled your drone, it’s time to take it out for a test run.
Make sure to start with a safe and legal area for flying, and to take it slow at first until you get the hang of it. With a bit of practice and persistence, you’ll be soaring through the skies in no time.
Safety Tips
When it comes to flying your FPV drone, safety should always be your top priority. Before taking off, it’s important to check your equipment to ensure everything is working properly and your batteries are fully charged. Additionally, make sure you’re flying in a safe and open area and avoid flying near restricted airspace or other areas with high foot traffic.
Always keep a visual line of sight with your drone and never fly above 400 feet. It’s also a good idea to have a spotter with you to help keep an eye out for potential hazards. And remember, accidents can happen even to the most experienced pilots, so be prepared with a first aid kit and know the emergency procedures for your drone.
By following these safety tips and being aware of your surroundings, you can have a fun and safe FPV drone flying experience.
Practice and Learning to Fly
Learning to fly a drone is both exhilarating and challenging, but with enough practice, it can become second nature. If you’re interested in flying your own FPV drone, it’s essential to start with the basics. Begin by mastering the controls and understanding how the drone reacts to your inputs.
Take the time to practice simple maneuvers, such as hovering, forward flight, and turning. As you build your skills, you can move on to more advanced tricks like rolls and flips. Effective practice can be the difference between a drone that’s fun to fly and one that is a source of frustration.
Remember to practice in different environments to prepare yourself for various conditions, and don’t forget to learn from your mistakes. Whether flying for fun or competition, having a solid foundation in the basics is key to taking your flying skills to the next level.
Conclusion
Congratulations on making it through the assembly process of your very own FPV drone! Remember, building a drone is not just about putting together a collection of parts – it’s about understanding how they work together to achieve flight. So if anyone asks you how to assemble an FPV drone, just tell them it’s all about balancing precision and creativity to take to the skies and capture breathtaking aerial footage. Happy flying!”
FAQs
What are the basic components required to assemble a FPV drone?
The basic components required to assemble a FPV drone include a frame, flight controller, motors, ESCs, propellers, camera, video transmitter, receiver, and FPV goggles.
How do I choose the right frame for my FPV drone?
Choose a frame that fits your motor and propeller size, provides enough space for your electronics, and has good durability and weight balance.
What is the best way to configure the flight controller for a FPV drone?
Follow the instructions and tutorials provided by the manufacturer and adjust the settings according to your flying style and preferences.
How can I improve the video quality of my FPV drone?
Use a high-quality camera with good resolution and low latency, a powerful video transmitter, and high-gain antennas for better signal reception.
What should I consider when selecting the battery for my FPV drone?
Choose a battery with the right voltage and capacity for your motors and ESCs, and consider the weight and size of the battery to ensure proper weight balance and flight time.


