If you’re an avid drone enthusiast, you know the importance of having a good quality FPV camera attached to your drone. Not only does it enhance your flying experience, but it also makes capturing breathtaking aerial footage a breeze. But for those who are new to the drone scene, attaching an FPV camera may seem like a daunting task.
Fear not, for we’re here to guide you through the process step by step. By the end of this blog post, you’ll have a better understanding of how to attach an FPV camera to your drone, and be well on your way to capturing stunning aerial footage. So let’s get started!
Why FPV is Important
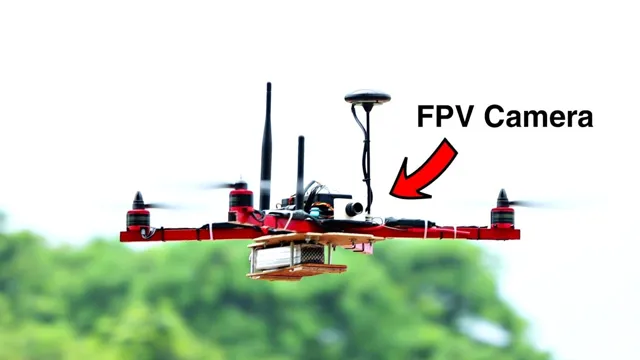
Attaching an FPV camera to your drone is essential if you want to take your drone flying experience to the next level. FPV or First Person View offers a real-time view of the drone’s flight path and enables you to see exactly what your drone sees. This is important because it allows you to fly the drone with greater precision and accuracy.
Additionally, FPV makes it easier to fly in difficult or tight spaces, as you can see exactly where the drone is going. To attach an FPV camera to your drone, you will need to purchase an FPV camera, a video transmitter, and an FPV receiver. You will then need to mount the camera onto your drone, attach the video transmitter, and connect the receiver to a monitor or headset.
It may sound complicated, but with a bit of research and practice, you will soon be able to enjoy the exciting world of FPV drone flying.
Better control and maneuverability
FPV (First-Person View) If you’re looking for a way to increase your control and maneuverability while flying your drone, then FPV is the answer. FPV, or First-Person View, allows you to see the drone’s live video feed through a headset or monitor – giving you the feeling that you’re actually flying the drone from inside it. This provides a level of immersion and control that simply can’t be achieved through traditional remote control flying.
With FPV, you can make more precise and accurate movements and adjustments, allowing you to fly the drone exactly where you want it to go. It’s like having a bird’s eye view of the world, and you’re in control. Plus, it’s a truly unique and thrilling experience that can’t be replicated by any other type of flying.
Give FPV a try and experience the incredible freedom and control that it provides.
Real-time viewing of the drone’s surroundings
FPV FPV, or First-Person View, is an essential feature in drone technology that enables users to view their drone’s surroundings in real-time. This feature is particularly important for drone pilots as it allows them to navigate their drones more efficiently and accurately. With FPV, users can easily control the drone’s movements from a first-person perspective, as if they are sitting inside the drone’s cockpit.
This feature is beneficial for several reasons, like capturing stunning aerial footage or monitoring a large area from a safe distance. Moreover, FPV makes flying drones more thrilling and enjoyable, giving users a unique and immersive flying experience. In short, no drone experience is complete without the excitement and convenience of FPV, a feature that enhances the user’s experience and ensures a successful flight every time.
Compatibility Check
If you’re wondering how to attach an FPV camera to your drone, the first step is to check if your drone is compatible with an FPV camera. Not all drones have the necessary mounting points or connectors to support a camera. Some drones require additional hardware or modifications to be compatible with an FPV camera.
It’s important to do some research and make sure your drone is compatible before investing in an FPV camera. Additionally, you want to make sure that the weight of the camera doesn’t affect your drone’s flight characteristics. Adding too much weight can cause the drone to become unstable or affect its battery life.
Once you have determined compatibility, most FPV cameras come with mounting hardware and instructions for installation, making it easy to attach the camera to your drone. With proper installation and setup, an FPV camera can provide a whole new level of immersive and exciting flying experience.
Ensure compatibility of camera and drone
When it comes to aerial photography, the camera and drone compatibility check is crucial. A compatible pair ensures smooth functionality and optimal output. Before making any purchase, it’s essential to consider the compatibility of both devices.
Every drone has a specific payload capacity, and the camera weight should not exceed this limit. If a camera is too heavy for the drone, the drone will struggle to take off, decreasing its flight time and affecting its stability. Additionally, the camera’s size should fit securely onto the drone’s gimbal.
A poorly fitting camera may cause unwanted movement and vibration, resulting in blurry images. Therefore, before purchasing a camera or drone, it’s vital to research their compatibility, read product descriptions, and establish their use cases to determine the ideal fit. This way, your aerial photography experience will be smooth and enjoyable, producing clear and stunning images.
Check camera weight and size for balance
When it comes to choosing the right camera for your needs, it’s important to consider the weight and size of the camera to ensure balance. Carrying a camera that is too heavy or bulky can be uncomfortable and tiring, especially if you plan to use it for extended periods of time. Additionally, the weight of the camera can affect the quality of your photos, as it can cause shakiness and blurriness.
That’s why it’s important to check the compatibility of your camera with any additional accessories, such as lenses or tripods, that you plan to use. Doing so will help ensure that your camera is stable and well-balanced, allowing you to capture clear, beautiful photos every time. So before you make your next camera purchase, be sure to consider both the weight and size of the camera, as well as any accessories you plan to use, to ensure a comfortable and balanced shooting experience.
Mounting Options
If you’re wondering how to attach an FPV camera to your drone, you’ll be glad to know that there are several mounting options available. The first option is to mount it on the drone’s body using double-sided tape or Velcro. This allows for a secure attachment and easy removal for maintenance.
Another option is to use a camera mount that attaches to the drone’s frame and keeps the camera stable during flight. This is a good option if you want to ensure that your footage is stable and free from vibrations. Finally, some drones come with a specific camera mount that is designed to fit a particular camera model.
If this is the case, simply attach the camera to the mount and secure it to the drone using screws or clips. Whether you opt for tape, a mount, or a specific camera mount, make sure that your camera is securely attached before takeoff to avoid any damage or loss during flight. So, go ahead and make your choice and get ready to capture some amazing aerial footage!
Gimbal for stabilized footage
When it comes to getting stable footage, a gimbal is an essential tool. But once you’ve got your gimbal, the next question is how to mount it. Luckily, there are several mounting options available that can suit your needs.
The most common is the handheld grip, which is perfect if you’re filming on the go and need something lightweight and easy to maneuver. You can also mount your gimbal on a tripod, which is great for taking static shots or filming in a controlled environment. For more extreme filming conditions, like when you’re on a bike or a car, a sturdy suction mount can be a great option.
This holds your gimbal securely and can take a lot of movement without affecting the footage. No matter which mounting option you choose, make sure it’s secure and stable so you can get the best-looking footage possible.
Mounting bracket for fixed placement
When it comes to mounting your device, there are a few options available depending on your preference and needs. For those who want a more permanent and secure fixture, a mounting bracket for fixed placement might be the perfect solution. This type of bracket can be attached to a wall, desk, or other flat surface to provide a stable and secure mount for your device.
It’s ideal for devices that need to be regularly accessed or used in the same location, such as monitors or cameras. The mounting bracket is usually made of durable materials such as metal or plastic, provides a stable base, and can be adjusted to fit different device sizes. Overall, a mounting bracket for fixed placement is a reliable and practical choice for those who want a permanent mounting option.
Connection Process
If you’re looking to enhance your drone flying experience with an FPV camera, you might be wondering how to attach it to your drone. The process is relatively easy and straightforward. First, you need to identify where you want to mount the camera on your drone.
This will usually be on the front or the top of the drone, but it varies depending on the model and your flying needs. Once you have identified the mounting location, you need to ensure that the camera is securely mounted and connected to the drone’s power source and video transmitter. Carefully follow the manufacturer’s instructions to ensure the camera is safely and properly attached.
You’ll also need to set up your FPV goggles to receive the camera’s transmission. Once everything is connected, it’s time to test the camera and adjust the angle for optimal flying. With the right setup, you’ll be soaring through the skies with a whole new perspective and excitement.
Whether you’re a hobbyist or a professional drone pilot, adding an FPV camera to your equipment will level up your drone flying game without breaking the bank.
Attach camera to mounting option
If you’re looking to attach a camera to a mounting option, there are a few things to consider first. Firstly, make sure that the mounting option you’re using is compatible with your camera. This will usually involve checking the weight limit and size of the mounting option to ensure that it can properly support your camera.
Once you’ve confirmed compatibility, it’s time to attach your camera to the mounting option. The process here will vary depending on the specific mounting option you’re using, but in general, you’ll want to use screws or other hardware to secure the camera to the mount. After attaching the camera, it’s also a good idea to double-check that it is properly secured and stable before use.
This will help prevent any accidents or damage to your camera. Overall, attaching a camera to a mounting option is a relatively straightforward process, but it’s still important to take the necessary precautions to ensure that your gear stays safe and secure. Whether you’re using a simple tripod or a more complex rig, make sure to thoroughly read and follow the manufacturer’s instructions for both the mounting option and your camera.
Connect camera to drone’s video transmitter
One of the most important aspects of putting together a drone that can capture high-quality aerial footage is connecting the camera to the video transmitter. This may seem like a daunting task, but it is actually relatively straightforward. First, you will need to find a video transmitter that is compatible with your camera.
Once you have the transmitter, you will need to connect it to the camera using the appropriate cables. Make sure to follow the manufacturer’s instructions carefully to ensure that everything is connected properly. Once the camera and transmitter are connected, you should be able to see the footage being transmitted to a viewing device such as a monitor or goggles.
By taking the time to properly connect your camera to your drone’s video transmitter, you can ensure that you capture high-quality footage that is sure to impress.
Adjust camera angle for desired view
When setting up your camera for the perfect shot, it’s important to adjust the angle for the desired view. Whether you’re taking a photo or recording a video, the camera angle can make all the difference in the final product. Start by considering what you want to capture in the frame.
Do you want a wide-angle shot that includes the entire scene? Or perhaps a closer, more intimate shot of a specific subject? Once you’ve determined the desired view, you can adjust the camera accordingly. Experiment with different angles and heights to find the perfect composition. Remember, the camera angle will directly impact the mood and atmosphere of the photo or video.
So take your time, and play around until you find the perfect perspective to capture your vision.
Testing and Troubleshooting
If you’re looking to attach an FPV camera to your drone, first consider the type of drone you have and where you want to mount the camera. Most drones have a built-in mounting system for cameras, but it’s important to make sure your camera is compatible with your drone before purchasing. Once you have your camera and drone sorted, it’s time to mount it.
Begin by removing any screws or bolts holding the drone’s plastic cover in place and set it aside. Then, attach the camera mount to the drone using screws and bolts or adhesive tape. Make sure the mount is secure and straight.
Next, attach the camera to the mount and angle it as desired. Finally, secure the plastic cover back onto the drone and test the camera’s signal and functionality. With a little patience and careful testing, attaching an FPV camera to your drone is a simple and rewarding process.
Test FPV system for proper operation
When it comes to flying your drone, safety should always be a top priority. To ensure you don’t run into any mid-air mishaps, it’s crucial to test your FPV system for proper operation before taking off. Start by checking that your transmitter and receiver are properly bound to each other.
Then, check the quality of your video feed by turning on your goggles or monitor and looking for any fuzzy or distorted images. If everything checks out, you’re good to go! But if you run into any issues, don’t panic. Troubleshooting is all part of the process.
Check your wiring connections, antenna placement, and battery levels, as these are common culprits for FPV system malfunctions. With a few simple tests and some problem-solving skills, you’ll be able to take to the skies with confidence and peace of mind. Remember, practicing safety during your drone flights is always key!
Check for interference or signal loss
When it comes to testing and troubleshooting your wireless network, one common issue you may encounter is interference or signal loss. This can occur due to a variety of factors, such as distance from the router, physical obstacles like walls or furniture, or even interference from other electronic devices. To check for interference, you can use software tools that measure signal strength and quality, and look for any unexpected drops or fluctuations.
You can also try moving your router to a more central location, or adjusting its settings to broadcast on a different channel or frequency. But if signal loss persists, it may be necessary to upgrade your router or invest in a signal booster to ensure a stronger and more reliable connection. By paying close attention to your network performance and actively addressing any issues, you can ensure that you are getting the most out of your wireless connection and enjoying seamless internet access without any interruptions.
Troubleshoot common connection issues
Connection issues can be a real headache when trying to get online. If you’re experiencing slow speeds, intermittent connection loss or packet dropping, it can be difficult to pinpoint the cause. The first step is to check your modem and router.
Make certain everything is plugged in correctly and reboot both devices. Also, investigate any red lights or error codes that may be appearing. If problems persist, it could be a problem with your ISP.
Contact them and have them check for any outages or issues on their end. Lastly, you may want to consider investing in a network monitoring tool to detect connectivity issues and pinpoint the root cause of the problem. By following these steps, you’ll be able to troubleshoot common connection issues and get back online quickly.
Conclusion
You’ve now seen how to bring your drone to new heights by attaching an FPV camera. Whether you’re soaring through the skies, capturing incredible footage, or just admiring the view, having a bird’s-eye perspective is truly eye-opening. So, grab your tools, get creative with your placement, and above all, stay safe in the air.
With a little bit of patience and a lot of enthusiasm, you’ll be a master FPV pilot in no time!”
FAQs
What kind of FPV camera should I use for my drone?
When choosing an FPV camera for your drone, consider factors such as weight, field of view, and image quality. Look for a camera specifically designed for drone use and compatible with your drone’s model and controller.
How do I mount my FPV camera onto my drone?
Typically, FPV cameras come with a mounting bracket that can be attached to the top or front of your drone using screws or adhesive tape. Make sure the camera is properly secured and adjusted to the desired angle before taking off.
What kind of transmitter do I need to use an FPV camera with my drone?
You will need an FPV transmitter that is compatible with your camera’s brand and model, as well as your drone’s controller. Look for a transmitter that offers a stable signal, low latency, and a range suitable for your flying needs.
How can I view the live feed from my FPV camera on my preferred device?
You will need a compatible receiver (such as a smartphone or monitor) that can display the video feed transmitted from your camera. Some FPV transmitter/receiver sets come with a built-in receiver, while others may require an external one to be purchased separately.


