Building your own FPV drone can seem like a daunting task, but with the right approach and guidance, it’s more than achievable. Not only do you get to customize your drone to your individual preferences, but it can also be a rewarding and exciting experience. Imagine the feeling of flying a drone that you put together yourself, knowing every component and wire is exactly how you want it.
Assembling an FPV drone from scratch is a perfect way to gain a deeper understanding of how drones work, and it’s a great opportunity to learn new technical skills. In this guide, we’ll provide you with all the information you need to build your own FPV drone, including selecting the right components, assembling them, and finally testing and flying your new drone. So, let’s get started and experience the thrill of building your very own drone.
Preparing Your Parts
One of the first steps in assembling your FPV drone is to prepare your parts. This involves inspecting each component to ensure that they are in working order and ready to be assembled. Make sure that you have all of the necessary tools and supplies, such as a soldering iron and wire cutters, before you begin the process.
It’s important to follow the manufacturer’s instructions for each part to ensure that they are used correctly and safely. A common mistake that beginners make is not properly securing their components, which can result in a crash or malfunction. Take your time to carefully connect each part and double-check that they are secure before moving on to the next step.
By preparing your parts correctly, you’ll save yourself time and frustration down the line and increase the chances of a successful flight.
Checking Components
When it comes to building or upgrading your computer, it’s essential to ensure that you have all the necessary components to make it work. Before you start assembling, it’s crucial to check that you have all the correct parts. Make a checklist of each component and go through it one by one to verify that everything is accounted for.
Some essential parts you’ll need to check include the motherboard, CPU, RAM, GPU, storage, and power supply unit (PSU). Additionally, make sure that each component is compatible with one another to avoid any issues when powering up your system. Checking your components before beginning the assembly process can save you a lot of frustration in the long run.
So take the time to properly prepare your parts, and you’ll have a much smoother building experience.
Organizing Tools
When it comes to organizing your tools, preparation is crucial. Before you start assembling your project, take the time to lay out all of your parts and make sure everything is sorted and labeled correctly. This will save you time and prevent the frustration of trying to find the right piece when you need it.
One helpful tool for preparing your parts is a parts tray. These trays have multiple compartments to keep screws, nuts, and bolts separate and easy to find. You can also use a label maker to identify each section of your tray or each bag of parts to ensure you know exactly what you need at a glance.
By taking the extra time to organize your parts before starting your project, you’ll be able to work more efficiently and with greater peace of mind. Plus, you’ll be less likely to misplace or lose any crucial pieces.
Building the Frame
When it comes to assembling an FPV drone, building the frame is the first important step. The frame serves as the foundation for your drone and needs to be built solidly to ensure the safety and stability of your drone. There are various types of frames available, such as H-frame, X-frame, and T-frame, each with its own advantages and disadvantages.
It’s important to choose a frame that suits your specific needs and flying style. Once you have your frame, assembling it can be quite straightforward. Start by finding the center of the frame and attaching the arms or plates to it.
Make sure to secure the screws tightly, but not so tight that you risk stripping them. Next, attach the motors to each arm and connect them to the ESC’s. Don’t forget to add the flight controller and power distribution board and ensure that all the wires are properly connected.
Finally, attach the props and you’re ready for the next step—building the FPV system! By following these steps and taking care throughout the process, you’ll be able to build a sturdy and reliable frame for your FPV drone that will serve you well for many flights to come.
Attaching Arms & Motor
When it comes to building your robot, attaching arms and motors is a crucial step in creating a fully functioning frame. It’s important to ensure that the motors are securely fastened in place and that the arms can move freely without obstruction. By carefully selecting the right components, you can ensure that your robot moves smoothly and efficiently.
Whether you’re building a robot for a competition or just for fun, taking the time to attach the arms and motor properly will make all the difference in the success of your project. So don’t rush this step – make sure you take your time and double check your work before moving on to the next stage of building your robot.
Mounting the Flight Controller
When it comes to building a drone, mounting the flight controller is an essential step that shouldn’t be taken lightly. The flight controller is the brain of the drone, controlling its movements and stabilizing it in the air. To mount the flight controller, you’ll first need to find a secure location on the frame where it can sit without getting in the way of other components.
Once you’ve found the right spot, use screws to attach the flight controller and make sure it’s aligned properly. But before you permanently mount the flight controller, it’s a good idea to test the drone to ensure there are no wiring issues or other problems that could affect its performance. So take your time, be patient, and double-check everything before takeoff.
With a properly mounted flight controller, you’ll have a reliable and stable drone that’s ready to take to the skies.
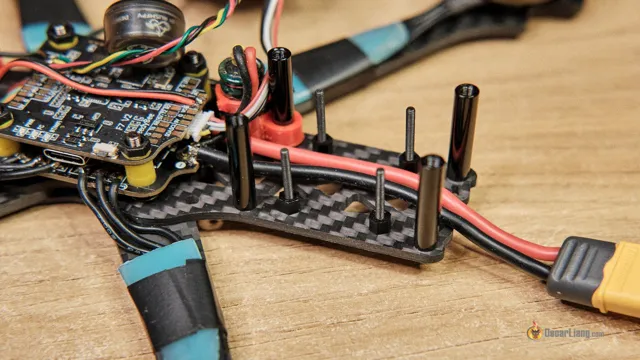
Securing Batteries & ESC
When building a drone frame, it’s important to consider the placement and securing of the batteries and ESC. These components are critical to the drone’s functionality and need to be protected from damage and interference. One method for securing them is using Velcro straps or zip ties to attach them to the frame securely.
It’s also important to ensure that the wiring is tidy and organized, as loose wires can interfere with the drone’s performance and pose a safety risk. When selecting a frame, look for one that has enough space to accommodate these components and allows for easy access for maintenance and repairs. With proper planning and installation, you can ensure that your drone’s batteries and ESC are secure, reducing the risk of damage and improving the overall performance of your aircraft.
Remember, securing these components is key to enjoying a safe and successful drone flight.
Installing the FPV System
Ready to take on the skies? Installing an FPV (First Person View) system on your drone can be a lot of fun, but can also seem a bit daunting if you’ve never done it before. The first step is to gather all of the necessary components, including the camera, transmitter, receiver, antenna, and display unit. Once you have all of the parts, the next step is to mount the camera on your drone using a vibration-dampening mount.
Then, connect your transmitter to the camera and the power source. Follow this up by connecting the receiver to the display unit, and installing the antenna on both the transmitter and receiver. Finally, turn on the drone and the display unit, and adjust the settings until you have a clear and stable picture.
Overall, assembling an FPV system can be a bit of a challenge, but it’s well worth it once you’re soaring through the sky with an immersive and exciting view.
Attaching Camera
Installing an FPV system in your drone is a great way to take your flying experience to the next level. Attaching a camera to your drone is an important step in making that happen. You’ll want to choose a high-quality camera that’s compatible with your drone and FPV system.
Mounting the camera properly is also important to ensure that it’s stable and won’t affect the drone’s flight. You can use a variety of mounting solutions, including gimbals, brackets, and adhesive mounts, depending on your drone and camera. Once the camera is securely attached, you’ll need to connect it to your FPV system.
This might involve running cables from the camera to the transmitter or receiver, depending on your setup. Once everything is connected, you can power up your drone and monitor the camera feed in real-time using your FPV goggles or monitor. With a high-quality camera and FPV system, you’ll be able to capture stunning aerial footage and get a new perspective on the world around you.
Connecting Transmitter & Receiver
Installing an FPV system and connecting the transmitter and receiver can be a bit overwhelming at first, but with proper guidance, it’s a piece of cake. To get started, you’ll first need to gather all the necessary components – a transmitter, a receiver, a camera, and a display monitor. Begin by mounting the camera onto your drone, followed by connecting the camera to the transmitter using a mini-video cable.
Next, plug the transmitter into your drone’s power source. Now it’s time to connect the receiver to your display monitor using an AV cable. Once all the connections are set up, switch on both the display monitor and the drone.
You should now be able to see a live video transmission from your drone on the display monitor. Keep in mind that the quality of your video transmission will depend on the distance between your transmitter and receiver, so be sure to keep them close. With these easy steps, you can now enjoy seamless real-time video monitoring while flying your drone.
Conclusion
Congratulations! You have successfully navigated the complex world of FPV drone assembly. By carefully selecting the right components, following the proper steps, and avoiding the occasional pitfalls, you have created a high-performance machine that is guaranteed to deliver heart-pumping, adrenaline-fueled flights. But assembling a drone is not just about putting together a bunch of parts.
It’s about tapping into your inner creativity, pushing your technical skills to the limit, and unleashing your inner pilot. It’s a journey that requires patience, perseverance, and a willingness to learn from your mistakes. So, whether you’re a seasoned pro or a new enthusiast, assembling your own FPV drone is a fulfilling and rewarding experience that will send you soaring into new heights.
So, keep those soldering irons hot, those propellers spinning, and let your imagination take flight!”
FAQs
What is an FPV drone?
FPV stands for First Person View and it refers to a drone that is equipped with a camera that transmits live video footage to a pair of goggles or a monitor, allowing the pilot to see exactly what the drone is seeing from its perspective.
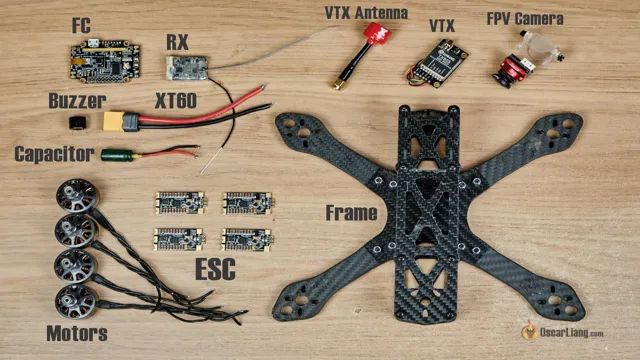
What are the components required to assemble an FPV drone?
The main components required to assemble an FPV drone include a frame, motors, electronic speed controllers (ESCs), flight controller, camera, video transmitter, receiver, antenna, battery, and remote controller.
How difficult is it to assemble an FPV drone?
Assembling an FPV drone requires some technical knowledge and skill, but it is not overly difficult, especially if you have experience building other types of RC vehicles. There are many online resources and tutorials available that can assist you in the assembly process.
Can I buy a pre-assembled FPV drone?
Yes, you can buy pre-assembled FPV drones from various manufacturers, but they are often more expensive than building one yourself. Building your own FPV drone also gives you the flexibility to customize the components according to your preferences and needs.


